Showing posts with label Projects. Show all posts

Monday, May 28, 2012

Advice for bagged "Garden Soil"


If you are tempted to buy the Miracle-Gro Garden Soil for Flowers and Vegetables please reconsider, depending on how you plan to use it! Be advised it repels water rather than absorbing it.

I just spread 4 bags (1.5 cu. ft. each) of it about 2" deep over the inverted sod on one end of my hugelculture bed, and put the sprinkler on it for an hour to soak it thoroughly so I could plant in it. I thought as a quick-start, it would be better than the cheap bagged topsoil that often has lumps of clay in it.

NOT!!  After an hour of running the sprinkler, I started to plant some winter squash seedlings (Potimarron), and the Miracle-Gro crap was wet barely 1/16" deep (if that) and the rest underneath was bone dry. It has no wetting agent and the water just ran off. Total waste of $24, and defeats the purpose of hugelkultur.

I scraped it all off as best I could, and went to Lowe's and bought Sta-Green's equivalent bagged garden soil (which was also cheaper) and applied it. After 45 minutes with the sprinkler, it was damp almost 1/8" deep, so not really any better than the Miracle-Gro "soil". The remaining 2 bags will go back to Lowe's.

I still have about 40 lineal feet of hugelkultur bed to cover with soil. My initial plan was to use the huge pile of compost/mulch/soil combo scraped off the sheet-mulched area I did last September, because there's plenty of it, rather than buy topsoil. However, my home pH test kit tested the pile at a pH of 9.0 so it's not useful in the garden until I can bring the pH down.

I tend to be wary of home garden test kits, so I also tested the pH in a couple of beds where I have a pretty good knowledge of the pH from previous professional testing, and they tested as I expected... so the pH of the "black gold" is probably close to what the test showed.

So now I have to buy a load of topsoil before I can get on with planting in my new hugelkultur bed.

Thursday, May 17, 2012

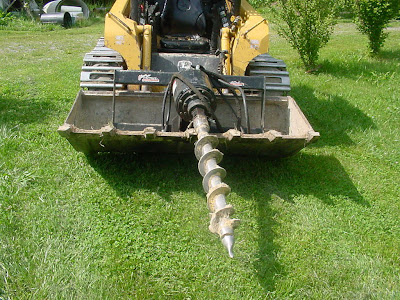
Coming Soon... Garden Re-Do!


The front bucket is just carrying the drill. It will be attached in place of the bucket to drill some post holes, and a few planting holes after the earth-moving is finished. I'm SO excited to finally be getting on with my project!!

Thursday, March 29, 2012

My Passive Solar Nautilus House


It has been a struggle for me to post the pictures of the floor plan and the model I'm constructing of my Nautilus House. Generally, anytime I (or anyone) mention something different than the accepted mainstream beliefs, we end up being ridiculed and thought totally weird. The concept for this house came to me from Spirit, in a meditation about 10 years ago.

The shape of this house is based ion a Fibonacci Spiral, or Phi:The Golden Number/Golden Mean/Golden Ratio.
.


Putting that aside, there are still many, many questions still to answer in fine-tuning in the plans for this house. The changing pitch of the roof in each section will be a real challenge to build. The "public space" of kitchen, dining and living room are planned to be one large open space, with probably a kitchen counter/bar as a visual separation. Then there are the things not definable, like the energy contained within the Fibonacci spiral shape.


There are a number of things I see built into this house. First off, it is basically Passive Solar, with the long exterior window-wall of the living room facing south. I envision radiant hot water pipes in a well-insulated concrete slab floor, now that hot water heat with long flexible lengths of piping to prevent leaks at junctions is possible, and affordable.


Some sustainable considerations include: a greywater system, composting toilet, earth cooling tubes, rocket mass heater, solar chimney, solar heated water, possible passive solar greenhouse attached, sustainable forestry adjacent to the site, and a sheet-mulched, no-dig permaculture / edible food forest garden.

I envision this as a long term project that includes other eco-buildings, food forest gardens, aquaculture ponds, coppicing and possible timber production depending on the site, a classroom for courses and workshops, orchard, cider making facility, wild food, wildlife refuge and maybe even part a future small sustainable community.

This house is only 1 bedroom, with slightly under 900 square feet of living space, but could be built to include one more turn of the "nautilus shell" so there are 2 bedrooms. Alternatively, there could be a loft bedroom above the private spaces (laundry/pantry, bath, and bedroom) without increasing the footprint. I didn't even consider a 2 bedroom mock-up since there is so much interest today in smaller houses, rather than McMansions.

I looked into several different types of exterior construction... from straw-bale, earthbag, and cob to a cast-in-place sculptural form like Flying Concrete. In the end I decided the transition to a passive solar non-conventional shape would be more readily accepted by using conventional stick-building techniques. The large vaulted, open (public) space with exposed wood beams supporting a wood tongue and groove ceiling would be striking, with a strong feel of "mountain getaway cabin".

I am hoping to interest some university (or perhaps private) schools with sustainable and/or alternative energy departments into considering this house as a hands-on teaching project.

Friday, July 15, 2011

Finally! Turning an Old Fridge into my Cheese Cave


This is about the most frustrating project I've ever tackled, partially because the refrigerator I got is very old and was nasty with mold and rust. The photo above (taken in front of my root cellar) was snapped after I removed the doors, the door gaskets, door storage panels, and wet fiberglass insulation from the doors.

Many of the newer refrigerators have a door sealing gasket that either pushes into a slot in the door, or is magnetic. Not so this old model. The gasket was held in place by preformed galvanized metal strips and a gazillion rusty sheet metal screws.

The carcass body got scrubbed, bleached, exterior sanded, and spray-painted. The main reason I went to all this aggravation and trouble is the cooling mechanism in this old refrigerator. Notice the aluminum grid at the back of the main compartment? It is much more efficient than having the coolant run through tubing in the walls like newer refrigerators do.


Here's the naked door panels after I sanded rusty spots and spot-painted Rust-Oleum on the insides. Somehow I have lost the photo of the metal strips that hold the door gaskets in place. Sorry.


I trimmed the soggy fiberglass insulation away, and added new insulation. I am very disappointed that I could not get the rust stains off the flexible door gaskets, even after soaking in a strong bleach solution. An old toothbrush and a powdered bleach cleanser scrubbed all the mold out of the folds in the gaskets but wouldn't touch the rust stains. However, at least I know it is clean and sterilized!

My original plan was to reinstall the original inside door panels but I had so much difficulty getting the cleaned gaskets back in place that for now I opted to just add a vapor barrier over the insulation. My sister works for a company that makes reefers (refrigerated food trailers) and I got a 30' x 8' roll of FRP (fiberglass reinforced plastic) that's approved for food use. When I have time, I'll cut flat panels to fit inside both doors under the gaskets.

 
Much of the work took place either on the covered front porch (all of the work on the doors), or after putting the refrigerator body in the root cellar to protect it from rain. I think I spent more $$ on all the various screw replacements and spray paints than I did for the refrigerator!

I had to remove the door to the root cellar to work on getting the refrigerator put back together because the old door opens the wrong way. So now I'm looking for a used exterior wood door with the opposite hand, and will put up with the inconvenience in the interim. I'd love a new insulated metal door but the height of the opening in the concrete block is too short, and only a wood door can be cut down easily.


Here's the shelf I built next to the refrigerator to hold the mini wine chiller I'm using to age blue cheese types, plus other storage items.


And here's the "Blues Mini-Cave" above with a Stilton aging in it.


And here's some of my cheese, now in the cave. The jar on the top shelf is Feta cheese, and the wood shelves are kiln-dried cherry. Sorry the photo is poor quality; I was standing in the root cellar doorway and that's as far away as I can get.


This is the digital control I got to keep the big refrigerator at "cave aging" temperatures. Now I need to work on a humidifier! For now the cheese aging in there is all vacuum-sealed so humidity control is not a problem, but when I start to do natural rind cheese wheels it will become very important.


I finally ripped more cherry to extend the shelves most of the way to the door. I had to drill a hole in the door to insert the temp. probe, as it was leaking air if placed over the top of the door and deforming the gasket.


All that remains now is a replacement door, cleaning up the mess inside the root cellar, and the hope the refrigerator works a few months or more. (If it doesn't, I now know exactly how a refrigerator is constructed and could probably build one!)


Update 7/15: It's all working just fine and I don't even need a new door to the root cellar. A neighbor helped me get the refrigerator up against the wall by using a crowbar to get the back feet up over a lump in the concrete around the incoming water pipes.