Showing posts with label Dehydrating. Show all posts

Monday, November 7, 2011

Save the Leeks


Leeks ready to Blanch
I found myself with some store-bought leeks and then no time to make something tasty with them before they spoil. (They are too expensive to allow to spoil!) My freezer is full, as are the canning shelves... so I decided to dehydrate them. Invariably I will want to use leeks in a dish and not find any available in our local grocery stores. Dehydrating solves the problem of limited storage space, and lets me Save the Leeks.

Eazy-Peazy. Many who dehydrate leeks prefer to slice the leeks in half lengthwise, but I prefer whole rings. Cut off the root end, peel off the outer layer, and slice into 1/4 inch slices. When you get to green, tough outer leaves, remove another layer, and slice up to the next tough leaves.  When you have salvaged all you can, put the slices in cold running water and clean thoroughly.

Leeks are grown planted in a trench and "hilled" as they grow, blanching the stems white. In the growing process, lots of sand/dirt gets trapped in the leeks so they must be rinsed thoroughly (unless you like to eat grit).

First batch chilling

After they are well-rinsed, drop them into a pot of boiling water for 3 minutes to blanch. You may need to do them in several batches to keep the water temp from dropping with the addition of the leeks, depending on quantity of leeks you have. Remove them from boiling water with a slotted spoon and drop immediately in an ice water bath to stop the cooking.

First batch draining

After chilling for 3-4 minutes, I drained mine briefly on paper toweling before distributing on the dehydrator trays. Dehydrate at about 100ºF. How long depends on how thick you sliced them, but easily done in an afternoon.

After Dehydrating

You can rehydrate them for use later in hot water for 15 minutes; mine usually go into a dish with lots of liquid so I add them dry.


I dry mine to the crispy stage, and just store them in a glass jar with a tight-fitting lid. I check them after 24 hours... if they aren't fully dry, some moisture will appear inside the jar. If so, they go back in the dehydrator for 2 or so more hours.


Thursday, November 3, 2011

What to do with Insipid Tomatoes

I read somewhere that the taste of bland or insipid-tasting tomatoes may be improved by dehydrating them. I'm thinking that the quick forced-heated air dehydration probably concentrates the sugars, making them taste sweeter. Since I had already made and canned all the tomato variations I wanted for winter...AND I still had a few non-prime, late tomatoes that generally tend to be less flavorful, I decided to give the suggestion a whirl.

First I dehydrated several trays of just thick-sliced tomatoes with no preparation other than washing and inspecting for bad/soft spots. They were cut about 3/8 of an inch thick, and dried into thin, almost membrane thickness.

Next I took several pounds of tomatoes that I dipped in boiling water to skin, then cut into wedges before dehydrating. Those also dried into thin but crumpled wedges.

The final batch was dipped, skinned, cored and rinsed of all seeds. They dried to thin membranes too.

I didn't take any photos because I was busy with some home renovation projects, but the several pounds of tomatoes processed by each treatment all dried to an almost equal amount, filling a quart jar. The REAL test will be in cooking with them this winter!

Wednesday, August 3, 2011

Just for Giggles

Photo after 24 hours of drying time. The drying greatly reduced the space between slices.

I've been doing a lot of dehydrating this summer, and cursing the energy I'm using when sunshine is free. On my post about dehydrating zucchini, I mentioned someone's method of drying zucchini on wooden dowels in a hot garage. Well, I don't have a hot garage... but my pick-up gets plenty hot when I keep the windows closed anticipating our almost daily afternoon thunderstorms.

So, you know I just had to try it! I put the threaded zukes in the truck about 2 PM, and by the next late afternoon they were perfectly dried! I only had one dowel rod long enough to span the space between the dashboard and the seat-back or I would have done more. The back window of a sedan would work great, too.

Now I need to rig some kind of support arrangement that will allow me to use the screened trays from my Excalibur in the truck, because I will be drying tomatoes soon.

Sunday, May 22, 2011

Dehydrating Spinach, Strawberries


I will have an abundance of spinach growing in the garden soon, probably more than I can ever eat while it is fresh. In the meantime, I bought a pound of fresh spinach at the Farmer's Market for a recipe I didn't get around to making before the spinach would have gone bad.

Since I'd rather not depend on my freezer any more than I need to, I decided to dehydrate the spinach and store it in a jar on the pantry shelf. Spinach dries quickly and easily, although mine was still very wet from washing the grit out. It took 2-3 hours at 120ºF. (Gotta get a solar dryer built this year!) It really did not loose the bright green color, that's just a poor photo and bad lighting.


Dried spinach can be used in soups and stews all winter. Add it to tomato sauce, or scrambled eggs. You could pulverize it and add for nutritional value to almost any liquid, especially something like V-8 juice.


I put a piece in some water to rehydrate, just to see what it night be like texture-wise to use as leaf spinach in recipes later. I think it would be just fine; it was supple and not fragile at all. For sure I'll use it in a spinach lasagna!


I ended up with a quart jar packed pretty tight with dehydrated spinach. I might make more if I have an abundance of spinach in the garden. 


I have also been dehydrating strawberries, since the local berries are in season now... and cheap. Believe it or not, that pint jar above holds what was a pound and a half of fresh berries! I cut them to just a tad over a ¼" thick; the dried berries are well under ⅛" thick. Man, did they smell delightful as they were in the dehydrator!

Saturday, December 18, 2010

Spiced Dried Pear Chips

I came across a recipe for pear chips dusted with cocoa powder mixed with sugar and some spices, and decided to make a trial batch of the chips without the 2 tablespoons of cocoa since I'm not a big cocoa fan. Kids would probably love these pear chips WITH the cocoa!

The recipe called for baking in a 275ºF oven, but our oven is non-functioning at the moment. (My sister ran the self-clean cycle and now the door won't open. She'll have to get a repair man out since I've tried every trick I could find online.)


I sliced just one peeled and cored pear on the mandoline, and spread the slices out on a dehydrator tray as a trial run.


I mixed 3 Tbs. sugar, 1/2 tsp. ginger, 3/4 tsp. cinnamon, 1/4 tsp. cloves and 1/2 tsp. galangal* together and lightly dusted the slices. Maybe should have left out the cloves? Note added later: No, I won't change the spice mix; it's tasty and subtle just as it is!

(*Galangal is ground from the rhizome of blue ginger. The flavor is similar to ginger, but more flowery with less peppery heat and a lingering intensity.)


Of course, I didn't think to put a cookie sheet under the dehydrator tray, so now I have a sugary mess all over the counter in addition to what actually landed on the slices. What a dunce!

Since I'm making this up (with no oven) as I go along, I put the tray in the dehydrator at the highest heat setting for an hour. Then I'll turn it down to about 135ºF until they are fully dry but still somewhat pliable. They will get stored in mason jars in the pantry but probably won't last very long anyway if they are as tasty as they smell!

Spiced Pears on left, plain dehydrated pears on the right

Update: The spiced pear chips are really yummy, but a little  too sweet for my taste. (These particular pears are exceptionally sweet and juicy, more so than the ones from my other neighbor. Even the Belgian Pears I made with no sugar added are pretty sweet.) I'm dehydrating a few pears with the spice dusting sans sugar, and also dehydrating several trays of just plain pear slices. 


These are the pears I dried. Only the smaller jar had spiced pear chips; the others are just dried pear slices. Isn't the pattern of the core interesting on the single slice? (I sliced some of the pears across the pear rather than from stem to bottom.)

How to use spiced pear chips (other than as a snack): They would be great on a cheese tray. Put a few pieces on sliced havarti cheese with sprouts and/or bibb lettuce on a hearty bread sandwich. Add a few to a sweet potato casserole. Soak a few slices and drape over a pork loin roast, or a roast chicken. YUM!

Tuesday, October 12, 2010

Preserving Tomatoes in Olive Oil

'Husky Red Cherry Tomato'

Tomatoes in my garden were a bust this year... terrible stink bug infestation. The only tomato doing well is a single Husky Red Cherry Tomato plant near the front door, providing a quick munchie coming and going from the house.

No one in the house but me eats fresh tomatoes, and some days there are simply too many ripe cherry tomatoes, so I put up a few in olive oil, vinegar and herbs, refrigerated. They are delicious plucked out of the jar for a salad, and they come with their own dressing! When I go to Charlottesville to house-sit for 10 days in mid-September, I will just replenish the jar with fresh tomatoes and pack it in my cooler.
Tomatoes in Olive Oil, Herbs, and Vinegar

I used fresh herbs from the garden, so the oil will need to stay refrigerated long after the tomatoes are gone. If I had used dried herbs, I'd have no worries about botulism growing in the oil if I had blanched dried herbs in vinegar first, and then the jar of oil (once emptied of tomatoes) was stored at room temperature in the pantry...Hindsight is always 20-20, LOL.

To make some fresh marinated tomatoes, wash enough tomatoes to fill a quart mason jar. Add ¼ cup vinegar and herbs of your choice, shake well, and cover with olive oil. Be sure the tomatoes are fully submerged/covered with oil. Refrigerate. Allow to marinate a few days before using. I don't know how long they will keep... I ate all mine within 2 weeks!

Dried Tomatoes in Olive Oil
I considered lacto-fermented ripe tomatoes, but like fruits, they don't keep well (although lacto-fermented green tomatoes do, and so does lacto-fermented salsa).

To have some marinated tomatoes that keep longer than a couple of weeks, I dried some of my cherry tomatoes and covered them with olive oil so I could leave the whole jar in the pantry all winter, or as long as they last. Here's how I did mine:

Ready to dry. Sorry but the 'after' picture was out of focus
Tomatoes briefly in boiling vinegar bath

To marinate some dried tomatoes (sun-dried or dehydrator-dried) in olive oil (which is one of the many preservation types called a confit), wash tomatoes and slice. Since these were cherry tomatoes, I just cut them in half. Seeding is optional, as is skinning in a boiling water bath; I skip doing either with cherry tomatoes. Dry tomatoes by whatever method you choose, but they must be thoroughly dry to prevent botulism. As an added (and tasty) safety precaution once the tomatoes are dry, dip them briefly in a boiling vinegar bath. Use whatever kind of vinegar you like... I generally use Bragg's raw apple cider vinegar or organic red wine vinegar. (This time I used plain apple cider vinegar, so I could throw it away.)


Scoop out the tomatoes from the vinegar bath and place on paper towels; pat dry.

Put the 'bathed' tomatoes in a sterile jar, add dried herbs and/or spices, and cover with a good olive oil. Store in a cool place out of direct light. You could dress up the jar by using fresh herb sprigs, but be sure to also immerse the herbs in the boiling vinegar bath first to kill any surface bacteria.

Ready to Store in the Pantry
I know folks who prepare tomatoes in this fashion, using heated olive oil, and process/seal them in a water-bath canner for half an hour. My belief is that it may be safer in their minds, but it destroys the enzymes and nutrition in both the olive oil and the tomatoes.

Thursday, October 7, 2010

Drying Sultanas: Thompson Seedless Grapes

My mother re-married when I was just out of high school, to a man born in Holland who had come to the US as a young lad with his parents and brothers. I can remember my step-father making a fruit/liquor concoction about this time of the year: sultanas, rock crystal candy, and brandy. By Thanksgiving it was yummy, and superb by Christmas. I loved it as a sauce on baked ham! (I wasn't allowed to drink any because I was under 21. Sigh.)

Recently, I finally discovered how to spell the name of it, Boerenjongens, which means Farmer's Son (or lad) in Dutch, and I decided to make a half-batch of it for this holiday season. First I need Sultanas, and here's the process I used to dry them. (I'll post the cordial later.)

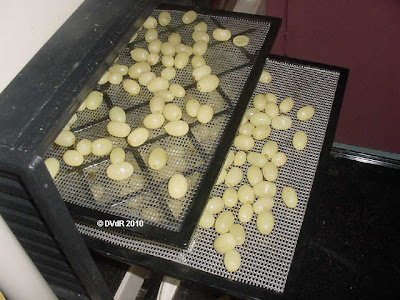
Sultanas are (usually) dried Thompson Seedless grapes, and I have some in the dehydrator as I'm writing. To dry these grapes, de-stem and wash the grapes, and discard any with bad spots. Heat a pot of water to boiling, then immerse the grapes in small batches for 30-60 seconds so the skin split. This reduces drying time. Drain, and cool in cold tap water.


Mix a tablespoon of citric acid in 4 cups of cool water and soak the grapes for 10 minutes. This step is optional for this particular use but if I was drying them to store, I'd always soak them to keep the color a bit better. Drain, pat dry and place in a single layer on dehydrator sheets.


Turn the dehydrator temperature to medium (about 140ºF) and let them dry. It may take from 24-48 hours depending on grape size. There were a few grapes where the skins didn't split when I dipped them in boiling water, so I ran the tip of a paring knife through the middle from one side to the other, being careful not to cut the grapes into 2 pieces.

Here's how they came out:


I think they are MUCH nicer than the ones I have purchased in a box!
 

Thursday, February 4, 2010

Salmonella in Peppercorns?

Green peppercorns, photo used with permission from macinate's photostream

I get all the updates on food recalls by the USDA, sometimes several a day. I seldom post them anymore because all that does is dwell on the negative.


However, I just recently noticed something I had not previously considered. A couple of huge batches of salami, Italian sausage, pepperoni, etc. were recalled for salmonella contamination, and it seems the culprit may be the peppercorns used in the spicing. I thought that would be almost impossible... aren't peppercorns machine-dried which entails heating?


Photo used with permission from exfordy's photostream

So I did some research. What turns the pepppercorns black is fermenting, the first step after harvesting. Traditionally the spikes are threshed and the ripe berries left overnight at room temperature to begin a simple fermentation. Depending on the drying process, the fermenting continues through the drying process.


Alternatively, the berries can be steam blanched to deactivate the enzymatic reactions in the pepper to speed the fermentation.


Traditional drying (rather than mechanical) is still done in many countries around the world. Usually the berries are placed on mats in the sun for about 4-5 days, until the moisture content is reduced to about 10%. You can also use a solar dryer, or even a tray-style dryer. The draw-back to air drying is the increased risk of contamination, so sorting must be done carefully.


In machine processes, sterilization is done just before packaging. Some processing plants use a steam process where the peppercorns flow through a steam container. This is not true sterilization. True sterilization requires a certain amount of time at prescribed temperatures and pressure to kill the microbes.

However, salmonella does not ever originate from the peppercorns themselves. Salmonella bacterium live in the intestines of birds, reptiles and mammals (including humans), and can contaminate our foods by transmission from animal and human feces due to unsanitary conditions, or even by bird droppings on air-drying peppercorns. Someone who has had salmonella exposure can unknowingly be a carrier for up to a year.

So when you purchase peppercorns, do so from a trustworthy processor. Bulk peppercorns may come from a reputable vendor like Frontier Herbs (mine do, via my natural food stores), or they may come from
purveyors of imported and unknown origin goods at the wharves.

There's lots more to know about various peppercorns and flavoring techniques, but that's for another day.

Sunday, October 18, 2009

Roasted Chestnuts


Well, I roasted a bunch of the chestnut hoard Buster gave me, and most of the first batch got moldy before I could get them peeled and processed. I suppose I didn't roast them long enough to fully dry out the nutmeats.

Here's another batch. Those suckers are hard to peel even with the "X's" put in the shell before roasting. I think they will go in the freezer for a project on another day later in winter.


Meanwhile, thanks for all who posted about my friend Buster's son. Today is Day 16 or 17 in a coma and on life support. They almost lost him at least twice, perhaps 3 times this past week, and had to do CPR once. Finally he seems to be stabilizing, and he is now on dialysis. They hope (if there's some small improvements in his stability) to put in a Trache tube next week and get the ventilator tubing out of his mouth. I don't know about the feeding tube.

Wednesday, September 30, 2009

Fresh Chestnuts!


My neighbor gave me some chestnuts, quite a lot of them as you can see from the photo! I don't know what they sell for or the open market but when I lived in Asheville, a street vendor sold fresh hot roasted chestnuts every fall, 6 for $1.50.

Chestnuts are very good nutritionally, being lower in fats and calories than most nuts. (Most nuts have nearly 50% fat; chestnuts only about 1%.) They don't keep the way most nuts do, so they need to have some processing or they will mold and spoil in just a few days.

Chestnuts are best known as roasted, because that brings out the sweetness. However, back in the days before the chestnut blight, they were used in a variety of dishes from a vegetable side-dish, or boiled and mashed, to puddings, stuffing ingredient, and even roasted and ground for flour. You can roast, peel and freeze them but since I'm out of freezer space, I'm looking at alternatives.

I have several ideas in mind for their use. Certainly, I shall roast and grind some (as soon as I can afford a grain grinder). I plan to puree some for use in combination with some kind of fruit for a leather roll-up, and I want to make a batch of chestnut biscotti.

I'll post pics and recipes when I make something with them.

Sunday, September 13, 2009

More "Putting Food By"...


As the garden languishes in the last throes of warm weather, I have been drying more of my produce since it takes up much less space (and energy) to store.

I had lots of pole beans, and the ones that didn't get picked while still tender were allowed to stay on the vines. However, with the wet and cooler weather, I was afraid they would mold rather than dry so I picked a bunch. Put them on low in the dehydrator for a couple of hours until they were dry enough to shell easily. What you see in the photo is only a portion, now drying since I shelled them.


These beans are Kentucky Wonder, and probably not the best bean to dry as a staple. However, they can be ground into a flour to add nutrition to a number of dishes like stews and meat loaf. They make a great thickener!


Besides that, any whole dry beans that aren't eaten over winter will still be viable for planting next spring.


Then I dried some corn. Blanched it about 2 minutes, cut it off the cob and spread on the dryer shelves. I wanted to make some old-timey parched corn, which is kinda like corn nuts only not as greasy or salty. Turns out you need to dry the corn ON the cob so you have whole kernels to parch. It makes a great snack, and my neighbor has a few ears drying now on his stalks for me.

Thursday, August 27, 2009

Dehydrating Vegetables


Since I am so cramped for food storage space, I decided to dehydrate some veggies instead of canning them. So far I am drying pole beans and tomatoes, and I have already made peach leather in the dehydrator. Oh, and I'm drying some herbs!

The beans are really easy. I string and snap them, then blanch for about 2 minutes.
Cool in an ice water bath, drain, and place in a single layer on my dehydrator trays. A gallon of beans (before breaking) will fit into 2-3 pint jars when dry. The beans took about 5 hours to dry at 130ºF.


What I really like best is the small space the dried vegetables need for storage. The amount of tomatoes that would have taken 10+ pint jars for canning all fit into 2 pint jars!

I drop the tomatoes in boiling water for about 30 seconds, then an ice water bath, to make it easy to slip the skins. I cut the tomatoes crosswise in slices about 3/4" thick, and remove as much of the seed stuff as I can. Dry at about 130ºF for several hours, depending on how thick the tomato pulp is... I turn mine over after about 5 hours, and remove any that are dry enough to still be pliable but not sticky, and then watch the rest closely.

Friday, July 24, 2009

Picking Blueberies

Photo: CreativeCommons license by Tacomamama

I have more-and-less fond memories of blueberry picking, some 25 years ago. The more-fond part is the memory of gigantic, delicious berries; the less-fond part is that I ate so many while picking that my stomach rebelled at fresh blueberries for many years!


Finally undaunted and hungry for fresh blueberries, I ventured out to a U-Pick blueberry farm yesterday. It was a less than satisfactory experience, although the drive was wonderful and the weather perfect. The berries were mostly all small, about the size of English peas or maybe wild blueberries, although they were not wild.
(The photo above shows the aprox. size.) The owners didn't know the varieties since the bushes were already there and mature when they bought the property.

In two hours of picking on the steep hillside, I barely managed to fill 3/4 of my gallon pail, only spilling the contents twice. Fortunately, returning to the field after a bathroom break, I spied several bushes with just a few large berries on each one. Since this was the first day of picking, those bushes had not yet been picked. Rather, I think they were simply old, and perhaps unfertilized and un-pruned for some time. However, their berries were the size of fat nickels and I soon topped off my gallon pail.


Arriving home, I sorted out the fat berries to eat fresh, and put the rest in my Excalibur Food Dryer. I dried them perhaps only halfway, and froze them in that state. Had I dried them completely, I think they would have been the size of peppercorns! My 3/4 gallon of semi-dried smaller blueberries almost filled a quart freezer bag; nonetheless, they will be handy and tasty for blueberry muffins or pancakes this winter.


Will I do it again? Yes, and No. I certainly won't go again to a blueberry field without first asking the age and care of the bushes, and the size of the berries.


There is another U-Pick nearby that has late-season blueberries ripening about mid-August. A phone call will tell me something of their size, and that will determine if I'll pick blueberries again other than from my own garden.


I have 4 blueberry bushes in my fruit garden so far (all new this year), and although they didn't bear much fruit, all the berries were large compared to most of what I just picked. It can only get better next year!