Showing posts with label Charcuterie. Show all posts

Monday, January 16, 2012

My Sausges, and more


Recently I spent the better part of a several hours daily making several kinds of sausage patties to freeze. It's nice to know exactly what is (and what isn't) in my sausage: free range meat, no hormones, no GMO's (even in their feed), and only organic herbs and spices. I posted pics earlier of the chicken-feta-spinach sausages, but here's a photo above (Yes, I know I am not a good photographer!) of the whole kaboodle. There are around 80-90 patties in the mix shown above, and that should keep me in sausage for several months. Plus I have enough venison to make another 60-75 patties. I'm short of home cured bacon, but hope to remedy that in February or March.

Next (after I eat up lots of frozen left-overs) is learning to make some terrines and pâtés out of all the odd bits in my freezer. I have several beef and pork hearts, plus beef, pork and chicken livers, some sweetbreads and a few trotters. Hey, how hard can it be to make a "meat" loaf??

Making rillettes is also on my list. I can't imagine that will be too hard... after all pulled pork is simply a slightly altered offspring of rillettes.

Tuesday, March 22, 2011

Bresaola, traditional cured beef


I was SO pleased with my first small trial bresaola using a piece of venison that I decided to risk a 3 pound beef eye round roast. I'm afraid if I don't start it now, the root cellar could get too warm for a proper cure since we're headed into spring and warmer days.

I won't have much to report for several weeks, but I thought I'd show you the start. Starting now it cures (bagged) in the refrigerator for a week or more, then gets wrapped and hung in the root cellar. I used the cure from Ruhlman's Charcuterie and added some black pepper, fresh rosemary and thyme for flavoring. I just made a small cheese wheel with thyme and it smells great, so I thought I'd try thyme in a bresaola. (The cheese won't be ready to taste for a month. Ugh.)

I really want to start a dry cured salami before it gets too warm too, but it will have to wait until next month when I can afford the bacterial starter and the casing.

Wednesday, March 9, 2011

6 Degrees of "Fermentation"

6 Degrees of Separation is a term is often used as a synonym for the idea of the "small world" phenomenon. It refers to the idea that everyone is on average approximately six steps away from any other person on Earth, so that a chain of, "a friend of a friend" statements can be made, on average, to connect any two people in six steps or fewer.

In my case, it's the small world of fermenting... and all ferments are connected within 6 steps or fewer, so to speak.

I hadn't given much thought to the connectedness of the food things I do (other than eat them) until I started learn to make charcuterie and cheese. Then it finally sunk in...  fermenting is the connection! I started to ferment breads (sourdough) 2-3 years ago, and over the last 2 summers I spent a lot of time learning and making lacto-fermented vegetables. Last fall, I started to re-learn fermenting wines and cider. Over the winter I have been learning to ferment sausages and salume with the hopes of eventually fermenting (curing) a ham.

Now, I'm also learning to ferment cheese. It seems to me that each new thing is a little easier because it builds on the related experience which is also connectedness, gained from the things I learned previously. The more I learn in each of these connected areas, the more I am beginning to understand some of the nuances of fermenting, with hopes of eventually mastering a few of them. Lactobacillus, common to ferments, is a very interesting bacteria and enriches my world by the fermentation of foods from chocolate and sauerkraut to merlot and Brie.

To make things interesting, Lactobacillus is like any other living thing (including us!)... it depends on what it eats, and what it eats affects what it does. Maybe that cow ate a few more blades of grass with higher Omega-3, so that one gallon of milk had a miniscule amount more butterfat and lactose than the other gallon I used. No two cheese wheels will turn out the same, nor will any 2 loaves of sourdough, or batches of beer... The bacteria and yeast in the air we breathe, on our walls and on our skin, are all working in addition to (or sometimes against) the bacteria and yeast we add from little packets into whatever we are making. 

Perhaps a slight puff of air from an open window flows over my pot just as I am adding the culture, bringing a tad more of my resident lactobacillus along with it... or maybe there were a few more grains of salt in one measured teaspoonful compared to another...or today the humidity is 2% higher than yesterday. SO many variables that all affect every outcome.

I actually find it very refreshing (although a little frustrating) to know that everything I make will NOT turn out exactly the same every time, even after I learn the basics and move into some proficiency. There will always be an element of surprise and discovery waiting in the wings, keeping Life interesting!

Thursday, March 3, 2011

Venison Bresaola

Photo is in the public domain

"Bresaola is air-dried salted beef that has been aged 2-3 months until it becomes a dark red, almost purple color. It is usually made from very lean beef top round. 

Served as an antipasto, bresaola is usually sliced paper thin and served at room temperature or slightly chilled. It is most commonly eaten on its own, but may be drizzled with olive oil and lemon juice or balsamic vinegar, and served with rocket (rucola, arugula) salad, cracked black pepper, and freshly shaved Parmesan cheese. The similarity to carpaccio, which is made from raw beef, results in that name being used (incorrectly) for bresaola dishes as well." ~ Wiki


I started my first bresaola with 2 pieces of venison on January 13th, 2011. The total weight of the 2 pieces was 1000 grams (a little over 2 pounds). All the instructions I have read suggest that it is a waste of time to try and cure a bresaola weighing less than 3 pounds (in one piece) and that it cures best if it is a rounded tube in shape.

As you can see, I ignored the suggestions because it's what I had available!

Here's my recipe:
Salt: 20g Coarse sea salt
Sugar: 20g Demerara sugar
Cure #2: 2.7g
Coarse Cracked Black pepper: ½ tsp
Dried rosemary: ½ tsp
Dried Thyme: ½ tsp
Crushed juniper berries: ½ heaping tsp.
Nutmeg: about 3 grinds
Ascorbic acid: pinch
Zest of 1 lemon
Zest of half an orange
Note: I intended to use dark Muscovada sugar, but I picked up the wrong package off my pantry shelf. It won't matter except it won't have a slight molasses overtone.

The cure was mixed together and half was thoroughly rubbed all over both pieces of venison, and refrigerated in a lidded plastic container. The venison was turned and massaged daily for 6-7 days, then rinsed and the other half the cure applied.


After another 7 days of turning and massaging daily, the meat felt rather dense and somewhat resistant to finger pressure, compared to the initial feel. I rinsed both pieces thoroughly in cold water, and put on a baking rack to air dry for about 3 hours. (Jan. 27th)


Next, I weighed them; they were down to 946g from the initial 1000g, showing a loss of some moisture during the refrigerated cure. Once they felt dry to the touch, I wrapped then in a double layer of cheesecloth. It was suggested to lightly coat with olive oil to keep them from the outside drying out too much and forming a hard "skin". I compromised by oiling just one so I can learn any difference it might make, if any.


On Jan. 27th I hung them in my root cellar, where the temps stay between 34-40ºF and the humidity stays around 70-75%. After one week, the one I didn't oil had lost 11% of its weight. They need to lose about 30% to be considered "finished". (I neglected to weigh the other one after I oiled it before hanging, so I have no idea what moisture loss it has experienced.)

Update, Valentine's Day: The uncoated bresaola has lost 27% of its weight by today. I am sorely tempted to unwrap it and slice a bit... BUT I'm equally determined to do this "by the book" if possible. Both still smell great. As best I can estimate, the olive oil coated one has lost only about 12% of it's weight. So it is definitely aging more slowly. Whether that is good or bad remains to be seen! 

I'll be back with a new post and photos of the finished product (good, bad or otherwise) in a few more days, when the loss reaches 30%!


Update: The bresaola reached the target weight while this post was in the queue, so here it is. The surface developed a lovely, very fine white mold, like the dry-cured Italian salumi get... and it smells like a really great (and expensive) cheese! (It's very difficult to slice it thin enough; I may have to take it to a deli counter.) It is really tasty, worth ALL the effort... YUM!

(I also brought in the olive-oil coated one, and unwrapped it. The very top portion where the oil had drained away was pretty hard. I cut off that portion, re-wrapped it sans oil, and hung it back in the cellar for a few days. I don't think it will develop as nicely as the uncoated one, though.)


ps, Jason Molinari posted some nice photos of his Breasaola di Cervo (Deer Bresaola) here.

Monday, February 28, 2011

Two Cured Steelhead or Salmon Recipes


These recipes are for cured salmon, and actually I don't have salmon, but a close relative, the steelhead trout. The recipes will work equally well for it. Both are easy to "cure" in the refrigerator in 2-3 days, offering up some lovely alternative taste treats during the dreary winter. Think gravlax, or Nova Scotia; bagels, lox and cream cheese; antipasto/canapes for a party, or just thin-sliced salmon with cream cheese on a good pumpernickel bread sandwich.

The first recipe is fennel-cured, and the second one is a citrus cure. My fish weighed just about two pounds so I divided it into 2 pieces of 1 pound each, because I want to try both cures.

Warning: If the fish happens to be wild caught, there is a possibility it could carry a parasite. I have read that freezing for 3 weeks in a home freezer will kill the parasite, but some chefs and seafood purveyors say only a commercial freezer that chills to -40ºF is cold enough to kill the parasites. If you are wary, use a farmed salmon or steelhead trout, which do not carry the parasite.


First, the fennel cure, adapted from Charcuterie: The Craft of Salting, Smoking, and Curing

1 pound salmon (or steelhead trout)
46 grams sugar
70 grams light brown sugar
65 grams kosher salt
1/8 cup Pernod (I could only find Ouzo at our state liquor store)
1 fennel bulb with ferns
25 grams toasted fennel seeds
1 tablespoon ground white pepper


Before toasting


This is twice the fennel seeds for the recipe, done before I decided to do half in a citrus cure

After toasting


Toast the fennel seeds in a hot skillet until fragrant and slightly browned.


Mix the sugars, salt and pepper together well. Put 1/3 down in the bottom of a dish.


Put the fillet skin side up on the mix and lightly pour half the Pernod over it. (not shown)


Turn the fillet flesh side up and pour the remaining Pernod over it. Add the remaining cure.


Slice the fennel bulb and the ferns, and place on top of the cure.


Sprinkle the fennel seeds on top of the fennel.


Cover with plastic wrap, and find a weight of several pounds that will fit inside the dish with the fish. Here I've used a loaf pan and a 6 pound brick wrapped in a clean plastic food bag.


Refrigerate. I turned them about twice a day to evenly distribute the cure. After 2 days (maybe 3 if the fish is thick), the fish should feel firm and you can rinse the cure off the fish in cold running water. Pat it dry, and you can slice it thinly to eat now, or freeze it for later. 


Here's the citrus cure for 1 pound of salmon or trout:
1 pound salmon or steelhead trout
1/2 cup sugar (use brown sugar for a deeper flavored taste)
3.5 oz. kosher salt
zest of one orange
zest of one lemon


Pretty simple! Mix all the ingredients together, add them to a baggie along with the fish (or wrap them in 2-3 layers of plastic wrap and put in a bowl to catch the juices), and refrigerate under some weight. Turn them about twice a day to evenly distribute the cure. After 2 days (maybe 3 if the fish is thick), the fish should feel firm and you can rinse the cure off the fish in cold running water. Pat it dry, and now you can slice it thinly to eat, or freeze it for later.


Here's the piece cured with fennel, after the cure was rinsed off. I put all the pieces in the freezer for a day or two, partly because I'm busy with other projects.


I sliced a bit this morning, and the taste isn't as strong after soaking 2-3 hours, and freezing for a couple of days. There is, however, a faint "fishy" smell, which means it wasn't really fresh when I bought it. One of the problems with not having a fishmonger in my small town is that I cannot ask to smell a fish before purchasing it. Supermarkets do not take kindly to me poking a finger through the plastic-wrap to get a whiff!

I'm prepping the cold smoker now, to give it all a light smoke. I think I will make a smoked fish spread/dip with some of it, and some smoked trout rillettes.


Here's the fish after cold-smiking in maple and apple wood for 8 hours.

Friday, February 18, 2011

Curing Ham Hocks

Another on my "to-make" list that I can't seem to buy anymore with decent quality! I got the fresh hocks at Whole Foods in Winston-Salem on a recent trip through there. That particular WF carries pastured pork and grass-fed beef. The fresh hocks weighed 1¾ pounds and cost me $1.85.


Here's the hocks that I vacuum-packed for the freezer. They are thawed in this photo because I was preparing to put them in a brine cure.


Brine, based on weight of the hocks:
Meat                795 g
Salt                   35 g
Sugar                25 g
Water              330 g
Cure #1          2.5-3 g


Here they are in the brine, day one. They were kept refrigerated, and I turned them over in the brine every day for 10 days.


Here they are, finally in the cold smoker, with a piece of tongue that has a pastrami coating. I'm using sugar maple sawdust in my CSG (cold smoke generator).

Next Day:
They were smoked about 8 hours in sugar maple smoke, refrigerated overnight, and smoked another 8 hours today in apple smoke.


This is what the "cold smoke generator" aka ProQ CSG looks like while generating cold smoke. It has been burning (smoking) about 2 hours in the photo above, and you can see how much of the apple sawdust has burned. You can also see a bit of the light smoke; it would be thicker smoke if the cardboard box wasn't uncovered (and the meat rack removed) for the photo.


Here they are, along with some cured, herbed salt pork in their second 8 hour cold smoke. When they finish tonight, they will go in a baggie and be refrigerated for several to allow the smoke flavor to equalize. Then each one will be individually vacuum-packed and frozen until I want to use one. 


Another option is to roast them at 200ºF until they reach an internal temp of 150ºF before freezing, so they are technically already partially cooked when adding to a pot of beans or greens. I did that with these just to see what difference it makes in a cooked dish, if any, and later I will cure another batch, but unsmoked, for comparison.


YUM!!


Wednesday, February 16, 2011

Making My Own Bacon!

Can you say "YUM"??

I finally located a piece of pork belly to make my own bacon. I wanted a larger slab, but this piece at just over 2 pounds, was all I could find. I found it in an Asian grocery store about 50 miles away, and it is also local (to them) pastured pork. 

Two of my local meat suppliers generally have pork belly when they butcher, but they were sold out. Besides, they want far too much money, $9 pound vs $2.99 at the Asian market.


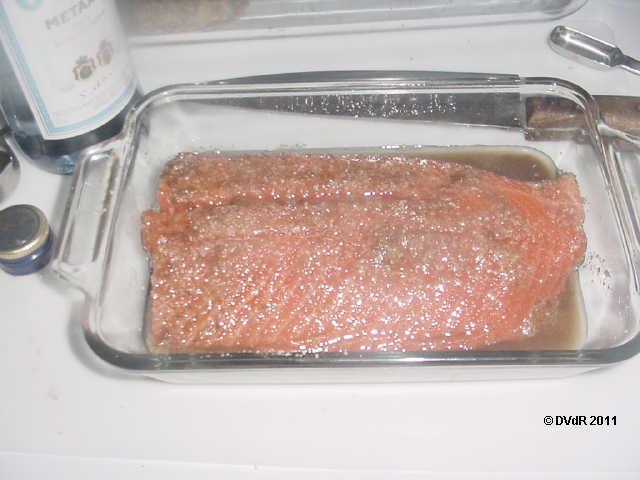
I mixed up a standard cure per Ruhlman's book, Charcuterie, which is based on the weight of the meat. (The cure is a mix of Kosher salt, raw sugar and Cure #1.)


I coated the belly thoroughly with the cure and sealed it in a vacuum bag (but not under a vacuum) before refrigerating. Every day for 8 days I turned the bag, massaging the cure into the belly. It seems pretty firm now at 8 days, so I'm calling it 'cured'.


Here's the bacon after the cure. I rinsed it well, and allowed it to air dry until a shiny, slightly tacky skin (pellicle) formed on the surface. The pellicle serves several functions: it provides an ideal surface for the smoke flavor to adhere, it helps seal in the remaining moisture through the smoking process, and it prevents the fats from rising to the surface and spoiling. 

I had planned to cold smoke it today, but this current winter storm is bringing us some fierce winds which would interfere with smoking. I'll refrigerate it for another day or two. 


Update:
I fired up the cold smoke generator this morning, using some apple sawdust in it.


Fired it up, and put it under the grill with the meats. If you look closely, the dark spot near the bottom center is the sawdust beginning to smolder/smoke.


This is the first batch, my bacon and some salt pork I cured. You can see the smoke rising up around the meat already.


Closed the box with foil to contain as much smoke as possible, without containing much heat.


A temp probe inserted shows smoke temp is 91ºF.


After several hours and 2 full loads of apple sawdust in the CSG, I decided it was smoked enough. Then it went in the oven at the lowest setting, which is 180ºF on our oven, until the internal temp reached 150ºF.


After it cooled, I vacuum-packed it and put it in the refrigerator for a week or two so the smoke flavor can equalize throughout the slab. At that point I will slice it, vacuum-seal and freeze it in small meal-size portions. It looks and smells so yummy that it was all I could do not to cut off a chunk to taste!


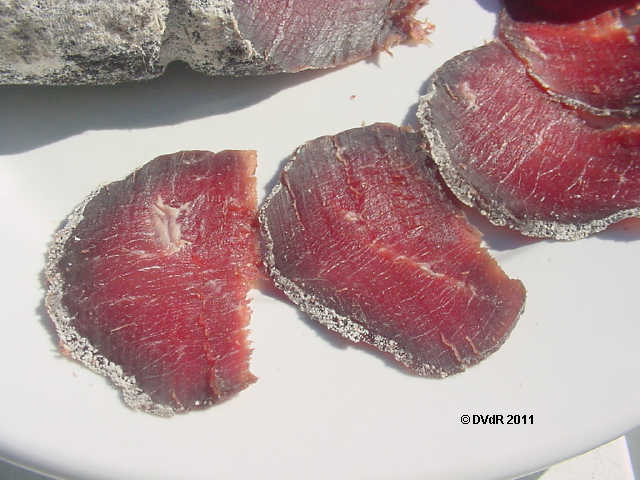
Shown above: after letting the smoke flavor equalize. Close-up of the bacon is the photo at the top of this post. Can you say "YUM" ?? 

I'll never go back to store-bought bacon again! Besides, I just found another more local pastured pork farmer who will sell me a whole pork belly (~15-20 pounds) for $2.50/pound.

Thursday, February 10, 2011

Curing Salt Pork

Pork Back Fat, covered with Cure, Day 1

I've been so disgusted at the rancid salt pork in the grocery stores in the last 2-3 years that I decided to make my own. It's actually easy!

I bought some pastured pork back fat from my meat supplier at the Farmer's market, and cut it into manageable chunks. Rather than make just a plain cured salt pork product for a pot of beans or greens, I decided to jazz it up a bit with some spices in the cure. Then when I smoke my bacon that's also curing, I'll smoke half the salt pork as well. I can imagine some recipes where the smoke flavor might be interesting, and I will smoke with apple chips since that's the flavor I want for my bacon.

If the salt pork turns out lousy, I will have lost only about $2 and some of my time! If it's good, it will be vacuum-sealed in small packages and go into the freezer. Since my investment is so small, I plan to put a couple of vacuum-packs of it out in the cool root cellar just to see how long it will keep fresh in there.

Here's my recipe, adapted from Charcuterie: The Craft of Salting, Smoking, and Curing
Total back fat weight, 1040g
Note: Salt, sugar and Cure #1 are based on the weight of the back fat!
Kosher salt, 35.8g
Dark Muscovada sugar, 17.9g
Cure #1, 3.89g
Cracked black pepper, 1 heaping tsp.
Bay leaves, 2 medium, torn
Quatre épices, 3/8 tsp.
Juniper berries, 1 tsp., crushed

I covered the back fat pieces with all the cure, being sure everything was thoroughly covered, and refrigerated it in a leak-proof container, as shown in the photo at the top. Every day I turned the pieces, making sure the cure was well distributed. 


After 7 days, it looks like this, and the basic recipe suggested 7-10 days to be fully cured. It probably has cured enough, as there is some resistance to finger-pressure, but I won't be ready to fire up the smoker until tomorrow or the next day due to high winds outside... so it goes back in the refrigerator for another day or two.


I fired up the cold smoker this morning with some apple wood, and smoked half the salt pork I had cured. Now it will get vacuum-packed and refrigerated for 2-3 weeks for the flavor to equalize throughout the pieces. Looks Yummy to me!


I relented, and "oven-roasted" part my salt pork until it reached an internal temp of 150ºF. Then it was vacuum-packed and frozen. I did this just as my homemade bacon was done, to assure it is not fully raw when freezing... esp. because I will be giving some of it away. It is STILL not fully cooked and needs to be cooked before eaten.