Showing posts with label Food Preservation. Show all posts

Friday, March 1, 2013

Duck Feet


In the past, I have used chicken feet in stock because they give off a lot of gelatinous material that is high in glucosamine and chondriton. Great stuff for our joints and bones, and they give a bit of body to stock.

Recently in a nearby Asian market,  I found frozen duck feet that had been skinned and had the nails cut off so I picked up some for just gelatinous stock to add to soups, stews or whatever. They add the same benefits as chicken feet, but I didn't have to skin and declaw them myself.

I cooked these in a crock pot about 6-7 hours, and then pressure-canned them in 4 oz. jars. Just one jar (or even half a jar) makes a great addition to any soup or stew, and doesn't add any flavor.

Saturday, August 18, 2012

Stocking the Pantry

I've kept a somewhat decently stocked pantry for many years, at first because I grew up in hurricane country, and now because I live miles from any grocery stores. Actually, I live more than 2 hours from stores that carry anything more than minimal fare. So I have come to rely on my 2 freezers for any abundance from my garden, and for grass-fed meats in quantity when available and less expensive.

However, relying on freezers is always iffy. A friend just 200 miles away lost the contents of a huge chest freezer during an 8 day power outage due to a fierce summer storm. I've been fortunate that the only extended power outage I've had here happened in a freezing winter, and I lost nothing from the freezers. But I can't count on always being that lucky. If an extended power outage happened in warm weather, I'm not sure I could make a wood fire (and keep it going for days) to cook everything in my freezers before the contents spoiled. Sure couldn't use the electric stove to cook during a power outage!

To remedy reliance on my freezers, I'm going through them and beginning to can some of the meats I have stored in them. My mother always canned beef, pork and chicken, although they froze the trout they raised because it tasted more like fresh-caught when thawed and broiled later on.

Here's a little bit of the pork shoulder I canned. The liquid is from the pork itself. The venison I canned 2 days ago was already on the pantry shelves before I thought to take any photos.

Lard and Tallow, hot and just out of the canner
Lard and Tallow, after cooling. Jar on the far right is chicken schmaltz, don't know why it didn't solidify.
I'm also rendering and canning all the pork and beef fat, salt pork, bacon, and sausage patties. Rendered pork lard and beef tallow don't really need to be canned if you store it in a cool, dark place, but the heat of this summer has shown me I need to do something else. It keeps better anyway if canned, to keep out the oxygen that causes it to turn rancid.

Canned salt pork chunks. The 2 jars on the left are trotters.
More canned salt pork. The small jars have cured and smoked salt pork with some herbs added. They will be great in a mess of greens or beans.

I already have a small pantry of home canned fruits and veggies, chicken stock, jellies and such, but not much in the way of protein, so the canned meats will be a bonus insurance policy. I know beans are a decent source of protein, but my body doesn't digest then very well, so I look to meat and eggs for protein. I've canned a few soups and stews with bits of chicken or beef, but not a lot. As a treat, I always can any bits of meat left on the bones as pet food when I make stock.

I'll have a separate post on canning bacon. YUM!


Friday, August 5, 2011

Freezing Zest

It happens every winter... I want/need some zest to add zing to a dish (usually it's lemon zest) and I have no lemons on hand. It's not worth the gas to drive to town for just lemons especially if the weather is bad, so I do without. Bleck.


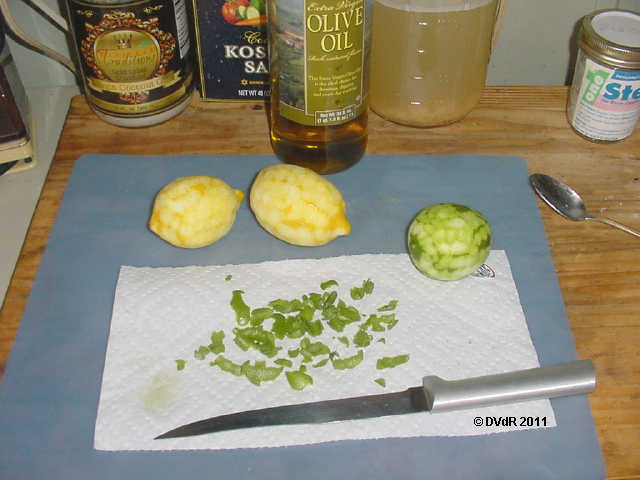
This year, with my success at freezing herbs, I am also freezing thin peels of lemon, lime and orange for zest. The orange zest will likely be used in desserts, not sure what I'll do with the lime zest... hot tea maybe. I thought about using my microplane to zest the fruit, but it's such fine zest that I'm not sure how it would hold up to freezing. With small peel sections, I can cut them into thin strips if I need to; besides, a lot sticks inside the microplane and I can never get it all out even with a pastry brush.


I sharpened and tried several of my knives; what worked best was a knife with a thin flexible blade that I use for filleting, shown above. I also found it easier to peel away from me except on the bumpy ends of the fruit. The knife doesn't really conform to the fruit, but the flexibility let me make slices thin enough to avoid cutting into the bitter pith.

After the zest was frozen, I vacuum-sealed it. Once I open one to use a bit of it, I will just bag the rest and put the bag in a small container with a lid back into the freezer.

It was easy to do, and worked so well (I tried some of the frozen orange zest in tea last month) that I may even buy one of those bags of hard, juiceless lemons just to freeze some more zest!

ps... I froze the now naked lemons, limes and oranges whole. I can cut off a wedge for juice anytime later on...

Wednesday, July 27, 2011

Freezing Culinary Herbs

Last year I dehydrated my chives before frost killed them all. They were tasteless when I cooked with them... Bleck!

This year I decided to freeze as many of my culinary herbs as I can IF they do well frozen, or at least do better than dried. In general, I prefer not to rely on the freezer for food preservation, and have managed to whittle down what I do freeze. However, I enjoy cooking with herbs so my winter options are limited since none are available in my garden after the first hard frost. Nor do I have an available windowsill to grow them inside over winter.

So far my frozen list includes basil, chives, thyme, flat leaf parsley and rosemary, but I may also freeze dill, oregano, marjoram, sage and tarragon as the summer wears on. Fresh frozen herbs are used in the same amounts as fresh herbs, whereas dehydrated herbs tend to have concentrated flavors and require a lesser amount. (Parsley is the exception... dried parsley has no taste at all in my opinion.) Frozen herbs will NOT be suitable to use as a garnish, as they will be wilted after thawing.

Opal Basil, chopped and in water
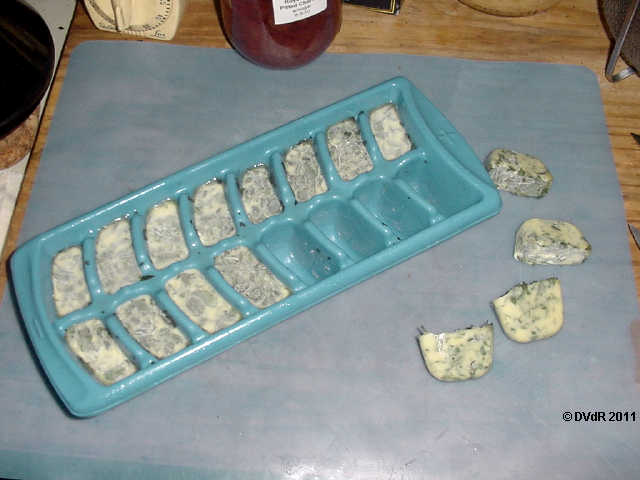
There are a couple of ways to freeze herbs. If you would like cubes to just drop into a dish, you can freeze them in water in an ice cube tray... but there's a trick to it. Chop the herbs by hand or in a food processor, and put some in each cube. Then add water BUT only half-way full. (The herbs will have a tendency to float.)


Freeze the tray, then after it's frozen, add enough water to fill the cubes to cover the herbs. Refreeze, and when solid, remove to an airtight container, label, date, and store in the freezer.


You can also use olive oil instead of water, as I did with the spicy globe basil in the photo above. I chopped the basil in my mini chopper with EVOO, filled the cubes and froze in one pass. They are back in the freezer to get very solid, and them I will vacuum-seal them, just 3-4 per bag so I'm not opening many at once for use.

Here is another option, and less messy: I'm choosing to freeze many of my fresh-cut herbs in thin layers on a cookie sheet, then vacuum-seal in small portions not more than 1/4" thick. That way I can pick out a section to use, and chuck the rest back in the freezer awaiting their inclusion in another fabulous dish!


I like to use sprigs of thyme rather than thyme leaves in many dishes, so I opted to freeze thyme in short sprigs, and vacuum-sealing small amounts of frozen sprigs. Same for rosemary. When rosemary is frozen on the stem, it it much easier to remove the needle-like leaves to chop if that's your preference.


Chives... What you see on the cookie sheet above was a clump of fresh cut chives about 1-1/2 inches in diameter before I trimmed the tiny thin ends and snipped them. (Much more than in an expensive fresh-pack at the store, by quite a lot.)


I found that taking the frozen snipped chives from the freezer (on the jelly-roll sheet) to take a photo allowed them to thaw just enough to be slightly wet. So I put half in each bag and refroze before trying to vacuum-seal.


After with the experience of the chives thawing while trying to take a photo, I decided to snap a photo of the flat leaf parsley leaves IN the freezer! (They are on 3 mesh dehydrator screens, stacked.) You will notice I snipped most of the stems off.


The parsley did much better that way, staying frozen for the few moments it took to vacuum-seal them.

Harvesting portions of my herb plants in mid-summer encourages the plants to generate new growth, and I will have more to put by later on... and still plenty to use fresh now.

Note: I froze some of the opal basil flat like the thyme (as well some in water cubes) for some comparisons later this winter.

Friday, February 18, 2011

Curing Ham Hocks

Another on my "to-make" list that I can't seem to buy anymore with decent quality! I got the fresh hocks at Whole Foods in Winston-Salem on a recent trip through there. That particular WF carries pastured pork and grass-fed beef. The fresh hocks weighed 1¾ pounds and cost me $1.85.


Here's the hocks that I vacuum-packed for the freezer. They are thawed in this photo because I was preparing to put them in a brine cure.


Brine, based on weight of the hocks:
Meat                795 g
Salt                   35 g
Sugar                25 g
Water              330 g
Cure #1          2.5-3 g


Here they are in the brine, day one. They were kept refrigerated, and I turned them over in the brine every day for 10 days.


Here they are, finally in the cold smoker, with a piece of tongue that has a pastrami coating. I'm using sugar maple sawdust in my CSG (cold smoke generator).

Next Day:
They were smoked about 8 hours in sugar maple smoke, refrigerated overnight, and smoked another 8 hours today in apple smoke.


This is what the "cold smoke generator" aka ProQ CSG looks like while generating cold smoke. It has been burning (smoking) about 2 hours in the photo above, and you can see how much of the apple sawdust has burned. You can also see a bit of the light smoke; it would be thicker smoke if the cardboard box wasn't uncovered (and the meat rack removed) for the photo.


Here they are, along with some cured, herbed salt pork in their second 8 hour cold smoke. When they finish tonight, they will go in a baggie and be refrigerated for several to allow the smoke flavor to equalize. Then each one will be individually vacuum-packed and frozen until I want to use one. 


Another option is to roast them at 200ºF until they reach an internal temp of 150ºF before freezing, so they are technically already partially cooked when adding to a pot of beans or greens. I did that with these just to see what difference it makes in a cooked dish, if any, and later I will cure another batch, but unsmoked, for comparison.


YUM!!


Tuesday, February 15, 2011

Dead Squash


I posted the winter squash I grew last year here. I wasn't too happy with the butternuts, because they just didn't look right, both shape and coloration. I even wrote to the seed company (a reputable heirloom seed company), and they assured me they were fine.

As my mother used to say, "Horsefeathers!"

I have been growing and storing winter squash, including butternuts, in this root cellar for five years. I know how to properly "cure" them before storing, and I've seldom lost any... unless I left some into late-April. I did lose about 5 the first year, when I didn't have enough straw to insulate a few from the outside (exposed) concrete block, and they froze against the wall.

Whatever my instincts were about these butternuts, they must have been correct. Yesterday I threw away the remaining squash from the root cellar; all were molding and rotting. I already threw away as many as a bushel in December and January, one or two every few days. I'm so sorry I took the time to clean and save seeds from the few I ate in early fall, because I surely will not plant them! 

When I cleared the shelves yesterday, I discovered one remaining acorn squash I had overlooked, which was just fine... and it became my vegetable portion of supper last night. The acorn squash was tasty, baked with just a bit of butter.

As for the butternuts, one of my favorite winter squash varieties, what a waste!

Thursday, February 10, 2011

Curing Salt Pork

Pork Back Fat, covered with Cure, Day 1

I've been so disgusted at the rancid salt pork in the grocery stores in the last 2-3 years that I decided to make my own. It's actually easy!

I bought some pastured pork back fat from my meat supplier at the Farmer's market, and cut it into manageable chunks. Rather than make just a plain cured salt pork product for a pot of beans or greens, I decided to jazz it up a bit with some spices in the cure. Then when I smoke my bacon that's also curing, I'll smoke half the salt pork as well. I can imagine some recipes where the smoke flavor might be interesting, and I will smoke with apple chips since that's the flavor I want for my bacon.

If the salt pork turns out lousy, I will have lost only about $2 and some of my time! If it's good, it will be vacuum-sealed in small packages and go into the freezer. Since my investment is so small, I plan to put a couple of vacuum-packs of it out in the cool root cellar just to see how long it will keep fresh in there.

Here's my recipe, adapted from Charcuterie: The Craft of Salting, Smoking, and Curing
Total back fat weight, 1040g
Note: Salt, sugar and Cure #1 are based on the weight of the back fat!
Kosher salt, 35.8g
Dark Muscovada sugar, 17.9g
Cure #1, 3.89g
Cracked black pepper, 1 heaping tsp.
Bay leaves, 2 medium, torn
Quatre épices, 3/8 tsp.
Juniper berries, 1 tsp., crushed

I covered the back fat pieces with all the cure, being sure everything was thoroughly covered, and refrigerated it in a leak-proof container, as shown in the photo at the top. Every day I turned the pieces, making sure the cure was well distributed. 


After 7 days, it looks like this, and the basic recipe suggested 7-10 days to be fully cured. It probably has cured enough, as there is some resistance to finger-pressure, but I won't be ready to fire up the smoker until tomorrow or the next day due to high winds outside... so it goes back in the refrigerator for another day or two.


I fired up the cold smoker this morning with some apple wood, and smoked half the salt pork I had cured. Now it will get vacuum-packed and refrigerated for 2-3 weeks for the flavor to equalize throughout the pieces. Looks Yummy to me!


I relented, and "oven-roasted" part my salt pork until it reached an internal temp of 150ºF. Then it was vacuum-packed and frozen. I did this just as my homemade bacon was done, to assure it is not fully raw when freezing... esp. because I will be giving some of it away. It is STILL not fully cooked and needs to be cooked before eaten.


Wednesday, February 2, 2011

Can Americans Cook?

Photo from thebittenword.com

Can Americans Cook? I see this question, in various forms, all over the internet... and actually I'm not sure what it really means, "cook". I must say I've eaten some very fine fare all over this country... and an abundance of dreck. My own plunge into real foods over the last year, and more recently into charcuterie, has shown me that I have far more to learn about cooking than I thought.

My 23 year old niece, who lives in this household, does what she calls "cooking" for herself and her mother. However, what she really does is heat food. As Michael Ruhlman says, "Heating isn't cooking. Heating heats. Cooking transforms!"

I grew up with the impression that French food/cooking was hifalutin' (haute bourgeois cuisine)... a concept absorbed growing up in the era of Swanson TV dinners and TV food marketing. In 1943 (when I was 3), there was a recipe for Apple Crisp Pronto, a concoction of packaged sliced white bread, margarine, honey and apples meant to help Rosie the Riveter get dinner on the table.

Now as I am starting to learn to make various charcuterie products, I have also been researching how to prepare them for the table. Let me tell you, it is an eye opener to see some of the thoughts about foods and cooking that have been lurking deep inside my head for many years!

So far I have cooked four of the five different kinds of sausages I made recently. Two were wonderful, and those were where I followed the recipe pretty closely. Two others have trashed after trying some in a meal, even though a bite was cooked and eaten as a trial patty before stuffing any of them. Those two were just not very flavorful, and I now believe it's partly because I cut down on the seasonings, thinking the amounts were overkill. That stems from my lack of experience in making sausage and knowing how flavors change over time, whether frozen or even refrigerated a day or two before cooking.

What the French (along with Spanish and Italian) countrysides provided was delicious food made from readily available, less expensive (or sometimes throw-away) items. It's not the expensive items that transform food (although truffles and caviar may, if you can afford them!). No, it's something else that transforms, and I'm searching for it... simple food prepared and presented with care and passion, and the elusive alchemy that fuels memorable meals.

Can you honestly tell me what the meat tastes like when you eat a BBQ sandwich (or even what kind of meat it is)? There's a current lawsuit against Taco Bell for false advertising, because their "seasoned beef" is less than 35% meat as required by the USDA. I bet those products are so covered in seasonings and/or sauces that no customer even notices there's almost no beef in them!

Photo from Naotakem's Photostream

What makes food taste delicious can be as simple as seasoning with spices and herbs, or marinating, and using delicate sauces... the attention to food preparation. (Of course, starting with quality food helps!) It takes Time, something many of us are unwilling or unable to expend on the task. We might miss Oprah! or NCSI... (someone should invent a font for sarcasm). It is just a mind-set about time, that's all. (The average American spends something like 15 minutes a day in the kitchen, and 3 hours in front of the TV.)

Time to prepare healthy, tasty food doesn't have to mean hours of drudgery in the kitchen. For example, the brined pork roast I wrote about recently took 10 minutes of my time to prepare the brine. The next day it took 15 minutes to brown the roast, turn on the oven, slice the onions and carrots and add some wine before covering it with foil. Then a few minutes to carve and serve later when it was cooked. That very small roast fed me for 5-6 meals, and took no more than half an hour of my actual time, spread over 2 days.

To be honest, some foods do take time to prepare, and I always have a learning curve where the preparation is even longer when it's a new food. I'm about to buy my first duck, which is expensive in this country.

There are many French recipes using duck. I realize now it's because they had them in their farmyards like we once had chickens, so they were cheap meat. A duck can provide many meals, and one use was putting the legs into a confit where they were covered with duck fat  in a crock, and stored in a cool place for several months. The famous cassoulet is nothing more than a slow cooked bean stew, with some sausage and duck or pork confit.

The bottom line was that to survive, those generations had to learn to preserve foods... all kinds of foods. In America during the last few years, home food preservation has increased dramatically, centered around home canning and dehydration. Probably many of us now have jars of homemade tomato sauce, jellies, jams and pickles on our pantry shelves, whereas 15 years ago it might have been unthinkable.

Charcuterie is simply a means of preservation, which was vitally important to the farmers and poorer classes of the populations in earlier times. (A confit like I mentioned above, is considered charcuterie.) Much charcuterie we know evolved in France and Italy because the climate was more moderate for curing things like olives, cheese, ham and salume. The charcuterie that evolved in say, Hungary or Poland, was quite different; they often smoked meats due to a colder climate, shorter seasons, and where the drying conditions were less favorable than in France, Spain or Italy. Regional charcuterie exists all over the world, in every culture because every culture needed to preserve foods.

In my opinion, the real key to the value of food preservation (besides economy, and the availability of food during possible disruption of electric and food transportation services) is how much we enjoy eating it later. (Make it tasty!)

I cannot tell you how many jars of some home-canned vegetable I have made and later thrown out because the taste was insipid and the texture just plain lousy. I'm getting better with learning how to adjust what happens to seasonings and textures during processing, but what's really important is that I have gained confidence in my home food preservation ability via canning and dehydrating to not poison myself... and now I'm ready to expand into meats other than home-canned.

That learned confidence about food safety makes me less afraid of killing myself (and friends) by preserving some meats. However, I cannot imagine a pantry full of jerky or pemmican, which are so easy to preserve. Sure, they qualify as preserved meats... but who wants a steady diet of jerky and pemmican?

So along with learning to make charcuterie, I want to look closer at French, Spanish and Italian countryside cooking for taste, and get over my learned bias. No, I will not be studying the foods of just those countries, but I'm starting there because there is so much written about them. I doubt I will ever be considered a cook, but hopefully I can learn to turn cheap cuts of meat into something tasty rather than merely edible.

I adore Julia Child, the towering Empress of the Kitchen, but truthfully have never attempted more than one or two of her recipes... and that was many years ago. However, I am told her book The Way to Cook teaches one to think about cooking, and that's something I really need to do!

Tuesday, January 25, 2011

Canning Pasteurizing Temperatures for pickles

If you have been reading my blog for a while, you know that last year I made a lot of lacto-fermented pickled vegetables. I did so because lacto-fermentation increases the nutritional content, and the veggies remain fairly crisp compared to vinegar-brined and water-bath-canned pickles.

Recently I came across this note on pasteurizing pickles from the Extension Service at the Univ. of Maine, which may interest some of you as a means of crisper pickles.

Low-Temperature Pasteurization Treatment

The following treatment results in a better product texture but must be carefully managed to avoid possible spoilage. CAUTION: Use this treatment only when recipe indicates. Place jars in a canner filled halfway with warm (120 to 140°F) water, Add hot water to a level 1 inch above jars. Heat the water to 180 to 185°F. Maintain this temperature for 30 minutes. Use a candy or jelly thermometer to check the water temperature, It must be at least 180°F during the entire 30 minutes. Temperatures higher than 185°F may cause unnecessary softening of pickles.

There are a few recipes on that page suitable for this method.

Thursday, December 30, 2010

Prepping, and Thoughts During a Winter Storm

Photo By jumpinjimmyjava 

I've been a 'Prepper' most of my life, having been raised in the Hurricane Belt. Living in snow country isn't much different for prepping, except for the cold weather. The recent ice storm left my area without power for several days, and I am happy to report that I was just fine thanks to my preps. I had plenty of heat, illumination after dark via candles and LED lights, food, water...

The big hole in my preps, though, was 2 sided. On one side, I was bored to tears, totally isolated, and had only a few library books. On the other side, I had plenty of time to fret about 2 freezers full of meat, and how long the power outage might extend. Fortunately I got lucky with the return of power just before I would have lost the freezer contents.

As a result, I plan to delve deeply this coming year into safe meat (and other food) preservation that doesn't require any power refrigeration or freezing, yet still retains safety, quality and taste. It will mean lots of experimenting, and probably loss of some meat during my trials, but I will feel better in a year if I have that option of preservation.

I have canned and dried foods for years, and canned a few meats along the way. What I don't have is a place to store jars of canned goods that could freeze and break in extreme cold. I want to better insulate my root cellar for canned goods, but I also want to store some meats that are not canned so I have some variety. Making cheese once I have a 'cave' is also high on the list!

There is something called 'rabbit starvation' whereby folks had only rabbit to eat, but starved to death because the body (especially the brain) requires fats to survive... and vegetables generally do not provide the fats that most animal meats, eggs and cheese do. Hence the interest in preserving meat, along with cheese and eggs.

My feet have been teetering at this threshold for some time, with my desire to learn to make cheese and charcuterie, but it's time to get more serious and cross over the damn line... get busy and make something! Charcuterie such as fresh sausage still requires refrigeration or freezing, but there are dry-cured meats (like chorizo, pepperoni and summer sausage) that keep at room temps. Some meats can be cured (salted), smoked, and hung in a cold (even if not freezing) place over winter; some pre-cooked meats can be stored immersed in a crock of fat in a cool place, and some meats can be dried. There is a lot for me to learn out there!


Update: I wrote this post above Dec. 19, after our ice storm. Then the East Coast Christmas Blizzard came along, and I worried about losing power again. Thankfully, although we got a ton of snow, the power stayed on! I worked on making sausages, which I will cover in several posts over the next week or two.

Tuesday, October 12, 2010

Preserving Tomatoes in Olive Oil

'Husky Red Cherry Tomato'

Tomatoes in my garden were a bust this year... terrible stink bug infestation. The only tomato doing well is a single Husky Red Cherry Tomato plant near the front door, providing a quick munchie coming and going from the house.

No one in the house but me eats fresh tomatoes, and some days there are simply too many ripe cherry tomatoes, so I put up a few in olive oil, vinegar and herbs, refrigerated. They are delicious plucked out of the jar for a salad, and they come with their own dressing! When I go to Charlottesville to house-sit for 10 days in mid-September, I will just replenish the jar with fresh tomatoes and pack it in my cooler.
Tomatoes in Olive Oil, Herbs, and Vinegar

I used fresh herbs from the garden, so the oil will need to stay refrigerated long after the tomatoes are gone. If I had used dried herbs, I'd have no worries about botulism growing in the oil if I had blanched dried herbs in vinegar first, and then the jar of oil (once emptied of tomatoes) was stored at room temperature in the pantry...Hindsight is always 20-20, LOL.

To make some fresh marinated tomatoes, wash enough tomatoes to fill a quart mason jar. Add ¼ cup vinegar and herbs of your choice, shake well, and cover with olive oil. Be sure the tomatoes are fully submerged/covered with oil. Refrigerate. Allow to marinate a few days before using. I don't know how long they will keep... I ate all mine within 2 weeks!

Dried Tomatoes in Olive Oil
I considered lacto-fermented ripe tomatoes, but like fruits, they don't keep well (although lacto-fermented green tomatoes do, and so does lacto-fermented salsa).

To have some marinated tomatoes that keep longer than a couple of weeks, I dried some of my cherry tomatoes and covered them with olive oil so I could leave the whole jar in the pantry all winter, or as long as they last. Here's how I did mine:

Ready to dry. Sorry but the 'after' picture was out of focus
Tomatoes briefly in boiling vinegar bath

To marinate some dried tomatoes (sun-dried or dehydrator-dried) in olive oil (which is one of the many preservation types called a confit), wash tomatoes and slice. Since these were cherry tomatoes, I just cut them in half. Seeding is optional, as is skinning in a boiling water bath; I skip doing either with cherry tomatoes. Dry tomatoes by whatever method you choose, but they must be thoroughly dry to prevent botulism. As an added (and tasty) safety precaution once the tomatoes are dry, dip them briefly in a boiling vinegar bath. Use whatever kind of vinegar you like... I generally use Bragg's raw apple cider vinegar or organic red wine vinegar. (This time I used plain apple cider vinegar, so I could throw it away.)


Scoop out the tomatoes from the vinegar bath and place on paper towels; pat dry.

Put the 'bathed' tomatoes in a sterile jar, add dried herbs and/or spices, and cover with a good olive oil. Store in a cool place out of direct light. You could dress up the jar by using fresh herb sprigs, but be sure to also immerse the herbs in the boiling vinegar bath first to kill any surface bacteria.

Ready to Store in the Pantry
I know folks who prepare tomatoes in this fashion, using heated olive oil, and process/seal them in a water-bath canner for half an hour. My belief is that it may be safer in their minds, but it destroys the enzymes and nutrition in both the olive oil and the tomatoes.