Showing posts with label Cooking. Show all posts

Saturday, March 23, 2013

My First Osso Buco

Osso Buco is a dish I have wanted to try for a long time. Finally last week, one of the grass-fed meat vendors at the farmer's market had veal shanks, so it was time to try it out.


Since there's just my sis and me to eat it, I only used 3 of the shanks, a total of just over 2 pounds. 


First I tied kitchen twine around each shank to keep them intact, followed by a liberal dose of freshly ground black pepper and sea salt. Next I dredged them in flour and browned them in about a third-cup of very hot olive oil in my heavy enameled cast-iron soup pot.


After they were well-browned, I took them out of the pot, added diced carrots and onions to the hot oil, cooking until translucent. (The loose recipes I combined called for celery too, but I was out.) Then I added about half a tablespoon of tomato paste, put the shanks back in with a cup of dry white wine, cooking until the wine was reduced by half.

Next I added a cheesecloth bag with a sprig each of fresh rosemary and thyme, 2 whole cloves, and a bay leaf, and 2 cups of homemade veal stock (chicken stock would work too). It simmered (covered) about 2 hours, and I added a bit more stock as it cooked down, keeping the liquid level up to at least 2/3 the thickness of the shanks.

I ran out of steam to finish the dish, so I let the pot cool, and refrigerated it overnight.

This morning, I veered from the traditional way of serving Osso Buco (whole shank pieces), taking the shanks out of the broth to cut away the tougher portions. (The meat was still very tough even after 2 hours simmering... after all, the legs of bovines get a good workout.) I trimmed away the "scraps" and cut the meat into bite-size pieces and added the meat back to the broth, along with the marrow I scooped out of the bones. 

I think it will all cook out nice and tender, and I'll serve it with creamy grits. So far, the taste of the braise is outstanding, but I need the meat to be more tender so we can chew it! Traditionally Osso Buco is served with polenta or risotto, but I have stone-ground grits on hand. Close enough to suit me!

The bones, trimmings and gristle are now simmering away in the crockpot for more stock, which I will pressure-can. Gristle is just cartilage, which will cook down to a gel substance that's great for our joints. 

Win-Win! 

Update: I forgot to add a very important part of the recipe: the gremolata garnish! 

Gremolata:
    2 Tbsp minced flat (Italian) parsley
    1 Tbsp finely grated lemon zest (use a microplane for best results)
    2 cloves garlic, crushed and minced
Combine the gremolata ingredients and place in a separate small serving dish. 

Wednesday, March 6, 2013

Roasted Sweet Potatoes with Fennel and Apples


I still have quite a few sweet potatoes and winter squash stored in my cool pantry, so I've been looking at new ways to use them before they aren't good anymore. I found this recipe online, Roasted Sweet Potatoes with Fennel, Apples, and Pecans.

I didn't add the pecans (I can't chew nuts), nor the maple syrup (I don't need the sugar), but I did sprinkle a little cinnamon mixed into a full teaspoon of sugar over the top before roasting.

I served this with the rabbit I fried. YUM!

Friday, March 1, 2013

Duck Feet


In the past, I have used chicken feet in stock because they give off a lot of gelatinous material that is high in glucosamine and chondriton. Great stuff for our joints and bones, and they give a bit of body to stock.

Recently in a nearby Asian market,  I found frozen duck feet that had been skinned and had the nails cut off so I picked up some for just gelatinous stock to add to soups, stews or whatever. They add the same benefits as chicken feet, but I didn't have to skin and declaw them myself.

I cooked these in a crock pot about 6-7 hours, and then pressure-canned them in 4 oz. jars. Just one jar (or even half a jar) makes a great addition to any soup or stew, and doesn't add any flavor.

Tuesday, November 15, 2011

Cushaw for the Best Pumpkin Pies!

Cushaw is a variety of winter squash that makes the very best pumpkin pies! (In fact the canned pumpkin in the grocery stores is either just cushaw, or a mix of various winter squash including cushaw.) Note: I wrote about cushaw last year here, too.

I don't grow my own cushaw anymore, even though they keep very well over the winter in a cool, dry space like a root cellar. Mainly I don't grow them because they are too big for one person to eat, unless I am processing pumpkin for holiday recipes. However, I just picked up a couple of 10-12 pound cushaws at the farmer's market last Saturday for only $3 each. I got over 10+ cups of purée out of just one cushaw, the equivalent of 5 or more jumbo cans of pumpkin ($2.99 here) from the supermarket.


I cut them in half, removed the strings and seeds from the cavity, and roasted them cut-side down in a 350ºF oven for about an hour and a half, until the thick neck pierced easily with a fork. (I lightly oiled the baking pan, and added enough water to a depth of almost half an inch... once the pan was in the oven.)


After the baked squash was cool enough to peel, I cubed it and ran it through a food mill. In retrospect, I could have skipped this step as these squash were not stringy at all.


Once puréed, I set some aside (in 2 cup amounts) to freeze for pies, or maybe some Pumpkin Pull-Apart Bread.


The rest of the first cushaw I roasted went into the crockpot to spice up and cook down for some Cushaw Butter. Even though I put it in canning jars, I did NOT can it. The USDA now strongly recommends against even pressure canning something extra-thick like pear or pumpkin butter because the heat may not penetrate to the center to guarantee safety.

I used local raw honey as the sweetener, and since honey is antimicrobial, it should keep in the refrigerator for several weeks. (Most of mine will be given away over the next few days.)


While I was roasting the squash, I removed all the good seeds from the stringy innards, discarded the flat immature seeds, and rinsed them well to remove any remaining flesh. Then I soaked the seeds several hours in salted water, getting them ready to roast as snack foods. (Soaking the seeds helps assure the nutmeat inside the shell gets a little salt.)

I dry the seeds after soaking... so the surface is dry enough to coat with olive oil. Lightly oil a cookie sheet, toss the seeds to coat evenly, add some sea salt, and roast in a 325ºF oven until toasted (about 25 minutes, depends on the oven) checking and stirring often after 10 minutes. 


You can add a variety of herbs or spices to the seeds before roasting. Try some ground chili pepper or ground smoked pepper if you like them spicy, or some garden herbs like sage and thyme... or some cinnamon and brown sugar for someone with a sweet tooth. Experiment and be creative!

Roasted pumpkin seeds will keep a couple of weeks stored in an airtight container. Be sure to smell any seeds or nuts before eating those you store, as the oils can go rancid quickly.

All together, my $6 spent on cushaws gave me 12 cups of purée to freeze (will make 6 generous pies or other desserts like pumpkin custard or pumpkin bread), 10 pints of pumpkin butter, and a bowl full of toasted pumpkin seeds. How's that for stretching food dollars? Plus, I know exactly what is in my pumpkin products... no chemical additives, just real food made with love.


Tuesday, October 4, 2011

I've Been Roasting

Despite my very busy schedule of house and garden projects, I still have to eat... and prepare canned things to eat later in the year when there's nothing fresh from the garden. So, along with roasting tomatoes with onions and garlic to can, I've taken advantage of the hot oven to roast a few vegetables for immediate consumption too. 


I found these lovely pattypans at my local farmer's market. They are common at the markets in large cities like Atlanta where I lived for a few years, but very unusual around here. (I could grow them, just never think to order seeds.)


I usually roast these on a charcoal grill, but since it was raining and I had the oven heated anyway, they went into the oven at 425ºF.  I quartered the pattypans, slathered on some olive oil, thyme and garlic mashed with coarse salt. Made just enough for me!


Stirred them once while roasting, removed them from the oven when they were browned and fork-tender. YUM!


Then I saw a recipe by Michael Ruhlman for roasted whole cauliflower with brown butter sauce. I just had to try it! I coated the cauliflower with olive oil, although his recipe called for canola (which I will not use). Other than that, I followed his recipe closely.


My oven temp may not be accurate, since my cauliflower got a tad too browned at the 425ºF the recipe suggests. Nonetheless, it was another "YUM"!!


Wednesday, June 15, 2011

Good Eats Gone Gone


My interest in cooking really began with Alton Brown's Good Eats many years ago. I liked that he explained the Why's and the How's, and it gave me confidence to try more foods than my mother or step-mother ever cooked.

I won't miss the show because I don't watch it anymore. I've come to dislike the programming on the Food TV channel (actually almost all TV shows anymore). I will honor all he has taught me about foods and cooking, though. Now I hear that Good Eats aired their last new show in early May 2011, with episode #249. I'm sure there will be re-runs for years to come. Sure wish they'd re-run Julia's shows, too... I'd make it a point to watch those!


Wednesday, May 4, 2011

Another cookbook?


I vowed 2-3 years ago NOT to acquire more cookbooks, and in fact have given away a substantial number of them in the last 2 years. However recently I ordered not just one, but 2 used cookbooks, each under $4. Old cookbooks to be sure, and cheap, but I think they will be useful now, and in the times ahead.

Both are from the Time-Life Series The Good Cook Techniques and Recipes published in the 1970's. The first one is Terrines, Pates and Gallantines. Think meatloaf advanced to high school or college level... a fine way to make delicious entrées out of less expensive cuts of meat.

The second one is Variety Meats: how to cook those meat cuts our grandmothers cooked... and we never buy, like sweetbreads, heart, kidneys, tails, and even pigs feet.

While I have tried some of the cuts labeled "Offal" in the past year, I really have not made a dedicated effort much past one recipe each. That's to my shame because everything I read about the nutritional values of those cuts says they far outshine the nutritional value of steaks and chops. It's time to get serious and try to make tasty meals, and make peace with my preconceived notions.

Wednesday, February 2, 2011

Can Americans Cook?

Photo from thebittenword.com

Can Americans Cook? I see this question, in various forms, all over the internet... and actually I'm not sure what it really means, "cook". I must say I've eaten some very fine fare all over this country... and an abundance of dreck. My own plunge into real foods over the last year, and more recently into charcuterie, has shown me that I have far more to learn about cooking than I thought.

My 23 year old niece, who lives in this household, does what she calls "cooking" for herself and her mother. However, what she really does is heat food. As Michael Ruhlman says, "Heating isn't cooking. Heating heats. Cooking transforms!"

I grew up with the impression that French food/cooking was hifalutin' (haute bourgeois cuisine)... a concept absorbed growing up in the era of Swanson TV dinners and TV food marketing. In 1943 (when I was 3), there was a recipe for Apple Crisp Pronto, a concoction of packaged sliced white bread, margarine, honey and apples meant to help Rosie the Riveter get dinner on the table.

Now as I am starting to learn to make various charcuterie products, I have also been researching how to prepare them for the table. Let me tell you, it is an eye opener to see some of the thoughts about foods and cooking that have been lurking deep inside my head for many years!

So far I have cooked four of the five different kinds of sausages I made recently. Two were wonderful, and those were where I followed the recipe pretty closely. Two others have trashed after trying some in a meal, even though a bite was cooked and eaten as a trial patty before stuffing any of them. Those two were just not very flavorful, and I now believe it's partly because I cut down on the seasonings, thinking the amounts were overkill. That stems from my lack of experience in making sausage and knowing how flavors change over time, whether frozen or even refrigerated a day or two before cooking.

What the French (along with Spanish and Italian) countrysides provided was delicious food made from readily available, less expensive (or sometimes throw-away) items. It's not the expensive items that transform food (although truffles and caviar may, if you can afford them!). No, it's something else that transforms, and I'm searching for it... simple food prepared and presented with care and passion, and the elusive alchemy that fuels memorable meals.

Can you honestly tell me what the meat tastes like when you eat a BBQ sandwich (or even what kind of meat it is)? There's a current lawsuit against Taco Bell for false advertising, because their "seasoned beef" is less than 35% meat as required by the USDA. I bet those products are so covered in seasonings and/or sauces that no customer even notices there's almost no beef in them!

Photo from Naotakem's Photostream

What makes food taste delicious can be as simple as seasoning with spices and herbs, or marinating, and using delicate sauces... the attention to food preparation. (Of course, starting with quality food helps!) It takes Time, something many of us are unwilling or unable to expend on the task. We might miss Oprah! or NCSI... (someone should invent a font for sarcasm). It is just a mind-set about time, that's all. (The average American spends something like 15 minutes a day in the kitchen, and 3 hours in front of the TV.)

Time to prepare healthy, tasty food doesn't have to mean hours of drudgery in the kitchen. For example, the brined pork roast I wrote about recently took 10 minutes of my time to prepare the brine. The next day it took 15 minutes to brown the roast, turn on the oven, slice the onions and carrots and add some wine before covering it with foil. Then a few minutes to carve and serve later when it was cooked. That very small roast fed me for 5-6 meals, and took no more than half an hour of my actual time, spread over 2 days.

To be honest, some foods do take time to prepare, and I always have a learning curve where the preparation is even longer when it's a new food. I'm about to buy my first duck, which is expensive in this country.

There are many French recipes using duck. I realize now it's because they had them in their farmyards like we once had chickens, so they were cheap meat. A duck can provide many meals, and one use was putting the legs into a confit where they were covered with duck fat  in a crock, and stored in a cool place for several months. The famous cassoulet is nothing more than a slow cooked bean stew, with some sausage and duck or pork confit.

The bottom line was that to survive, those generations had to learn to preserve foods... all kinds of foods. In America during the last few years, home food preservation has increased dramatically, centered around home canning and dehydration. Probably many of us now have jars of homemade tomato sauce, jellies, jams and pickles on our pantry shelves, whereas 15 years ago it might have been unthinkable.

Charcuterie is simply a means of preservation, which was vitally important to the farmers and poorer classes of the populations in earlier times. (A confit like I mentioned above, is considered charcuterie.) Much charcuterie we know evolved in France and Italy because the climate was more moderate for curing things like olives, cheese, ham and salume. The charcuterie that evolved in say, Hungary or Poland, was quite different; they often smoked meats due to a colder climate, shorter seasons, and where the drying conditions were less favorable than in France, Spain or Italy. Regional charcuterie exists all over the world, in every culture because every culture needed to preserve foods.

In my opinion, the real key to the value of food preservation (besides economy, and the availability of food during possible disruption of electric and food transportation services) is how much we enjoy eating it later. (Make it tasty!)

I cannot tell you how many jars of some home-canned vegetable I have made and later thrown out because the taste was insipid and the texture just plain lousy. I'm getting better with learning how to adjust what happens to seasonings and textures during processing, but what's really important is that I have gained confidence in my home food preservation ability via canning and dehydrating to not poison myself... and now I'm ready to expand into meats other than home-canned.

That learned confidence about food safety makes me less afraid of killing myself (and friends) by preserving some meats. However, I cannot imagine a pantry full of jerky or pemmican, which are so easy to preserve. Sure, they qualify as preserved meats... but who wants a steady diet of jerky and pemmican?

So along with learning to make charcuterie, I want to look closer at French, Spanish and Italian countryside cooking for taste, and get over my learned bias. No, I will not be studying the foods of just those countries, but I'm starting there because there is so much written about them. I doubt I will ever be considered a cook, but hopefully I can learn to turn cheap cuts of meat into something tasty rather than merely edible.

I adore Julia Child, the towering Empress of the Kitchen, but truthfully have never attempted more than one or two of her recipes... and that was many years ago. However, I am told her book The Way to Cook teaches one to think about cooking, and that's something I really need to do!

Monday, January 31, 2011

Slow Cookers and the Danger Zone

My new slow cooker

I have a new slow cooker, and it is lousy. It overcooks, scorches and burns. At first I just thought I had a cheap cooker, but then I began to hear my friends voicing the same concerns. It appears the Powers That Be have decided they know more about what is right for me than I do. The old slow cooker I had for years finally died and I had to buy a new one. They are all the same except for looks and control gadgetry, right? Well the answer is Yes... and No. 

Yes, the new models all work just about the same... and No, they do NOT work like the old ones! They get much hotter, to the point of abusing the food in them.

Every person who has ever packed picnic food, or who has canned food at home, or made cured meats knows there is a DANGER ZONE in food for safety. That danger zone is between 40ºF and 140ºF,  because it is within that temperature range that the pathogens proliferate. (Bacteria that cause disease are called pathogens; not all bacteria are pathogens however. When certain pathogens enter the food supply, they can cause foodborne illness.) That's why our refrigerators are designed to keep foods chilled below 40ºF (or frozen to 0ºF or below). Pathogens will still grow at low temps, just very slowly. Cooked foods need to reach at least 140ºF to kill any pathogens in them, and kept at 140ºF or warmer after being cooked, OR chilled to below 40ºF.


Water is pasteurized at ~150ºF and food is pasteurized at ~160ºF. Note that pasteurized means the destruction of all bacteria that may be harmful to health (pathogens). There are two primary methods of pasteurization: the liquid can be heated to 145ºF and held there for at least thirty minutes, or the liquid can be flash pasteurized at 161ºF  for a minimum of 16 seconds. After pasteurization, bacteria can still appear. It is important that foods be safely handled and stored at every step of the supply process from animal, fruit or vegetable to stomach. In most cases, after food is pasteurized it should be refrigerated.

After pasteurization, bacteria can still appear. It is important that foods be safely handled and stored at every step of the supply process from animal, fruit or vegetable to stomach. In most cases, after food is pasteurized it should be refrigerated. Keep cold foods cold. Keep hot foods hot.

Fish is cooked at 125º-140ºF; beef is cooked at 145º-170ºF; pork is cooked at 160º-170ºF and chicken is cooked at 165º-180ºF. According to the USDA Food Safety and Inspection Service (FSIS), the recommended minimum temperatures, to kill off potentially harmful bacteria are:
* Beef, veal, and lamb steaks, roasts and chops: 145ºF
* All cuts of pork: 160ºF
* Ground beef, veal and lamb: 160ºF
* All poultry: 165ºF
* When reheating cooked food, heat to a minimum internal temperature of 165ºF.

My old slow-cooker

The older slow cookers generally had a temp range on the low setting of around 185ºF, which was acceptable even if a bit high for slowly cooking foods over a long time. Newer slow cookers generally heat to something over 200ºF on the low setting, and over 300ºF on the high setting. I couldn't find the average temp for the "keep warm" setting, but my new slow cooker simmers with tiny bubbles on "warm". There is a thread on one of the forums I read about the newer slow cookers. NO ONE is happy with them. They now cook with higher temps that overcook and sometimes burn the food.

I decided to check out the heat range in my new cooker by filling it 2/3 full with warm water (115ºF) and see what it actually does. I started it on HIGH, as I would do for food. Note, times are from the beginning, or from the previous change in temperature setting, NOT from the previous reading.

Initial water temp: 115ºF
Set Temp Control to HIGH
After 1 hour: 160ºF
After 1½ hours: 175ºF
After 2 hours: 200ºF
After 3 hours: Boiling, 212ºF
Reduced Temp Control to LOW
One hour later: 200ºF
Two hours later: 200ºF
Three hours later: 200ºF.
Reduced Temp Control to KEEP WARM
One hour later: 175ºF
Two hours later: 175ºF
Three hours later: 175ºF

I am going to let it cool down overnight, and start again set to WARM tomorrow. I need to know if 175ºF is the temp it will heat to initially after setting just to WARM, or if that's the temp a cooked food will cool down to and then stay there to keep warm.

My, my... how interesting (and possibly dangerous)! I started my slow cooker on KEEP WARM, with the cooled water from last night, now @ 75ºF.

One hour later: 100ºF
Two and Three hours later: 125ºF
One more hour: about 150ºF, and a bit higher (165ºF) as the heat cycled on.
Then I turned the control to LOW
In one hour, it went to 175ºF
In another hour, it went to 180ºF
In another hour, it jumped to 200ºF, and stayed there all night.

Here are my conclusions:
1. Using the HIGH setting is clearly too high, and overcooks.
2. Starting on LOW with something already lukewarm still cooks it too hot to suit me, although it takes almost 2 hours to get to 200º. It will maintain 200º as long as it is turned on.
3. Starting a refrigerator-temp meat on KEEP WARM has the meat in the DANGER ZONE (40ºF - 140ºF) for far too long, over 4 hours. But then it keeps it between 150º and 170º.

So, what seems safe to me now, is to begin with a heated liquid (over 140º) and perhaps browning any meat before putting it in the warm liquid in my slow cooker, and setting it to Keep Warm, where it will stay in the 150º-170ºF range. I will be satisfied (but not happy that it's not like my old one), and feel my foods are safe and not overcooked or burned by doing it this way.

Research shows the common causes of food poisoning in the home are generally due to unsanitary conditions, and leaving cooked foods or raw fish and meat at room temperatures too long. There are occasionally reports of food poisoning from undercooking foods, but no data linking between those undercooked foods and a slow cooker!

At any rate, the manufacturers have determined that making the slow cookers cook hotter is in our best interests. (It probably IS the best option for my sister!) However, any idiot can still turn a slow cooker OFF before food is fully cooked. What's next... a "hot" slow cooker that will not turn off in less than 8 hours, or not even allow us to unplug them??

Monday, January 17, 2011

More on Rocket Stoves

A continuation of thoughts posted here: Baking without an electric or gas oven

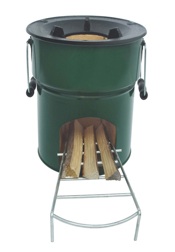
I've been looking into Rocket Stoves, and they are easy (and cheap) to make and operate. One problem with making one out of tin cans is that they rust out and need to be replaced perhaps as often as every 6 months. I have a hard time with things that are destined to be thrown "away" because "away" is just a pile somewhere out of my sight. It doesn't really disappear... someone else will have to deal with "my junk" sooner or later, from wherever 'away' happens to be.

So I'm wondering if a ready-made and more substantial Rocket Stove might be a better bet as a back-up means of cooking for me, even at the cost? 

StoveTek 'GreenFire Flex' (Wood-Charcoal Stove)

StoveTec sells one that burns either wood or charcoal for under $90 with free shipping, and it's made from steel, or at least a galvanized steel pot skirt (not shown... and the photos on their website are woefully inadequate) with painted steel metal body and legs. It has a cast iron stove top, an insulative abrasion-resistant combustion chamber, a fuel grate, and 2 doors with sliding covers.

StoveTek Rocket Stove, probably the wood burning only model

I'm not sure I could actually travel around and hunt the proper materials, and then find and pay someone to do the cutting and welding any cheaper than the cost of buying a manufactured one.

Tuesday, December 28, 2010

Why Brine?

Photo from Average Jane's Photostream

It is past Christmas and a brine for a Goose this year, but maybe you have a duck or turkey planned for New Year's Day? You could still brine it! I've been brining my annual Thanksgiving turkey for 3-4 years now, and throughout the year I brine whole chickens and even Cornish game hens. I haven't brined any pork or beef roasts yet, but now it's on my List.

If you had asked me before now why I brine, my answer would have been "to make it juicier", but with no real scientific knowledge behind my observations.

Now, thanks to Harold McGee's book On Food and Cooking, I know that the salt disrupts the structure of the muscle filaments... that is, salt uncoils/unbinds the proteins to form looser bonds. How that actually works is that a 3% salt solution dissolves part of the protein structure that supports the contracting filaments in muscle tissue... and a 5.5% salt solution actually dissolves the filaments themselves. By such actions, the meat actually becomes more tender!

Secondly, the interaction of salt with the proteins result in a greater water-holding capacity in the muscle cell structure, thus the meat loses less moisture when cooked... in other words, the meat is juicier. This is especially important if you are smoking meat a long time over slow heat.

Another benefit of brining is the infusion of added flavors. The moisture in both meat and brine travels back and forth between them until it reaches equilibrium, and any flavorings (herbs, spices, lemons, oranges, and even the salt) you have added to the solution end up in the meat... IN the meat, not just in the outer surface of the meat. Because of that transfer of flavorings, it is important to brine with the correct balance of salt to water, and to brine for the amount of time recommended for the weight of your bird or whatever you are brining. Otherwise, you could end up with a salty bird.

See some brine recipes and tips here.

Saturday, November 27, 2010

Turkey on the Smoker/Grill


Out of necessity (broken oven) I cooked my heritage turkey on my almost-never-used 18" diameter smoker-grill. Good thing it was a small bird! I had lots of fear and trepidation about doing it, but that was my only choice unless I wanted to fry it in a skillet. My old gas grill bit the dust several years ago and it didn't seem reasonable on my limited income to buy another one, or a turkey deep-fryer. This smoker came new in a box, but cheap from a yard sale several years ago, and only my brother has used it when he visits... for grilled steaks and oysters steamed in their shells.

Thankfully, I found directions for cooking a turkey in it online. My small turkey had been brined several hours the day before, and then rinsed and refrigerated overnight. I had no charcoal starter since I hate the stuff and the taste it imparts to food, so I had a hard time getting a fire going. (I bought one of those chimneys to start charcoal last year but have no idea where I put it!) The charcoal I used is pure hardwood charcoal, not briquettes made chemicals and paraffin as a binder. I burned the bag as part of the starter so I can't tell you who made it.


Turkey went on when the temp indicator in the domed top said "Ideal". The stainless steel pan under the turkey was to catch the drippings, but that didn't happen until later. I was too clueless to take the smoker body off and notice the charcoal forms an ash covering that kept the fire temperature low. Had I noticed sooner, the bird would have cooked sooner/faster, and had more drippings from the fat in the skin and around the cavities!


After 2-3 hours, it was finally beginning to show a rise in the internal temperature of the bird! Shaking the coals to cause the ash to fall off helped increase the cooking temperature a lot!


Finally, after dark (I got a late start), the bird was done. It was very moist and juicy, and exceptionally tasty, like a free-range heritage turkey should be! Now I won't have to cook much for my Christmas  Dinner... lots of turkey, apple-sausage dressing, and half the giblet gravy makings in the freezer!

Would I cook a turkey on the smoker-grill again? Yes, now that I have tried it once!! I might even smoke it the next time... I had soaked some apple chips to add flavored smoke, but didn't use them after all. No particular reason, though... I just didn't. The turkey had no smoky taste, because the charcoal didn't put off much smoke and I didn't add any moist chips on the coals to make smoke.

Turkey Brine:
I used the Chez Panisse recipe, but cut the garlic by 3/4, the salt by 1/2 and added some fresh sliced ginger. I also cut the time to about 6 hours since my bird weighed only 7 pounds.

Chez Panisse Turkey Brine
2 1/2 gallons cold water (I only needed 2 gallons to cover my bird)
2 cups kosher salt (I used 1 cup)
1 cup sugar (I used brown sugar)
2 bay leaves, torn into pieces
1 bunch fresh thyme, or 4 tablespoons dried ( (I used fresh)
1 whole head of garlic, cloves separated and peeled (I used 4 small cloves)
5 whole allspice berries, crushed
4 juniper berries, smashed
(I added about a tablespoon or more of fresh sliced ginger)

Instructions
Place the water in a large non-reactive pot that can easily hold the liquid and the turkey. Add all the ingredients and stir for a minute or two until the sugar and salt dissolve.

Put the turkey into the brine and refrigerate for 24 hours. (I brined my bird only about 6 hours because it was small) If the turkey floats to the top, weight it down with a plate and cans to keep it completely submerged in the brine.

Note: You may halve or double the recipe. The important thing is to prepare enough brine to cover the turkey completely. Also note that the brine may make pan drippings too salty for gravy.

Thursday, November 25, 2010

Baking and Other Cooking Equipment Challenges

Everyday cooking is not usually a big challenge for me... well until lately anyway. Over the last year (due to family disharmony) I have been cooking more and more often in a makeshift corner of my office, outfitted with a 2 burner hotplate, a crock-pot and a coffee pot. I do bigger things like baking and canning in the regular kitchen at the other end of the house, occasionally burning things in the oven because I don't hear the timer this far away. 

However, at the beginning of November my sister killed the oven while I was out of town, and now I'm trying to learn rudimentary baking in a small counter-top convection oven in my space. (I bought the oven a year ago, just didn't make space for it then.) The area around the oven gets very hot, too hot for comfort, so I moved it to the brick hearth by my wood stove. I need something heat-proof to sit it on so it's higher, though... these old bones don't like working at floor level!


It's a real challenge to try and bake in it, as everything has to be adjusted for size/quantity, and watched carefully once in the oven... recipe temperatures don't always work out just by automatically lowering the temp by 25º, and most of my bakeware won't fit. Best so far are an 8x8 square or round commercial pan which heats more evenly. The instructions say not to use glass pie pans or loaf pans in it, I'm fearful of damaging my pottery bakeware, and I refuse to buy disposable aluminum pans. Certainly my Thanksgiving turkey won't fit either, even though it's a very small turkey.

I've already burned the tops of muffins even though the centers were still uncooked. Same for a small cake. It makes me very hesitant about more "trial" baking with Thanksgiving just a day away. My stuffing/dressing recipe has cornbread in it, and I have always made my cornbread in a cast iron skillet in the oven. 

Thinking on it though... my grandmother made cornbread, biscuits and who knows what else over an open fire when she and 2 sisters homesteaded 160 acres in Colorado and lived in an Army-type walled tent. 

If she could manage, I'm sure I can figure it out too. In actuality, I'm considering it good practice in the event of extended power outages. Whatever I learn to cook on a hot plate burner should translate to cooking over a fire with some minor tinkering. Even the cardboard smoker I made could act as an oven with some adaptation.

Tuesday, November 23, 2010

Brining a Turkey

Photo from Rachel Tayse's Photostream

I just took my free-range heritage turkey out of the freezer to thaw before I drop it in a brine for a few hours. I do a LOT of brining... turkey, chickens, Cornish Game hens, and even some pork. Of course, the corned beef I make is also really a brine. and I don't know why I haven't posted before now about brining in general. It's the best thing I've ever done to a turkey, other than buying a heritage turkey!

Since I'm brining overnight (tonight) and Thanksgiving is imminent, I don't have time to do a 'show and tell' about my brine at the last minute. I am using the Chez Panisse brine, cut down in quantity and brining time since my turkey is very small.

Chez Panisse Brine
2 1/2 gallons cold water
2 cups kosher salt
1 cup sugar
2 bay leaves, torn into pieces
1 bunch fresh thyme, or 4 tablespoons dried
1 whole head of garlic, cloves separated and peeled
5 whole allspice berries, crushed
4 juniper berries, smashed

Place the water in a large non-reactive pot that can easily hold the liquid and the turkey. Add all the ingredients and stir for a minute or two until the sugar and salt dissolve.

Put the turkey into the brine and refrigerate for 24 hours. If the turkey floats to the top, weight it down with a plate and cans to keep it completely submerged in the brine.

Note: You may halve or double the recipe. The important thing is to prepare enough brine to cover the turkey completely. Also note that the brine may make pan drippings too salty for gravy.

To roast: Remove the bird from the brine, rinse and drain well. Pat dry. Follow the instructions for roasting.


However, I think I will add a little of the candied ginger that Alton Brown uses, just because I love ginger!

Here's a great link with information about brining, and several good brine recipes. At another time, I think I may try their Apple Brine

Happy Brining for a Happy Turkey!


Sunday, July 11, 2010

Time to Order Saffron Crocus

 Photo Courtesy of AYankeeCat  
Note the long red saffron stigmas coming off the centers

Saffron is the most expensive spice you can buy, costing thousands of dollars per pound (or several dollars for what would be half a teaspoonful), yet it is incredibly easy and cheap to grow your own. Saffron, the bright red-orange spice, is the dried stigmas of the fall Saffron Crocus (Crocus sativus) flower. It takes over 80,000 flowers to produce one pound of saffron, and it must be picked by hand. We tend to think of crocus as an early spring flower yet there are many that bloom in the fall, including Saffron Crocus. Without saffron, paella or curries wouldn't be the same.

Now is the time to order saffron crocus corms for fall shipping. (Just like some garlic varieties... they both become scarce if you wait until fall to order.) You can search the 'Net for good values; I found some for 32¢ each, buying 50 or more. 50 is just $16. And, they multiply!

Caveat: Always check any vendor in The Garden Watchdog, where companies are rated by actual customers relating their experiences. A company with a change in management can quickly go downhill... or uphill.

Planting
Saffron crocus are hardy in USDA Zone 6-8 in the South, and 6-9 in the West. Plant the corms 4" deep and 4" apart immediately when you receive them. They do best in full sun, and well-drained soil. If you have moles or voles, you might line the bed with hardware cloth. The flowers will appear about 4-6 weeks after planting, and last 2-3 weeks. Look for the stigmas after the morning dew has evaporated and the flowers are fully open. Carefully pluck the 3 red-orange stigmas, dry carefully and store in a small, airtight container. 25 corms will provide enough saffron for 2-3 tasty meals.

If you live in those zones above, you can leave the corms in the ground year 'round. Otherwise, plan to dig and store them before the ground freezes in winter. To make digging easier, plant them in small pots (and in a good soil mix) and place the pots about 2" below the soil surface so the pots don't show. After digging the corms, cover them with dry sawdust or peat moss and store in a cool(40-50ºF), dry area like a basement. Replant in spring after all danger of frost has passed. Don't water them (except rain) until leaves appear in fall.

About every 4-6 years you should divide and replant the corms after the foliage has faded in fall. Dividing will keep them from over-crowding which cuts down on flowering.

A word of advice: mark the area where they are planted, since most of the year it will look like a bare spot begging for a new plant. I learned that the hard way, and accidentally dug my corms 2 years in a row!


Buying and Using Saffron
If you buy some saffron to use until you have some of your own to harvest, avoid powdered saffron as it is often inferior and has turmeric added. Look for small vials or bottles containing just red stamens without the yellow filaments attached. They add nothing but weight and cost.

Steep the threads in a hot liquid like broth, water or milk depending on the recipe, for about 10 minutes before adding. Add the saffron/liquid early on in cooking or baking because it takes a while for the color and flavor to develop. Don't add saffron directly to hot oil; the flavors will evaporate quickly, and although the dish may smell wonderful, the flavor will be absent.

Saffron Bread in a Bread Machine
Great toasted with butter and honey!

1 cup milk
1/8 teaspoon fresh ground saffron
1 tablespoon butter, softened
2 eggs
1/3 cup sugar
3 1/4 cups flour
1 teaspoon salt
1 package yeast
3/4 cup raisins

Directions:
Mix saffron with 1/4 cup of the warmed milk. After 10 minutes, add to rest of the milk. Add all ingredients, except raisins, to the bread maker pan in the order listed (or as directed in your bread maker instructions).

Set bread maker to the regular setting and start. Add the raisins when the beeper sounds to add additional ingredients.

Recipe from:
http://www.donogh.com/cooking/bread/saffron.shtml
 

Monday, June 21, 2010

Homemade Sugar


Sugar, as we all probably know, is sucrose... and we get it from sugar cane. Usually the sugar we get is refined and filtered in many steps to a pure white, although raw cane sugar is a light tan color. Cane sugar was often hard to come by, and expensive, in earlier times in this country. When I was a child during WWII, sugar was rationed and almost impossible to get, so I didn't get a birthday cake until I was five, and then it was only 5 inches across. In those earlier times of scarcity and expensive prices, our great-grandmothers may have made their own sugar from sugar beets (or sugar maples, depending on where they lived), which are the same form of sugar: sucrose. Even today 30% of the sugar produced in the US is still made from sugar beets, sadly mostly GMO sugar beets. :(

Sugar beets are not those red globular things we grow in our gardens. Regular beets have only a low percentage of sucrose. Sugar beets, Beta vulgaris 'altissima' or Beta vulgaris 'saccharifera', are white beets with an elongated root, and 12-15% sucrose (by weight). Unlike sugar cane, beet sugar is free from uncrystallizable invert sugar but does contain a small amount of the sugar raffinose, which humans do not digest. (The result may be a slight form of gas, like eating beans.) You can still get seed to grow sugar beets, with diligent searching. One source I found is J.L. Hudson, Seedsman, in California; they carry open pollinated, non-F-1 hybrid, non-patented sugar beet seeds. I have emailed 2 other companies to find out if they also have open pollinated heirloom sugar beet seeds, which I think they might. I will post them when I get an answer.

I am, of course, concerned because Monsanto has a patent on a GMO sugar beet, now used by 95% of commercial sugar beet farmers in the US since the introduction 3-4 years ago.

As it happens, there is a "shortage" of GMO sugar beet seed. Capital Press, an informative weekly agricultural newspaper, ran an article on the front page of their November 13, 2009 issue about sugar beets and how commercial growers will be affected "by a recent decision to halt the sale of the genetically modified Roundup Ready sugar beet seed until the USDA produces an environmental impact statement. Without GMO sugar beet seed on the market, commercial farmers are forced to go back to conventional seed—but finding conventional sugar beet seed is going to be a problem."

My heirloom seed-saver friends say to sow sugar beet seed in May and pull the beets in October, after the first hard frost, when they are sweeter. They are a good cool weather crop, and can be sown as early as soil can be worked. Sow 1/2" deep in rows 1 foot apart. Thin to 4", using the tender seedlings as early greens. A rich, light sandy loam, kept moist, is best for growing crisp, tender beets. Mature roots are about 8" long, some longer, weighing 2 - 5 pounds.

Sugar beet is a temperate climate biennial root crop. It produces sugar during the first year of growth in order to see it over the winter and then flowers and seeds in the second year. It is therefore sown in spring and harvested in the first autumn/early winter. The beet stores the sucrose in the bulbous root which bears a strong resemblance to a fat parsnip. Beets being biennial, they will produce seeds rather than beets the second year. If you plant some early in the spring for use that same year, you can plant more later in the summer, then you can save the summer beet plants to produce seed the following year. (They will flower the first year but no seeds.) In mild winter areas you can leave beets in the ground all winter.

In severe winter areas, you can dig the beets before the first frost and save some with the best roots to replant the following spring.To store them, treat them like carrots: cut off all but an inch or two of the tops and store them in a root cellar in damp sand or sawdust and fully covered. Not too wet or they will rot. These may be replanted in spring, where they will grow tall again, produce a flower, then a seed pod. Cut the stalks when the seed pods are dry to the touch, and hang upside down in a dry, ventilated area. You can cover the seedpods with a paper bag to collect the seeds as they dry and fall out, but some pods may need some help giving up the fully dry seeds...

The basic home procedure for obtaining sugar from sugar beets is just like making any other sweet syrup, whether cane syrup, ribbon cane syrup, maple syrup or sorghum molasses (all are sucrose), except beets do not readily crush at home to exude juice (unless you have a hydraulic press). The easy way is to shred the beets (clean well, remove green shoulder and any soft or bad spots), put them in a pot or pan, add a little water and cook until they are soft.

From there it is just like cooking down any sugary liquid into a thick syrup. Strain the juice through several layers of muslin or cheesecloth, squeeze the pulp to extract as much juice as possible. Put the filtered juice in a heavy pot and cook long and slow over low heat, keeping it below boiling. Any impurities will rise to the surface where they may be skimmed off. When it is as thick as molasses, let it cool, then transfer to a container (wider will make removal easier later on) with a loose cover for storage. (The loose cover is to let it continue to evaporate, and to keep it clean.)

Check it often. If there's too much moisture still in it, it could mold on top. If that happens, scrape the mold off and cook more of the moisture off. I have read to use a tight lid rather than a loose lid. I guess it depends on how much you have cooked it down.

The syrup will very slowly crystallize over time, just like cooked honey does, and quicker of course in a dry storage area. If some of it becomes hard, you could pound it into small chunks or crystal flakes. I suppose if you were most careful, you could probably cook it down almost to crystals instead of a thick syrup, but I'd be afraid of scorching it, tainting the taste of the whole batch.

Here's a link to the basic commercial beet sugar process.

One thing you may try as an experiment that will fascinate the kids (and make a good science project) is to make rock crystal candy. Put some cooled syrup in a jar with several inches between the top of the syrup and the top of the jar. Place a pencil across the top, and run a string from the pencil down into the syrup a few inches. Coarse cotton string like butcher's twine works best, and it's food-grade. Cover with a paper towel to keep clean. Store in a cool dry place. The sugar should precipitate crystals on the string, and they will continue to grow. (Growing rock candy crystal candy is dependent on the sugar saturation of the liquid. You may have to take some and dilute it to grow crystals. Trial and error?)

Our great grandparents may have used this beet syrup as a sweet spread on bread, perhaps as an 'icing' on a cake, to sweeten tea... In all likelihood, they used it in the curing of meats for the winter, and since sugar is topically antiseptic they probably used it in this manner too. In fact sugar was only used as a medicine (particularly in China and India) for centuries, and didn't became a 'common food' until well after the Spaniards introduced it to the West Indies.

I have read commercial processing of sugar beets into sugar is more complicated than the process for cane sugar, partly due to the odor, the presence of about 1.25% nitrogenous matter, and a comparatively large amount of salts (like magnesium salts). Molasses from sugar beets is about 50% sucrose. The objectionable odor and taste can be eliminated during home processing by completely removing the green shoulder (the part growing above ground) of the beets, avoiding cooking the juice in a copper pot, and storing the beets longer covered but frost-free before processing.

Other options for making sugar or sugar syrup at home include sorghum (sweet sorghum aka cane sorghum, not grain sorghum) and sugar maples. I have a friend in the next county who taps several kinds of trees for syrup: birch, box elder and black maple (the last 2 are maples just not the sugar maple). The process is all the same.

Making your own sugar from sugar beets, cane, sorghum or sugar maples (if you have access) may not be ideal, but if there is NO sugar available at all, it may come in handy.