Showing posts with label Recipes. Show all posts

Wednesday, June 12, 2013

I have artichokes growing!


I have 3 artichokes growing on one plant in my weedy garden!

I didn't believe it was possible in my 5B zone, but sometimes I try to push the envelope anyway. The summer before last, I bought 2 artichoke seedlings about 4" tall from a big box store. One was dead within a week, but the other one seemed to thrive.

Everything I read said the artichoke makes fruit in it's second year, which was last summer for this plant. Mine produced nothing last summer, and in fact I was surprised it survived the winter. However, I let it grow anyway.


Imagine my surprise yesterday when I discovered it now has 3 artichokes growing on it! I just hope they grow large enough to harvest.

My favorite way to eat them is boiled, cooled, and leaf tips dipped in a quick blender bernaise. (Not an original recipe by me, but I've had it at least 10 years. It's really GOOD!)

Blender Bernaise

Makes 3/4 to 1 cup

2 tablespoons white wine
1 tablespoon tarragon vinegar
2 teaspoons chopped tarragon
2 teaspoons chopped shallots
1/4 teaspoon freshly ground black pepper
1/2 cup butter
3 egg yolks
2 tablespoons fresh lemon juice
1/4 teaspoon salt
Pinch of cayenne pepper

Combine wine, vinegar, tarragon, shallots and pepper in a small skillet. Bring to a boil and cook rapidly until almost all liquid disappears. In a small saucepan, heat the butter to bubbling but DO NOT brown.

Place egg yolks, lemon juice, salt and cayenne in a blender; cover, and flick on and off gradually until mixture is combined. With the blender on low, gradually add the hot butter. Add the herb mixture and blend on high speed for about 4 seconds.

Serve warm, at room temperature, or chilled. May refrigerate but cover with plastic wrap to keep a skin from forming.

Tuesday, May 7, 2013

Growing Zucchini

If you only plant one zucchini seedling, it will die. If you plant 2 or more, they will ALL live and you'll have a bunch to give away.

I always try to grow 2 plants (enough for just one person), and always used the excess grated and frozen to make zucchini bread in the Fall and Winter. Since I don't need all the fattening stuff in zucchini bread, I decided last year to make some Zucchini Faux Crab Cakes from a recipe I found on the internet.

They were acceptable when I ate a couple of them just-made, but when I started eating the ones I froze, they were delicious! I squeeze some fresh lemon on them after re-heating. YUM!

Zucchini Faux-Crab Cakes from http://nancyvienneau.com/blog/recipes/those-curious-zucchini-faux-crab-cakes/

2 cups coarsely grated Zucchini
Salt
1 cup Bread Crumbs (I used a baguette)
1 Egg
2 Green Onions, thinly sliced, use entire scallion
¼ cup small diced Sweet Red Bell Pepper
1 ½ teaspoons Old Bay seasoning
1 teaspoon Dijon Mustard
1 Tablespoon Mayonnaise (or plain yogurt)
Juice of ½ Lemon
a pinch or 2 Red Pepper flakes

vegetable oil, for frying with a smidge of butter (I used EVOO and butter, equal amounts)

Place grated zucchini in a colander; sprinkle lightly with salt, allow to stand for 30 minutes draining. Squeeze to remove additional liquid – zucchini should be fairly dry. Place zucchini, bread crumbs, with all the other ingredients in a large bowl and mix well.

Form into 8 patties the size of crab cakes.

Heat a small amount of oil and butter in a skillet, and cook patties on both sides, browning well. Drain on paper towel.


Freeze any extras.

Tuesday, April 23, 2013

What Else I'm doing...


Well, my health is preventing me from doing much, but here's the pea shoots I just bought. If you haven't ever tried pea shoots, they are marvelous! I love them topped on a baguette hat's covered with fresh soft cheese and lightly dressed with EVOO, or in a salad. They can also be lightly cooked in a stir-fry, or sautéed with some garlic. Do not overcook them!

Pea shoots are showing up more and more at farmer's markets because they produce 4X what fresh peas do. I couldn't find any information about their O-6 to O-3 ratio, but being a green shoot, I would expect it to be good.


Then, on the not-quite-so-good-for-me list, I bought a box (18 pcs) of Champagne Mangoes that I'm slicing to freeze. I grew up with Florida mangoes, and as my mother always said, "I could just waller (wallow) in them". These are close in taste but with an added hint of lime to the fruit. I figure if I only eat a few frozen pieces once a month, it will satisfy my mango cravings, and not disrupt my O-6:O-3 ratio too much.

Tuesday, March 26, 2013

Osso Buco Garnish

Aaaaccckkk!


When I posted a couple of days ago about making my first Osso Buco, I neglected to mention a very important ingredient... the Gremolata garnish. Truly, the dish is incomplete without it!

Thankfully, I had a little bit of Italian parsley still growing beneath the snow.

Gremolata

    2 Tbsp Minced flat (Italian) parsley

    1 Tbsp grated lemon zest (use a microplane for finer grating, if possible)

    2 cloves garlic, crushed and finely minced


Mix all ingredients together, and put them in a small dish to serve atop the Osso Buco at the dinner table.

(I did go back and add it to the original post, but not all my readers go back to see updates.)

Saturday, March 23, 2013

My First Osso Buco

Osso Buco is a dish I have wanted to try for a long time. Finally last week, one of the grass-fed meat vendors at the farmer's market had veal shanks, so it was time to try it out.


Since there's just my sis and me to eat it, I only used 3 of the shanks, a total of just over 2 pounds. 


First I tied kitchen twine around each shank to keep them intact, followed by a liberal dose of freshly ground black pepper and sea salt. Next I dredged them in flour and browned them in about a third-cup of very hot olive oil in my heavy enameled cast-iron soup pot.


After they were well-browned, I took them out of the pot, added diced carrots and onions to the hot oil, cooking until translucent. (The loose recipes I combined called for celery too, but I was out.) Then I added about half a tablespoon of tomato paste, put the shanks back in with a cup of dry white wine, cooking until the wine was reduced by half.

Next I added a cheesecloth bag with a sprig each of fresh rosemary and thyme, 2 whole cloves, and a bay leaf, and 2 cups of homemade veal stock (chicken stock would work too). It simmered (covered) about 2 hours, and I added a bit more stock as it cooked down, keeping the liquid level up to at least 2/3 the thickness of the shanks.

I ran out of steam to finish the dish, so I let the pot cool, and refrigerated it overnight.

This morning, I veered from the traditional way of serving Osso Buco (whole shank pieces), taking the shanks out of the broth to cut away the tougher portions. (The meat was still very tough even after 2 hours simmering... after all, the legs of bovines get a good workout.) I trimmed away the "scraps" and cut the meat into bite-size pieces and added the meat back to the broth, along with the marrow I scooped out of the bones. 

I think it will all cook out nice and tender, and I'll serve it with creamy grits. So far, the taste of the braise is outstanding, but I need the meat to be more tender so we can chew it! Traditionally Osso Buco is served with polenta or risotto, but I have stone-ground grits on hand. Close enough to suit me!

The bones, trimmings and gristle are now simmering away in the crockpot for more stock, which I will pressure-can. Gristle is just cartilage, which will cook down to a gel substance that's great for our joints. 

Win-Win! 

Update: I forgot to add a very important part of the recipe: the gremolata garnish! 

Gremolata:
    2 Tbsp minced flat (Italian) parsley
    1 Tbsp finely grated lemon zest (use a microplane for best results)
    2 cloves garlic, crushed and minced
Combine the gremolata ingredients and place in a separate small serving dish. 

Wednesday, March 6, 2013

Roasted Sweet Potatoes with Fennel and Apples


I still have quite a few sweet potatoes and winter squash stored in my cool pantry, so I've been looking at new ways to use them before they aren't good anymore. I found this recipe online, Roasted Sweet Potatoes with Fennel, Apples, and Pecans.

I didn't add the pecans (I can't chew nuts), nor the maple syrup (I don't need the sugar), but I did sprinkle a little cinnamon mixed into a full teaspoon of sugar over the top before roasting.

I served this with the rabbit I fried. YUM!

Saturday, July 14, 2012

Blackberries are abundant!

A few berries ready to freeze, and a quarter on the tray for size


My Triple Crown thornless blackberries are fruiting in abundance this year! I expect to get several gallons off my short row. One of the things I will be making is Blackberry Savory, used like cranberry sauce but less sweet than the canned cranberry sauce.

Blackberry Savory
(From Sensational Preserves by Hilarie Walden)
Serve with chicken, turkey, duck or any white meat
Makes about 4 cups

1 Tbs. whole cloves
2 cinnamon sticks
1 tsp. allspice berries
4 pounds blackberries
2/3 cup Spiced Vinegar (recipe below)
4-1/2 cups sugar, warmed (see below)

Tie spices in a cheesecloth bag and put in a large non-reactive pan with the blackberries and vinegar. Bring to a boil, then simmer gently 30 minutes.

Strain mixture through a non-metallic sleeve, like a jelly bag, and return to the pan. Discard contents of the bag. Over low heat, stir in the warmed sugar until it has dissolved, then continue to simmer, stirring as necessary until well thickened.

Ladle savory jelly into warm, clean, dry jars. Cover and seal per normal jelly canning directions. Store in a cool, dark, dry place at least 3 weeks before eating.

Spiced Vinegar
Use for pickling, salad dressings and mayonnaise
Makes about 5 cups (I cut the recipe in half)

1 Tbs. Allspice Berries
1 tsp. Whole Cloves
2 Cinnamon Sticks
1 Tbs. Whole Black Peppercorns
2 blades of Mace
2 Bay Leaves, torn
4 dried red chilies
5 cups red or white wine vinegar

Put all ingredients in a non-reactive saucepan and bring to a boil. Pour into clean, dry bottles, distributing the flavorings evenly. Cover with acid-proof lids and seal.

This vinegar can be used after only one day, but it is better to leave it for 1-2 weeks before using. Store in a cool, dry place. If the vinegar is kept for some time, check the flavor. If it becomes too strong you might want to strain out the flavorings.

Warmed Sugar
Sugar will dissolve more quickly if warmed. Put the required amount of sugar in an ovenproof bowl and place in a pre-heated oven at the lowest setting for about 20 minutes until the sugar is warmed but not hot.,

Sunday, July 8, 2012

Cheddar Corn Chowder

h
Sweet corn is ready to be harvested and I highly recommend this recipe! This is the best soup I've made in ages, and unfortunately, I cannot even take credit for the recipe, nor did I get any photos. The recipe is from Ina Garten, The Barefoot Contessa Cookbook, 1999. I would call it a real old-fashioned chowder.

I made the first batch about 2-3 weeks ago and took a bowl to my neighbor Buster. When he brought the bowl back, he said he licked the bowl it was so good! Last weekend I cooked another batch for a get-together, and everyone ate 2-3 servings (served along with a fresh garden salad and crusty bread) and really raved about it. There was enough left to send take-home containers with everyone. (I already had put 10 pints in my freezer; it's not a good candidate for canning because of the cream.)

Makes 6½ to 7 quarts, 10 to 12 servings. The recipe filled my enameled cast iron pot to the very brim.

    * 8 ounces bacon, chopped (I used applewood smoked bacon)
    * 1/4 cup good olive oil
    * 6 cups chopped yellow onions (about 4 large onions, I used Vidalia onions)
    * 4 tablespoons (1/2 stick) unsalted butter (I used organic pastured butter)
    * 1/2 cup flour
    * 2 teaspoons kosher salt
    * 1 teaspoon freshly ground black pepper
    * 1/2 teaspoon ground turmeric
    * 12 cups chicken stock (I used homemade)
    * 6 cups medium-diced white boiling potatoes, unpeeled (~2 pounds, I used red-skinned fingerlings)
    * 10 cups corn kernels, fresh (10 ears) or frozen (3 pounds). I used fresh corn, cut off the cob and blanched
    * 2 cups half-and-half
    * 1/2 pound sharp white cheddar cheese, grated (I used imported Irish cheddar)

In a large stockpot over medium-high heat, cook the bacon in the olive oil until the bacon is crisp, about 5 minutes. Remove the bacon with a slotted spoon and reserve. Reduce the heat to medium, add the onions and butter to the fat, and cook for 10 minutes, or until the onions are translucent.

Stir in the flour, salt, pepper, and turmeric and cook for 3 minutes. Add the chicken stock and potatoes, bring to a boil, and simmer uncovered for 15 minutes, until the potatoes are tender. If using fresh corn, cut the kernels off the cob and blanch them for 3 minutes in boiling salted water. Drain. (If using frozen corn you can skip this step.) Add the corn to the soup, then add the half-and-half and cheddar. Cook for 5 more minutes, until the cheese is melted. Season, to taste, with salt and pepper. Serve hot with a garnish of bacon.

The only change I made was the kind of potatoes, and to add the cooked bacon to the chowder when I added the half-and-half and cheddar.

Monday, April 30, 2012

Pea Shoots!


Who knew the tips of pea vines (pea shoots) are not only edible, but very tasty?

I like the flavor of peas... but not so much the texture, so I don't grow peas. A vendor at the farmer's market last week had a basketful, and when I inquired what they were, she told me and offered a taste. A taste of just one sold me! They are slightly crunchy, and taste like fresh peas right off the vine but with a more delicate flavor! I got a big handful to add to fresh salads.

I should have asked what kind of pea plant they came from. The tendrils of any edible pea can be harvested for shoots, and apparently those from snow peas and sugar snaps make excellent shoots. NOTE: the shoots of ornamental flowering sweet peas are poisonous!

"The University of Washington calls pea shoots a "nutrient-dense" green and says that for 10 calories from 2 cups of pea shoots,  your RDA gets 35% of its vitamin C, 15% of its vitamin A, 132% of its vitamin K, and 10% of its folate.  So, 2 cups of pea shoots sounds like a lot, but I can assure you that if you decide to cook them you will get about 2 tablespoons of cooked (delicious!) greens." (Source)

Fresh pea shoots are also a good source of vitamin E, folate, thiamine, riboflavin and vitamin B6, with all the beneficial fiber, phytonutrients and antioxidants of many leafy greens. Harvest the pea shoots when they are anywhere from 3" to 7" long. If you leave the lowest set of leaves on the plant (3-4" above the ground), you can get a succession of shoots.

If you usually grow peas and save seeds, you know pea seeds are easy to save but have poor germination rates if kept too long. Here's a great suggestion. Grub out a small area in the garden (even just one square foot will do) and plant it heavily with your old pea seeds. You'll have enough germinate to harvest pea shoots in 2-4 weeks. When there are no more growing to cut (or getting tough rather than tender), dig the spent plants into the ground where they will supply nutrients for other plants.

If you have a long planter box that will fit on a cool windowsill inside the house, you can grow pea shoots in winter! (Peas are a cool weather crop and may not do well in a very warm house.)

Pea shoots can be used in salads, stir-fries, appetizers... any way you might use fresh spinach. Here are a couple of recipes, and a search engine will turn up many more:

Pea Shoot, Radish and Apple Salad
Crostini with Pea Shoots and Strawberries

Kohlrabi Slivers and Pea Shoots with Sesame Dressing

Pea Shoot and Spinach Salad with Bacon and Shiitakes


Wednesday, March 21, 2012

What to do with Fennel stalks


Fennel is a recent introduction to my food palate, and I love it enough that I have started some seeds for this year's garden. It is outrageously expensive in the supermarkets here, so it often stays on the shelves long past it's prime. There IS one vendor at the farmer's market with great, fresh and affordable fennel, but he always sells out fast.

Fennel bulbs are almost always sold by weight, and there's not much value in the stalks and ferns which can make up half the weight/cost. The stalks and ferns are tasty when fresh, and can be used sliced thin in salads and as a garnish but they lose all taste/flavor if dried, much like dried parsley. So... the stalks often get thrown on the compost pile, keeping just the fat bulb for cooking.

However, I came across this recipe for making orange pickled fennel stalks from a charcuterie blog I  read. It's a simple recipe and takes just a few minutes of your time (plus some wait while the sliced stalks are in salt to lose some of their liquid). I put mine on some lamb chops... delish!


My picture should have been taken immediately, as the orange looses color (but not taste) after a couple of days, but I was busy with seedlings and forgot!

Orange Pickled Fennel Stalks
Adapted from recipe by Joy of Pickling by Linda Ziedrich

    * Stalks from two fennel bulbs, sliced
    * 1 1/2 tsp. kosher salt
    * zest of 1/2 orange, peeled from the orange in thin strips
    * 1/2 cup white wine vinegar
    * 1/2 cup orange juice
    * 1 Tbsp. sugar
    * 4 black peppercorns, cracked

1: Combine sliced fennel with salt and let stand for one to two hours.

2: Drain fennel slices and combine them with the orange zest.

3: Pack fennel stalks and zest into a jar. Heat vinegar, orange juice, sugar and peppercorns to a simmer, stirring to dissolve the sugar. Pour the hot liquid over the fennel and screw on lid.

4: Let cool to room temperature and then place in the refrigerator. It will be ready in a few days.

I think this would be good on salmon, too. YUM!


Thursday, March 8, 2012

Using Preserved Lemons

Recently I posted about Making Preserved Lemons, and since then, several folks have asked me just how to use these pretties. It's actually a very good question, since preserved lemons are not a typical part of the American Food Culture. Here's some suggestions, and at the end, a couple of recipes.

First, the taste: There is a really intense lemon taste to them, and like fresh lemons, it has a tartness but also a sweetness (and of course, a saltiness since they are preserved in salt). The small is wonderfully lemony, like lemon oil. But the taste and texture is not really like fresh lemons, and I don't have the words to adequately describe the taste. You'll just have to make some yourself and taste... Use it only lightly at first, because the taste can be powerful (and partly depends on the lemons used). You will develop a feel for how much to use, to suit your own taste.

Some prep is necessary for use. Take one out of the jar and rinse it. Pull or cut away the pulp and scrape away the white pith, which can still be bitter... although some folks use both pulp and pith, discarding any seeds. I wouldn't start with pith and pulp in my introduction to preserved lemons, however.

Uses:  
You might start with a lemon vinaigrette. Make your usual  oil and vinegar combo (including any herbs), and add some finely minced preserved lemon peel to taste. 

Add a touch of finely minced preserved lemon peel to roasted vegetables... the kind of veggies where you might brighten with a splash of fresh lemon... such as carrots or broccoli. I use a tad of the juice on just cooked (rather than roasted) vegetables like summer squash, and on seafood, especially salmon and scallops.

Add some to braised lamb shanks, and chicken picatta. Add some to soups and stews, but don't forget to reduce the amount of salt!

Add some to stir-fried or braised greens like spinach, chard and kale. Use it to add a bit of tang to pilafs, pasta, quinoa and couscous. Roasted chicken is wonderful with a wedge or two alongside.  

Slow-cooked meats like short ribs are dazzling with a sprinkling of minced preserved lemon peel.

Add a touch of preserved lemon to guacamole, aoili, and your Sunday Brunch Bloody Mary.

Here's a relish that would be wonderful with roast chicken:

Preserved Lemon Relish
Makes ¾ cup
1 shallot, minced
5 or 6 preserved lemon wedges, seeded and minced
½ cup minced fresh Italian parsley
1 tablespoon fresh oregano, minced
2 teaspoons fresh thyme leaves, minced
—Kosher salt, if needed
—Black pepper in a mill
3 tablespoons extra virgin olive oil
¼ cup pine nuts, lightly toasted

Put the shallot, preserved lemon, parsley, oregano and thyme into a medium bowl and toss together gently. Taste and correct for salt if necessary. Add several turns of black pepper and stir in the olive oil. Add the pine nuts and toss gently. Use immediately or store in the refrigerator, covered, for 2 to 3 days.

Variation: Use just a cup parsley and replace the oregano and thyme with a cup minced fresh cilantro leaves. Use chopped toasted walnuts in place of the pine nuts. For a mildly spicy version, remove the stem and seeds of a small serrano, mince it and fold it into the relish.

"Gremolata in its most traditional form is a mix of grated lemon zest, minced garlic and minced parsley. It is served sprinkled over osso buco and similar meat stews. This version uses preserved lemon instead of fresh lemon zest, which adds several layers of flavor. It is delicious sprinkled over soups, stews, grilled poultry, fish and meats and rice dishes."

Preserved Lemon Gremolata
Makes ½ cup
Use about 2 cups, loosely packed, Italian parsley leaves and small stems
5 or 6 preserved lemon wedges, peel only, minced
4 to 5 garlic cloves, crushed and minced

Use a sharp chef's knife to mince the parsley and transfer it to a medium bowl. Add the minced lemon peel and minced garlic, toss and transfer to a small serving bowl or glass jar. Use within a day or two.

Variation: Add ½ to 1 teaspoon red pepper flakes

Other Recipes:


Friday, February 17, 2012

Making Duxelles, Essence of Mushrooms

Duxelles is a finely chopped (minced) mixture of mushrooms, sautéed in butter and reduced to a paste. A bit of duxelles can be used in almost any dish, from an omelette to Beef Wellington... any place a bit of concentrated earthy mushroom flavor will add punch to the recipe.

Some folks add onions, shallots, and/or herbs when making duxelles. Since mine are to be frozen in cubes to add a mushroom flavor to some future dishes, I opted for James Beards' recipe that is just mushrooms and butter. That gives me the option to always add shallots and various herbs to whatever recipe I am making.

Since fresh mushrooms are not commonly available in my local markets, I tend to buy mushrooms whenever I'm out of town... and usually with no recipe planned in mind. As a result, I often waste part of the fresh mushrooms because I didn't get around to using them all before they got slimy. Occasionally I have canned a few fresh mushrooms, which by the way make great mushroom soup, but that's a LOT of work if you have only a few mushrooms!

However, turning fresh mushrooms into duxelles that I can freeze in cubes will give me lots of that wonderful concentrated mushroom taste to add to recipes. Frankly, I'm told they lose a tad of their punch in freezing, but they will also last for 2-3 weeks just refrigerated. I'm choosing possibly less than perfect mushroom taste over NO mushroom taste!

Since all the prep (chopping to a mince) for duxelles is a LOT of work, I bought 4 pounds of baby bellas to make a big enough batch that may last me several months.

Here's the recipe I used, followed by some of my photos of making duxelles. I've had the recipe for years and unfortunately, I don't have the recipe source...

Chop Away for Lovely "DUXELLES" by James Beard

I'm often surprised to find how few of my students are familiar with duxelles. It is one of the simplest and most versatile mixtures that you can have on hand in the refrigerator.

Despite the exotic name, which is derived from that of the Marquis d'Uxelles, whose chef invented the special way of cooking mushrooms. It is idiotically easy to prepare, provided you don't mind expending a little energy in chopping. Duxelles is nothing more than finely chopped mushrooms cooked down slowly in butter until they become a dense, dark mass, almost a paste, marvelous for adding concentrated flavor to any- thing from soups to stews to sauces and stuffing.

To make a reasonable amount worth the effort of all that chopping, buy two to three pounds of mushrooms. They don't have to be large, perfect, spanking white caps. They can be small, varied in size and a bit discolored. The taste is what matters, not the appearance, so you can buy those slightly overage mushrooms that are often reduced for quick sale in supermarkets.

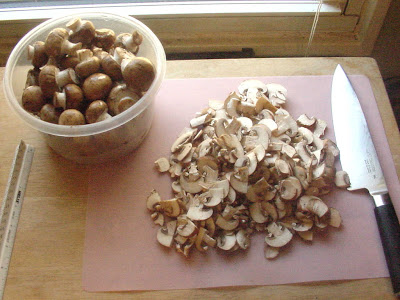
Pick the mushrooms over, wiping off any dirt or bits of straw with a damp paper towel, then put them on a board and slice them, stems and all. (The slices need not be even; this is just so they are easier to chop.) I like to use a large heavy-bladed French chopping knife or a Chinese clever, because the chopping goes faster with a big blade. I don't recommend chopping them in a food processor -- they get too mushy.

Chop the slices by hand until the pieces are fairly fine, then put them in a sturdy dish towel, a piece of muslin or several thicknesses of cheesecloth, pull up the corners and twist the fabric into a bag so the mushrooms are pushed into a tight ball.  Then twist and squeeze as hard as you can with your hands to make them yield up a goodly amount of their liquid. It takes a good deal of force to extract as much liquid as possible, but keep on squeezing over a bowl until they seem comparatively dry.

Save the liquid for vegetable soup, a brown sauce or a stew that would be enhanced by a slight mushroom flavor. The point of this squeezing is that the mushrooms will cook down faster if there isn't a lot of excess liquid to evaporate.

Now melt one stick (a quarter-pound) of unsalted butter in a heavy 7- or 9-inch iron or stainless steel skillet over medium-low heat, open the cloth and tip in the mushrooms. Stir the mass with a wooden spoon to break it down and distribute it over the pan.

As they cook down, the remaining liquid will evaporate and the color will become very dark, almost black. This may take 30 minutes or more, and it is a process that you can't hurry.  When you have a thick, reduced mass that holds together, season to taste. Usually I don't add salt, only about eight to ten grinds of pepper, because it is my feeling that duxelles should be salted only as needed when it is added to a dish.

Transfer the duxelles to a crock or bowl and cool -- take a taste and you'll marvel at the intensity of that rich, buttery mushroom flavor -- and then cover with plastic wrap and store in the refrigerator. Duxelles will keep for 10 days to two weeks under refrigeration.  It can be frozen, of course, but to my mind it loses something in the process.  However, better to freeze than leave to spoil, so use your judgment as to how quickly you'll use it up.

This glorious mixture has infinite uses. You can add it to soups, sauces, scrambled eggs; use it as a filling for omelettes and crepes; mix it in stuffings; swirl it into mashed rutabagas, turnips, celery root , potatoes or winter squash; combine it with peas; or spread it on toast, heat and serve as an hors d'oeuvre. The taste is so fantastic, the very essence of mushroom, that you'll find yourself dreaming up more and more possibilities.

There are different flavor variations for duxelles. You can add six or seven finely chopped shallots to the butter just before putting in the mushrooms, mix the two well and let them cook down. Or put six or eight peeled whole shallots or three or four unpeeled garlic cloves in with the mushrooms after they have started to cook, stir them around and remove them after the duxelles is cooked, which gives a slightly less assertive, but pleasant flavor.

One of my favorite ways to use duxelles is as the base for a quick, rich sauce for eggs, vegetables, poached fish filets or poached chicken. Combine one-half to one cup duxelles and one-half cup or more heavy cream in a saucepan and heat, stirring until it just reaches the boiling point. If you like, add about two tablespoons Madeira or a tablespoon of Cognac and heat until the spirit evaporates, leaving only the flavor.

So don't be put off by the name. Once you've made duxelles and discovered how great a flavoring it can be, you'll wonder how you ever cooked without it

Okay, here are my photos...

Slicing mushrooms

I discovered I could only mince a small portion at a time... I'm a messy chopper!


Mr. Beard says to squeeze out excess mushroom liquid. I failed with the first pound.

First pound cooked to almost nothing!

For the second batch (3 pounds), I chose to mince the mushrooms in my mini-chopper even though Mr. Beard says it produces a less than perfect texture. First, mincing a pile of mushrooms is a LOT of work, and secondly... when they are cooked into almost a paste, who can tell??
Second Batch (2 pounds) from the mini-chopper
I did a bit better on squeezing the second batch... probably got almost 3/4 cup of liquid, but they still gave off a lot more once in the heated pan. It takes a tremendous of upper arm/hand strength to squeeze the moisture out... I should have invited a weight-lifter! (Not getting the mushrooms dry enough just means more time cooking to release all the moisture before it cooks down into a paste.)

Cooking Down Duxelles

Here's the most amazing thing about this process... the first batch cooked and cooked and cooked (because they were so wet)... and finally all of a sudden the room was filled with the most amazing, potent mushroom smell... minutes before they were ready!! The second batch (and larger, 3 pounds) is cooking now as I'm writing this, but I expect I will know just by the smell when they are almost ready.

Mushroom Juice, and Duxelles from 4 pounds of mushrooms

I filled ice cube trays with the cooled duxelles (and also some of the squeezed-out mushroom juice, lower left) and froze them. I'll bag and vacuum seal 2-3 cubes together for the freezer. 11 cubes doesn't look like much for 4 pounds of mushrooms, but it's concentrated goodness, ready for some future meals! YUM!!

Note: For best mushroom results, please purchase only mushrooms with tightly-closed gills (the underside of the cap) which show freshness; if the gills are open, they are well past their prime. Store them in a brown paper bag in the crisper for best keeping.

Thursday, January 26, 2012

Parsnip Snips and Chips


I had a few parsnips in the pantry... and most went into a pot roast with some dried porcini mushrooms, potatoes, carrots, shallots and onions. Then I had a brainstorm with the 2 that were left... parsnip chips! I have to say I was amazed at how good they are!!!

For the first trial batch, I peeled the parsnips, and then sliced slivers off with the potato peeler, down as close to the core as I could get. For the second trial batch, I peeled, then quartered, the parsnips... and removed the pithy core. Then I sliced them as thin as I could with my chef's knife, around 1/8 inch thick.


I heated home-rendered tallow in a cast iron skillet, and dropped in a few strips. Cooked until lightly browned, removed, drained... and lightly salted.  The potato-peeler slices cooked before I could get my camera ready and focused, but the thicker slices took a couple of minutes, so I at least have one photo!

The thicker sliced chips are absolutely wonderful (and easier to prepare), with just a hint of the natural sweetness of parsnips. The fried slivers taste just like most chips... okay (mainly bland and salty) but not outstanding! Next time, I'll fry up a whole bagful of parsnips. YUM!!

Note: The thicker chips are best eaten (just like french fries) while they are still warm!

The Nutritional Data site I use doesn't have a listing for fried parsnips, but here's the skinny on 100 grams of raw parsnips:

glycemic load 5; inflamation, mildly inflammatory -12
high in Vitamin C, Vitamin K, Folate (B9, used in our DNA), Vitamin E, magnesium, potassium and manganese
However, the Omega 3:6 ratio isn't so good... but not as bad as many products:
Total Omega-3 fatty acids 3 mg
Total Omega-6 fatty acids 41


glycemic load 8; inflamation, mildly inflammatory -46
High in Vitamin C, moderate B6 and potassium
However, the Omega 3:6 ratio is better than parsnips:
Total Omega-3 fatty acids 10 mg
Total Omega-6 fatty acids 32

For myself, I'll take the trade-off of more vitamins, less glycemic load and less inflamation over the Omega 3:6 ratio since my diet is higher than most in Omega 3 due to all the grass-fed meats, butter and eggs I eat.

Sunday, January 8, 2012

Chicken, Feta and Spinach Sausage


I've had in mind for a while now to make some chicken, feta and spinach sausage and finally made the time. They could have been stuffed into casings, but I opted for patties since I don't like the casings I ordered.


I boned the thighs and legs from 4 free-range birds and ran the meat, fat (there wasn't much) and some of the skin through the grinder. I ended up with just over 2.5 pounds.


To the ground chicken I added a half pound of fresh spinach very lightly steamed, then squeezed almost dry, and chopped. Frozen chopped spinach would have worked also, as long as it was squeezed of most of the liquid.


Then a couple of garlic cloves finely minced, some tarragon, salt, freshly ground black pepper, and about a quarter-cup of homemade goat feta, crumbled.


Mix it all together, put some parchment paper squares on the scale, and weigh out patties. I chose quarter-pound patties because I don't eat a lot of food at any one meal.


They look pretty well mixed. My feta was a tad salty from the refrigerated brine so I hope the added salt (reduced amount) and pepper distributed evenly. I should have fried a test patty for seasonings but I'd just had lunch.


Patties on a baking sheet, ready for a quick freeze. I did end up with one small patty but I'll use that one along with a full patty sometime when I'm especially hungry. 

Once frozen, I'll vac-pak them in serving size bags. It will be a nice addition to variety of my main meals. I hope I don't regret not adding more feta, or that I ground up some of the skin with the meat!!

I also hope they hold together when cooking. In retrospect, I should have made and added a panade, or added a couple of egg whites as I do with one of my venison sausage recipes.


Friday, December 2, 2011

Traditional French Onion Soup

Michael Ruhlman posted this Traditional French Onion Soup over on his blog recently. It is made without a beef stock base, and I wanted to try it for a weekend party because we had a vegetarian in our group. Let me tell you, it is a great tasting soup! I liked it better than the typical French Onion Soup made with canned beef broth... but to be fair, I've never tried the stock version with homemade beef stock.


I made a double batch to take to my pre-Thanksgiving vacation weekend with friends. The pot of onions shown above is just the start of one batch, about 5 pounds of Vidalia onions in the pot, which is what I had on hand, rather than Spanish onions the recipe calls for. Vidalia onions are sufficiently sweet for this soup, although not always available all year long.


The onions cook down slowly in a bit of butter. Here's what they look like (above) after 6½ hours at a low simmer.

The next step is to slice and toast some baguettes or french bread, and grate half a pound or more of Emmanthaler or Gruyére cheese. Set the toasted bread rounds and cheese aside, and preheat the broiler.

To the pot of onions, add the water and sherry, bring up to high heat, and adjust seasonings to taste. Fill oven-proof soup bowls with soup, float the baguette slices on top, cover with a generous amount of grated cheese and stick under the broiler to melt and lightly brown the cheese.


In all our dinner hubbub, no one took photos if the individual bowls as they came out of the oven, but the photo on Ruhlman's blog is great.

Serve immediately. YUM!

Sunday, November 20, 2011

Mmmmm, good! Bacon Jam!

For several years I've been reading about Bacon Jam all over a slew of blogs, and I finally decided to make some to see what all the fuss was about. Well, let me tell you it's one of the tastiest things I've had in years!!!

My kitchen had the most enticing smells coming from it for several hours as I was making this recipe, and it will surpass anything you can buy in a jar. YUM!


I tripled the recipe, using 3 pounds of thick-sliced applewood smoked but uncured bacon, cut into 1" pieces and fried until just curling at the edges. You want them still soft in the middle. Remove the bacon and drain.


Then leave just a tablespoon (or 3 tablespoons since I tripled the recipe) of bacon fat in the pan, add the brown sugar and sliced onions. Cook over low heat until the onions are slightly caramelized.


Add the spices, cook for about 5 minutes, then add the liquid ingredients and the bacon. Cook at a low simmer for a couple of hours, until somewhat thickened. Cool it enough to handle and then run the cooked "stew" through a food processor until it is the consistency you like. After 2.5 hours, mine was still on the thinish side, so after I processed it to a jam consistency, I added a half a tablespoon of Knox gelatin dissolved in a bit of water... then heated it up for the gelatin to "set" before putting it in jars to refrigerate.


I suppose you could can it in a pressure canner, but frankly I think it will be eaten in short order so I just refrigerated it.

Here is the basic recipe I used; the only changes were to add some finely chopped crystalized ginger, and to reduce the hot sauce and chile powders a bit. It still has a 'bite' but not an eye-burning bite. Oh, since I was tripling the recipe, I cut down on the apple cider vinegar, starting with ¼ cup and then adding more to taste as it cooked down. (You can always add more but you cannot take it out once it's added.) I ended up with a nice sweet/sour balance.

Ingredients
1 pound thick-cut applewood smoked bacon, cut into 1-inch pieces
1 large sweet onion, cut into 1/4-inch thick slices
3 tablespoons light brown sugar
3 cloves garlic, minced
¼ teaspoon allspice
¼ teaspoon cinnamon
Pinch fresh grated nutmeg
Pinch ground cloves
½ teaspoon dry chipotle powder [I used ancho which isn't as hot but it's what I had]
¼ teaspoon smoked paprika
½ cup strong brewed coffee
¼ cup apple cider vinegar
½ cup good quality bourbon
¼ cup maple syrup
1 tablespoon hot sauce

Recipe Steps
In a Dutch oven or large skillet cook the bacon over medium high heat until it begins to crisp up at the edges - the pieces should still be soft in the center. Drain on paper towels and retain one tablespoon of bacon grease in the pan.

Lower the heat to medium low and cook the onion and brown sugar until soft and caramelized (20 minutes or more).

Add the garlic and spices and cook for 5 more minutes.

Add the liquid ingredients and the bacon to the pan. At medium heat, bring to a boil, then reduce the heat to low and barely simmer for about 2 hours. Check every 30 minutes to make sure that the mixture does not dry out. If it does, just add a few tablespoons water. The final mixture should be moist and sticky.

Let cool slightly and add to the bowl of a food processor and pulse until it reaches the consistency you like - slightly chunky to showcase the bacon or smoother.

Make 1½ cups.
Recipe source: kayb @ eGullet


ps, this is my second attempt. The first time I used a Smithfield hickory smoked, thick-cut bacon without cooking a piece of the bacon first to check the taste. It was terrible tasting, and I should have known better. What a waste of money and ingredients! Usually I make my own bacon, but sometimes I'll buy bacon at a natural foods store if I don't have access to fresh pork belly to make my own bacon.

pps... I'll be out of pocket and able to approve comments until the morning of Nov. 21

Tuesday, November 15, 2011

Cushaw for the Best Pumpkin Pies!

Cushaw is a variety of winter squash that makes the very best pumpkin pies! (In fact the canned pumpkin in the grocery stores is either just cushaw, or a mix of various winter squash including cushaw.) Note: I wrote about cushaw last year here, too.

I don't grow my own cushaw anymore, even though they keep very well over the winter in a cool, dry space like a root cellar. Mainly I don't grow them because they are too big for one person to eat, unless I am processing pumpkin for holiday recipes. However, I just picked up a couple of 10-12 pound cushaws at the farmer's market last Saturday for only $3 each. I got over 10+ cups of purée out of just one cushaw, the equivalent of 5 or more jumbo cans of pumpkin ($2.99 here) from the supermarket.


I cut them in half, removed the strings and seeds from the cavity, and roasted them cut-side down in a 350ºF oven for about an hour and a half, until the thick neck pierced easily with a fork. (I lightly oiled the baking pan, and added enough water to a depth of almost half an inch... once the pan was in the oven.)


After the baked squash was cool enough to peel, I cubed it and ran it through a food mill. In retrospect, I could have skipped this step as these squash were not stringy at all.


Once puréed, I set some aside (in 2 cup amounts) to freeze for pies, or maybe some Pumpkin Pull-Apart Bread.


The rest of the first cushaw I roasted went into the crockpot to spice up and cook down for some Cushaw Butter. Even though I put it in canning jars, I did NOT can it. The USDA now strongly recommends against even pressure canning something extra-thick like pear or pumpkin butter because the heat may not penetrate to the center to guarantee safety.

I used local raw honey as the sweetener, and since honey is antimicrobial, it should keep in the refrigerator for several weeks. (Most of mine will be given away over the next few days.)


While I was roasting the squash, I removed all the good seeds from the stringy innards, discarded the flat immature seeds, and rinsed them well to remove any remaining flesh. Then I soaked the seeds several hours in salted water, getting them ready to roast as snack foods. (Soaking the seeds helps assure the nutmeat inside the shell gets a little salt.)

I dry the seeds after soaking... so the surface is dry enough to coat with olive oil. Lightly oil a cookie sheet, toss the seeds to coat evenly, add some sea salt, and roast in a 325ºF oven until toasted (about 25 minutes, depends on the oven) checking and stirring often after 10 minutes. 


You can add a variety of herbs or spices to the seeds before roasting. Try some ground chili pepper or ground smoked pepper if you like them spicy, or some garden herbs like sage and thyme... or some cinnamon and brown sugar for someone with a sweet tooth. Experiment and be creative!

Roasted pumpkin seeds will keep a couple of weeks stored in an airtight container. Be sure to smell any seeds or nuts before eating those you store, as the oils can go rancid quickly.

All together, my $6 spent on cushaws gave me 12 cups of purée to freeze (will make 6 generous pies or other desserts like pumpkin custard or pumpkin bread), 10 pints of pumpkin butter, and a bowl full of toasted pumpkin seeds. How's that for stretching food dollars? Plus, I know exactly what is in my pumpkin products... no chemical additives, just real food made with love.