Monday, February 28, 2011

Two Cured Steelhead or Salmon Recipes


These recipes are for cured salmon, and actually I don't have salmon, but a close relative, the steelhead trout. The recipes will work equally well for it. Both are easy to "cure" in the refrigerator in 2-3 days, offering up some lovely alternative taste treats during the dreary winter. Think gravlax, or Nova Scotia; bagels, lox and cream cheese; antipasto/canapes for a party, or just thin-sliced salmon with cream cheese on a good pumpernickel bread sandwich.

The first recipe is fennel-cured, and the second one is a citrus cure. My fish weighed just about two pounds so I divided it into 2 pieces of 1 pound each, because I want to try both cures.

Warning: If the fish happens to be wild caught, there is a possibility it could carry a parasite. I have read that freezing for 3 weeks in a home freezer will kill the parasite, but some chefs and seafood purveyors say only a commercial freezer that chills to -40ºF is cold enough to kill the parasites. If you are wary, use a farmed salmon or steelhead trout, which do not carry the parasite.


First, the fennel cure, adapted from Charcuterie: The Craft of Salting, Smoking, and Curing

1 pound salmon (or steelhead trout)
46 grams sugar
70 grams light brown sugar
65 grams kosher salt
1/8 cup Pernod (I could only find Ouzo at our state liquor store)
1 fennel bulb with ferns
25 grams toasted fennel seeds
1 tablespoon ground white pepper


Before toasting


This is twice the fennel seeds for the recipe, done before I decided to do half in a citrus cure

After toasting


Toast the fennel seeds in a hot skillet until fragrant and slightly browned.


Mix the sugars, salt and pepper together well. Put 1/3 down in the bottom of a dish.


Put the fillet skin side up on the mix and lightly pour half the Pernod over it. (not shown)


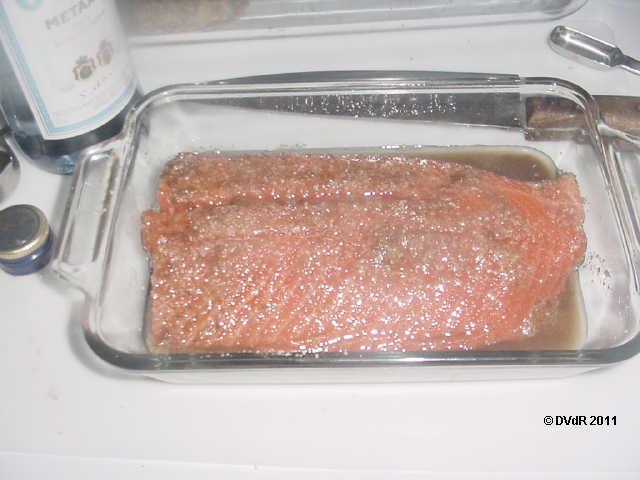
Turn the fillet flesh side up and pour the remaining Pernod over it. Add the remaining cure.


Slice the fennel bulb and the ferns, and place on top of the cure.


Sprinkle the fennel seeds on top of the fennel.


Cover with plastic wrap, and find a weight of several pounds that will fit inside the dish with the fish. Here I've used a loaf pan and a 6 pound brick wrapped in a clean plastic food bag.


Refrigerate. I turned them about twice a day to evenly distribute the cure. After 2 days (maybe 3 if the fish is thick), the fish should feel firm and you can rinse the cure off the fish in cold running water. Pat it dry, and you can slice it thinly to eat now, or freeze it for later. 


Here's the citrus cure for 1 pound of salmon or trout:
1 pound salmon or steelhead trout
1/2 cup sugar (use brown sugar for a deeper flavored taste)
3.5 oz. kosher salt
zest of one orange
zest of one lemon


Pretty simple! Mix all the ingredients together, add them to a baggie along with the fish (or wrap them in 2-3 layers of plastic wrap and put in a bowl to catch the juices), and refrigerate under some weight. Turn them about twice a day to evenly distribute the cure. After 2 days (maybe 3 if the fish is thick), the fish should feel firm and you can rinse the cure off the fish in cold running water. Pat it dry, and now you can slice it thinly to eat, or freeze it for later.


Here's the piece cured with fennel, after the cure was rinsed off. I put all the pieces in the freezer for a day or two, partly because I'm busy with other projects.


I sliced a bit this morning, and the taste isn't as strong after soaking 2-3 hours, and freezing for a couple of days. There is, however, a faint "fishy" smell, which means it wasn't really fresh when I bought it. One of the problems with not having a fishmonger in my small town is that I cannot ask to smell a fish before purchasing it. Supermarkets do not take kindly to me poking a finger through the plastic-wrap to get a whiff!

I'm prepping the cold smoker now, to give it all a light smoke. I think I will make a smoked fish spread/dip with some of it, and some smoked trout rillettes.


Here's the fish after cold-smiking in maple and apple wood for 8 hours.

Saturday, February 26, 2011

Uses for Whey

There are many things you can do with leftover whey (even the small amount of whey that accumulates in a container of yogurt) other than to just make whey ricotta. That liquid (whey) is chock full of nutrients like proteins, vitamins and minerals, and has far more sustainable uses than just dumping down the drain.

Whey falls into 2 classes: sweet whey, and acid whey, and both have many uses. Sweet whey is the whey drained off a cheese process that uses a bacterial culture, such as hard cheese (like cheddar, and many soft cheese types). However, if you have added vinegar, citric acid or lemon juice to the milk (as in making mozzarella, or whole milk ricotta) the whey is already very acidic, hence makes acid whey.

Sweet whey contains active bacterial cultures and is great to add to a jar of fresh chopped vegetables to ferment, like sauerkraut or pickles (lacto-fermentation). You can use it as a substitute in any recipe that calls for buttermilk, or to replace the liquid in a bread recipe. In addition to live bacterial cultures, sweet whey is full of vitamins and minerals, and makes a healthy addition to soups, or beverages like smoothies. A common use in Italy is to use the sweet whey to make traditional ricotta, which is different than a whole-milk ricotta. There are other whey-based cheeses, too; consult a cheese book like Home Cheese Making by Rikki Carroll, or The Cheesemaker's Manual by Margaret P. Morris if you can find a copy.

Acid whey is good to feed acid-loving plants in the garden; I use it on my blueberry bushes where there is a constant battle to keep the pH low enough for the blueberries to survive.  You can add to the soaking water for beans and grains to reduce phytates (as long as it is rinsed away the next morning). It is not good for making whey ricotta.

Both sweet whey and acid whey may be fed to farm animals, or the household dog and cat.  My cats don't much care for the acid whey, but my sister's dog does. Sweet whey can be used for all the same things as acid whey, but not the reverse.

Thursday, February 24, 2011

Ricotta from Whey

I saved the whey from the fromage blanc I made, and decided to make ricotta since I don't have a pig to feed it to! Actually, I seldom use ricotta (probably because I don't know how), but I hate to waste anything... and ricotta can be frozen. Not all whey from cheesemaking is suitable for making ricotta... there is acid whey and sweet whey. If you have used an acid-base like lemons or vinegar to make mozzarella or Whole Milk Ricotta, it will not work for this whey ricotta.

However, if you have used a bacterial culture to make cheese, it should work fine, depending on the pH when you removed the curds. I'll do a post soon on the many uses of whey.

Here's what happens in this process: Once the curds have been removed from the whey, a lot of inoculated bacteria remain in the whey. If allowed to ferment for 12-24 hours, the remaining sugars are converted to lactic acid, lowering the pH of the whey and reducing the solubility of the proteins. Then when you heat it, the proteins become denatured, which causes them to precipitate out as a fine, small-grained curd, which can be filtered out.

Let the whey sit 12-24 hours to develop enough acidity to make ricotta. 


The next morning, heat the whey, stirring frequently, to near boiling... about 203ºF. It will develop somewhat of a foam on the surface. I chose to use my slow cooker because it heats (on high) to just about 208ºF, and I didn't have to watch it, other than stirring occasionally.


Cover, and remove from the heat. DO NOT STIR. As it cools, it will develop sort of 'cloud' looking clumps in the whey, and the whey will take on a clear, yellowish-green hue. (The riboflavin in the whey gives it that color.) Let it set undisturbed until cool to the touch.

Once cool, set up a strainer or colander lined with fine cheesecloth, butter muslin, or a non-terry tea towel over a large pot or bowl to catch the liquid. 

Residue in pot shows small curd size

Carefully pour the small curds and whey into the cheesecloth and allow to drain. Because the small curds are so fine, it may take several hours to drain.


Once a lot of the liquid has drained off, you may pull together the corners of the cheesecloth and hang the "bag" over a sink or container to catch the remaining liquid. This may take several hours, or even overnight. If your room is warm, you might want to do this in the refrigerator. As you can see in the photo above, the leftover whey from my initial half-gallon of milk used to make the fromage blanc didn't make much ricotta... but I didn't waste the nutrients, either! (Mine is still hanging and draining 2 hours later; from the looks of the diminished size of the bag, I'd bet that there is not much more than ¼ cup of ricotta. Not much to show, but a good learning experience for almost no effort except hanging the bag.)

Will I do it again? Yes, but not with the scant amount of leftover whey from making Fromage Blanc, and probably not with any half-gallon batch. I've just started a 1 gallon batch of feta and will probably try the whey from it, just for giggles.


The remaining whey after making whey ricotta has very little protein in it, but still may be fed to a pig or chickens. I put mine on the garden; the microbes love it!


After the whey has stopped dripping out, put the ricotta in a bowl and add some fine-grained salt, to taste. It won't take much, maybe less than ¼ teaspoon for the whey from 1 gallon of milk. You could also add herbs now, depending on how you will use the ricotta.

Note: many recipes call for the addition of some cream, or whole milk, to the whey before heating. What many cheesemaking folks suggest is that the addition may make it creamier, but also more grainy. Since I have no frame of reference, I opted for the more traditional, old-school method, without any milk addition.

Update: While this post was sitting in the queue, I did make the gallon batch of feta, and tried again for some whey ricotta. It is draining as I'm writing this, and I think there will be more than a cup when it is finished. Since this batch apparently contained more milk proteins, it looked very much like egg drop soup as it cooled and I ladled off the clear whey on top.

Tuesday, February 22, 2011

Another (Better) Feta


Now that I'm getting a better handle on some basics of cheese-making, I thought I'd try another feta, this time with proper rennet and cow's milk. (Most of the feta sold in the US is made from cow milk rather than the traditional sheep or goat milk.)

I only had a gallon left of fresh, local whole milk so that's what I'm using. I also made a batch of mesophilic starter culture, now frozen in cubes. The shelf life in the freezer is fairly short, maybe a month or two... but it's easy and cheap to make.


First, the mesophilic starter culture: Put 2 cups of fresh store-bought cultured buttermilk in a bowl and allow to come to room temperature. After that, it needs 6-8 hours, or maybe even overnight depending on room temperature, for it to ripen enough to be a starter culture. It will thicken, like yogurt, as it ripens. (I left mine overnight.) Then carefully pour it into ice cube trays and freeze. 


Depending on the size of your ice cube trays, the cubes may run from under an ounce, to trays like mine shown above, where the cubes weighed almost 3 ounces. The small chunk in one corner is what remained after cutting off 2 ounces for this recipe.

When the cubes are frozen, put them in a well-marked container or zip-lock baggie and store in the freezer. Later I'll post about making your own thermophilic culture, which is also frozen in cubes... and they will look alike... so mark them carefully.

Back to making the feta: slowly warm a gallon of whole milk to 85ºF. Add 2 ounces of mesophilic starter culture and stir it in well. Cover, and allow to ripen for 2 hours.

A few minutes before the 2 hours is up, crush ¼ rennet tablet in a small bowl and mix with 3-4 tablespoons of distilled water. When it is fully dissolved and the time is up, slowly pour the rennet into the milk, stirring constantly with a whisk for at least 5 minutes. Cover and allow to set for 1-2 hours until a firm curd is set and a clean break is achieved.

Clean Break

Once the curds are set and a clean break is achieved, cut the curds into ½ inch cubes and allow them to set for about 10-15 minutes to set-up. 

After 1st cutting of curds

Then gently stir the cubes and cut any that are larger than ½ inch. Now allow the curds to set for another 30 minutes, stirring occasionally. (I'm getting to the part where I wish I had started this earlier in the day; my back is aching badly and I just want to be horizontal!)


This is half the curds


Line a colander or strainer with cheesecloth and drain the curds. After most of the whey has drained off, tie the corners of the cheesecloth and hang the "bag" to drain for 5 hours, or in my case, overnight. Leave the whey to ripen overnight too, and use it to make whey ricotta. (Hey, I have to try it at least once more!)


Make up a brine before the curds are fully drained so it is thoroughly chilled when the curds are ready. Put it in the freezer or refrigerator after it has cooled close to room temp so you don't add heat to the freezer/fridge.


Brine: ~⅞ cup Kosher salt to 2 quarts hot or boiling water. (Actually, 7 ounces of Kosher salt but I tried to estimate it in cups for those who don't have a good kitchen scale.)  This is a mild brine to use if you are going to keep the feta in the brine, which I am. If you want to only keep the feta in the brine for a few days, you might make a brine that's 10 oz. salt to 2 quarts water. I use distilled water because our town water is so hard (full of minerals).


I should have set my alarm to get up in the middle of the night when the curds had drained 5-6 hours... but I didn't. They were fine, but if I had done what I should, the 2 "balls" would have become one solid mass in the refrigerator. Once the curds are drained, put them in a covered container in the refrigerator for 1½ - 2 hours to chill. 


Then remove them and cut into slabs, then into smaller cubes. I left some in short slabs, and the rest in cubes. 


Put the feta in the ice-cold brine and place in the refrigerator for a minimum of 5 days to take on some salt, and as long as 30 days. The longer the feta is in the brine, the more crumbly the it will be, and the saltier. You can remove the feta after a few days and pat it dry to store in an air-tight refrigerated container but I find feta keeps better in the brine... or at least in some diluted brine.

The Feta weighed just over 1½  pounds, from 1 gallon of whole milk.

Important Update 3/8/2011
Please do not follow this recipe. It turns to mush after just a few days. I'm working to make a better Feta and will post when I do.

Sunday, February 20, 2011

Little Old Blue-haired Ladies Driving...

Photo by dlofink

I remember walking to a service station in the 1970's, and standing in line with my gasoline can to get enough gas to drive to work and home. During that gas shortage, the government reduced the national speed limits to 55 MPH to increase fuel economy. 

That was the first time I actually understood (and experienced) a lowered speed actually increased the mpg on my old Chevy. I could easily get 10+ more miles per gallon at a slower speed! Of course, when the speed limit went down, so did traffic accidents and deaths.

For most years after the 70's, I planned my sightseeing trips around the countryside so I could travel back roads, where I could drive at 45 mph and not be run over (or off the road!). That allowed me to travel farther on the same tank of gas, AND it allowed me to see more of the wayside and smell the flowers.

Today I live 3 miles off an interstate, where the speed limit has just increased from 65 mph to 70 mph... and if I happen to travel on it, everyone runs by me going even faster than the speed limit. I still drive the back roads whenever I can, even on long trips where I have to stay overnight somewhere. Does an extra half hour of driving time on a long trip make much difference? Or an extra 10 minutes to get to the next town?

The speed limit on all the roads in my county is 25 mph unless posted otherwise. That means the road in front of my house is limited to 25 mph, yet everyone barrels down the road like there was a fire; several pets have been killed on my block just in the 5 years I have lived here. Only once have I seen a patrol car, and he was going to arrest someone for a bad check.

How can people complain about the horrific gas prices, and do nothing to drive more economically? AND, why hasn't the government stepped in (again) and reduced at least the highway speed limits? Why doesn't my county enforce the rural speed limits, which would increase the county coffers for a while at least?

I do know that states get their highway (interstate) maintenance money based on the number of speeding tickets they write. Not enough tickets = no fed highway money. But is there something else going on?

This whole speed limit thing is baffling to me... but if you get behind my 20 year old truck on a back road, I will be the little old blue-haired lady driving at just speed limit.

Saturday, February 19, 2011

Waxing my Cheese

The first Hard Rind Cheese I attempted has been drying in the refrigerator, with a change of clean and dry cheesecloth everyday. Finally it has quit "weeping" excess moisture and is ready to be waxed and put on the shelf out in the root cellar to age.

I have a beautiful double boiler a good friend in Ohio sent me, still new in the box. However, it is aluminum and I don't like to use aluminum as cookware, but it is perfect to melt other things. I bought some paraffin last summer to wax the metal lids on jars of dry goods stored in the root cellar to inhibit rust in that high-humidity environment. And, since I still had some paraffin in it, I heated it again to use on this small cheese wheel.


I had to set the double boiler on the oven door so I could see into the pot and show a picture! I dipped the small wheel several times, rotating to get good coverage. (The paraffin doesn't show against the cheese since they are close in color.) I suppose it has about 7-8 layers. Paraffin is generally too brittle to use as a cheese wax, but it's what I had on hand and will suffice until I can order some cheese wax.


It's now ready to make the journey to a shelf in the root cellar to age for several months. The humidity in there is not quite high enough for cheese; it stays around 75-80% RH, which is great for curing meat, but cheese needs 90-95% RH. So until I get the wine cooler I was promised for use as a cheese cave, I will set the wheel over a pan of salted water.

I know there must be field mice in the building since it is still winter. I'm thinking to line my small live animal trap (Havahart) with metal window screen to enclose the cheese, just in case. Those buggers can get through the tiniest openings! It's a tedious chore to line the cage, but I'm stumped for an alternative and not willing to risk the cheese!


Update: My oldtimer-neighbor Buster says ¼" hardware cloth (aka rabbit wire) will keep the mice out. That's certainly easier to fasten to the trap than window screening. In fact, I actually had some, so I wrapped the trap with it. Now it's ready to put in the root cellar... and cross my fingers that there are no tiny (and hungry) mice living in there!

Friday, February 18, 2011

Curing Ham Hocks

Another on my "to-make" list that I can't seem to buy anymore with decent quality! I got the fresh hocks at Whole Foods in Winston-Salem on a recent trip through there. That particular WF carries pastured pork and grass-fed beef. The fresh hocks weighed 1¾ pounds and cost me $1.85.


Here's the hocks that I vacuum-packed for the freezer. They are thawed in this photo because I was preparing to put them in a brine cure.


Brine, based on weight of the hocks:
Meat                795 g
Salt                   35 g
Sugar                25 g
Water              330 g
Cure #1          2.5-3 g


Here they are in the brine, day one. They were kept refrigerated, and I turned them over in the brine every day for 10 days.


Here they are, finally in the cold smoker, with a piece of tongue that has a pastrami coating. I'm using sugar maple sawdust in my CSG (cold smoke generator).

Next Day:
They were smoked about 8 hours in sugar maple smoke, refrigerated overnight, and smoked another 8 hours today in apple smoke.


This is what the "cold smoke generator" aka ProQ CSG looks like while generating cold smoke. It has been burning (smoking) about 2 hours in the photo above, and you can see how much of the apple sawdust has burned. You can also see a bit of the light smoke; it would be thicker smoke if the cardboard box wasn't uncovered (and the meat rack removed) for the photo.


Here they are, along with some cured, herbed salt pork in their second 8 hour cold smoke. When they finish tonight, they will go in a baggie and be refrigerated for several to allow the smoke flavor to equalize. Then each one will be individually vacuum-packed and frozen until I want to use one. 


Another option is to roast them at 200ºF until they reach an internal temp of 150ºF before freezing, so they are technically already partially cooked when adding to a pot of beans or greens. I did that with these just to see what difference it makes in a cooked dish, if any, and later I will cure another batch, but unsmoked, for comparison.


YUM!!


Thursday, February 17, 2011

Blog Snapshot


The number and locations of visitors to my blog is amazing, and growing. There is more than a ten-fold increase over a year ago, which is really awesome considering that there are 126 million blogs as of January, 2010.

The snapshot above is just a moment in time showing where my visitors were when they logged on... the internet surely has shrunk our world and increased our communications!

Wednesday, February 16, 2011

Making My Own Bacon!

Can you say "YUM"??

I finally located a piece of pork belly to make my own bacon. I wanted a larger slab, but this piece at just over 2 pounds, was all I could find. I found it in an Asian grocery store about 50 miles away, and it is also local (to them) pastured pork. 

Two of my local meat suppliers generally have pork belly when they butcher, but they were sold out. Besides, they want far too much money, $9 pound vs $2.99 at the Asian market.


I mixed up a standard cure per Ruhlman's book, Charcuterie, which is based on the weight of the meat. (The cure is a mix of Kosher salt, raw sugar and Cure #1.)


I coated the belly thoroughly with the cure and sealed it in a vacuum bag (but not under a vacuum) before refrigerating. Every day for 8 days I turned the bag, massaging the cure into the belly. It seems pretty firm now at 8 days, so I'm calling it 'cured'.


Here's the bacon after the cure. I rinsed it well, and allowed it to air dry until a shiny, slightly tacky skin (pellicle) formed on the surface. The pellicle serves several functions: it provides an ideal surface for the smoke flavor to adhere, it helps seal in the remaining moisture through the smoking process, and it prevents the fats from rising to the surface and spoiling. 

I had planned to cold smoke it today, but this current winter storm is bringing us some fierce winds which would interfere with smoking. I'll refrigerate it for another day or two. 


Update:
I fired up the cold smoke generator this morning, using some apple sawdust in it.


Fired it up, and put it under the grill with the meats. If you look closely, the dark spot near the bottom center is the sawdust beginning to smolder/smoke.


This is the first batch, my bacon and some salt pork I cured. You can see the smoke rising up around the meat already.


Closed the box with foil to contain as much smoke as possible, without containing much heat.


A temp probe inserted shows smoke temp is 91ºF.


After several hours and 2 full loads of apple sawdust in the CSG, I decided it was smoked enough. Then it went in the oven at the lowest setting, which is 180ºF on our oven, until the internal temp reached 150ºF.


After it cooled, I vacuum-packed it and put it in the refrigerator for a week or two so the smoke flavor can equalize throughout the slab. At that point I will slice it, vacuum-seal and freeze it in small meal-size portions. It looks and smells so yummy that it was all I could do not to cut off a chunk to taste!


Shown above: after letting the smoke flavor equalize. Close-up of the bacon is the photo at the top of this post. Can you say "YUM" ?? 

I'll never go back to store-bought bacon again! Besides, I just found another more local pastured pork farmer who will sell me a whole pork belly (~15-20 pounds) for $2.50/pound.