Showing posts with label Tutorial. Show all posts

Monday, February 27, 2012

Making Preserved Lemons with Kumquats

Yes, you can find posts on this all over the internet, but it's new to me. I DID try some kind of preserved lemons years ago, but they were in olive oil if I remember correctly. They spoiled, and now I never even put herbs or garlic in olive oil... too risky.

I finally found Meyer Lemons in the grocery store in the next town. The price was right (and cheaper than regular lemons!) so I bought 2 bags of juicy Meyer lemons. They also had kumquats, which grew wild in the neighborhood where I visited my grandfather, and I haven't had any in years. They went in the basket, too.

I shy away from buying foods with a lot of miles to get to me, but sometimes I just can't help myself!


I started out with the method I see a lot, which is quartering each lemon almost all the way through, and packing a tablespoon of non-iodized salt inside before putting them in the jar. Then I remembered this blog post, where he cuts the lemons all the way through, and adds a variety of spices (like star anise and black pepper) as well as salt. The neat thing he does is make use of the salty residue when all the lemons are used up, by dehydrating the salty liquid and crushing it in a mortar/pestle to use to flavor other dishes.

I mashed down the lemons a couple of times, and the next day I quartered them, added spices (cinnamon, star anise and peppercorns) and more salt. More occasional mashing, and now they are releasing more juice. Last, I added kumquats cut in half, and more salt. 


After another day or two, I put them in a smaller jar (didn't do it earlier as my masher wouldn't fit in the opening of a smaller jar), put a lid on, and I'll store them in a cool place for a month before using.

Friday, February 17, 2012

Making Duxelles, Essence of Mushrooms

Duxelles is a finely chopped (minced) mixture of mushrooms, sautéed in butter and reduced to a paste. A bit of duxelles can be used in almost any dish, from an omelette to Beef Wellington... any place a bit of concentrated earthy mushroom flavor will add punch to the recipe.

Some folks add onions, shallots, and/or herbs when making duxelles. Since mine are to be frozen in cubes to add a mushroom flavor to some future dishes, I opted for James Beards' recipe that is just mushrooms and butter. That gives me the option to always add shallots and various herbs to whatever recipe I am making.

Since fresh mushrooms are not commonly available in my local markets, I tend to buy mushrooms whenever I'm out of town... and usually with no recipe planned in mind. As a result, I often waste part of the fresh mushrooms because I didn't get around to using them all before they got slimy. Occasionally I have canned a few fresh mushrooms, which by the way make great mushroom soup, but that's a LOT of work if you have only a few mushrooms!

However, turning fresh mushrooms into duxelles that I can freeze in cubes will give me lots of that wonderful concentrated mushroom taste to add to recipes. Frankly, I'm told they lose a tad of their punch in freezing, but they will also last for 2-3 weeks just refrigerated. I'm choosing possibly less than perfect mushroom taste over NO mushroom taste!

Since all the prep (chopping to a mince) for duxelles is a LOT of work, I bought 4 pounds of baby bellas to make a big enough batch that may last me several months.

Here's the recipe I used, followed by some of my photos of making duxelles. I've had the recipe for years and unfortunately, I don't have the recipe source...

Chop Away for Lovely "DUXELLES" by James Beard

I'm often surprised to find how few of my students are familiar with duxelles. It is one of the simplest and most versatile mixtures that you can have on hand in the refrigerator.

Despite the exotic name, which is derived from that of the Marquis d'Uxelles, whose chef invented the special way of cooking mushrooms. It is idiotically easy to prepare, provided you don't mind expending a little energy in chopping. Duxelles is nothing more than finely chopped mushrooms cooked down slowly in butter until they become a dense, dark mass, almost a paste, marvelous for adding concentrated flavor to any- thing from soups to stews to sauces and stuffing.

To make a reasonable amount worth the effort of all that chopping, buy two to three pounds of mushrooms. They don't have to be large, perfect, spanking white caps. They can be small, varied in size and a bit discolored. The taste is what matters, not the appearance, so you can buy those slightly overage mushrooms that are often reduced for quick sale in supermarkets.

Pick the mushrooms over, wiping off any dirt or bits of straw with a damp paper towel, then put them on a board and slice them, stems and all. (The slices need not be even; this is just so they are easier to chop.) I like to use a large heavy-bladed French chopping knife or a Chinese clever, because the chopping goes faster with a big blade. I don't recommend chopping them in a food processor -- they get too mushy.

Chop the slices by hand until the pieces are fairly fine, then put them in a sturdy dish towel, a piece of muslin or several thicknesses of cheesecloth, pull up the corners and twist the fabric into a bag so the mushrooms are pushed into a tight ball.  Then twist and squeeze as hard as you can with your hands to make them yield up a goodly amount of their liquid. It takes a good deal of force to extract as much liquid as possible, but keep on squeezing over a bowl until they seem comparatively dry.

Save the liquid for vegetable soup, a brown sauce or a stew that would be enhanced by a slight mushroom flavor. The point of this squeezing is that the mushrooms will cook down faster if there isn't a lot of excess liquid to evaporate.

Now melt one stick (a quarter-pound) of unsalted butter in a heavy 7- or 9-inch iron or stainless steel skillet over medium-low heat, open the cloth and tip in the mushrooms. Stir the mass with a wooden spoon to break it down and distribute it over the pan.

As they cook down, the remaining liquid will evaporate and the color will become very dark, almost black. This may take 30 minutes or more, and it is a process that you can't hurry.  When you have a thick, reduced mass that holds together, season to taste. Usually I don't add salt, only about eight to ten grinds of pepper, because it is my feeling that duxelles should be salted only as needed when it is added to a dish.

Transfer the duxelles to a crock or bowl and cool -- take a taste and you'll marvel at the intensity of that rich, buttery mushroom flavor -- and then cover with plastic wrap and store in the refrigerator. Duxelles will keep for 10 days to two weeks under refrigeration.  It can be frozen, of course, but to my mind it loses something in the process.  However, better to freeze than leave to spoil, so use your judgment as to how quickly you'll use it up.

This glorious mixture has infinite uses. You can add it to soups, sauces, scrambled eggs; use it as a filling for omelettes and crepes; mix it in stuffings; swirl it into mashed rutabagas, turnips, celery root , potatoes or winter squash; combine it with peas; or spread it on toast, heat and serve as an hors d'oeuvre. The taste is so fantastic, the very essence of mushroom, that you'll find yourself dreaming up more and more possibilities.

There are different flavor variations for duxelles. You can add six or seven finely chopped shallots to the butter just before putting in the mushrooms, mix the two well and let them cook down. Or put six or eight peeled whole shallots or three or four unpeeled garlic cloves in with the mushrooms after they have started to cook, stir them around and remove them after the duxelles is cooked, which gives a slightly less assertive, but pleasant flavor.

One of my favorite ways to use duxelles is as the base for a quick, rich sauce for eggs, vegetables, poached fish filets or poached chicken. Combine one-half to one cup duxelles and one-half cup or more heavy cream in a saucepan and heat, stirring until it just reaches the boiling point. If you like, add about two tablespoons Madeira or a tablespoon of Cognac and heat until the spirit evaporates, leaving only the flavor.

So don't be put off by the name. Once you've made duxelles and discovered how great a flavoring it can be, you'll wonder how you ever cooked without it

Okay, here are my photos...

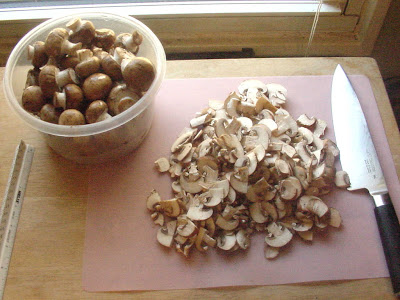
Slicing mushrooms

I discovered I could only mince a small portion at a time... I'm a messy chopper!


Mr. Beard says to squeeze out excess mushroom liquid. I failed with the first pound.

First pound cooked to almost nothing!

For the second batch (3 pounds), I chose to mince the mushrooms in my mini-chopper even though Mr. Beard says it produces a less than perfect texture. First, mincing a pile of mushrooms is a LOT of work, and secondly... when they are cooked into almost a paste, who can tell??
Second Batch (2 pounds) from the mini-chopper
I did a bit better on squeezing the second batch... probably got almost 3/4 cup of liquid, but they still gave off a lot more once in the heated pan. It takes a tremendous of upper arm/hand strength to squeeze the moisture out... I should have invited a weight-lifter! (Not getting the mushrooms dry enough just means more time cooking to release all the moisture before it cooks down into a paste.)

Cooking Down Duxelles

Here's the most amazing thing about this process... the first batch cooked and cooked and cooked (because they were so wet)... and finally all of a sudden the room was filled with the most amazing, potent mushroom smell... minutes before they were ready!! The second batch (and larger, 3 pounds) is cooking now as I'm writing this, but I expect I will know just by the smell when they are almost ready.

Mushroom Juice, and Duxelles from 4 pounds of mushrooms

I filled ice cube trays with the cooled duxelles (and also some of the squeezed-out mushroom juice, lower left) and froze them. I'll bag and vacuum seal 2-3 cubes together for the freezer. 11 cubes doesn't look like much for 4 pounds of mushrooms, but it's concentrated goodness, ready for some future meals! YUM!!

Note: For best mushroom results, please purchase only mushrooms with tightly-closed gills (the underside of the cap) which show freshness; if the gills are open, they are well past their prime. Store them in a brown paper bag in the crisper for best keeping.

Sunday, November 20, 2011

Mmmmm, good! Bacon Jam!

For several years I've been reading about Bacon Jam all over a slew of blogs, and I finally decided to make some to see what all the fuss was about. Well, let me tell you it's one of the tastiest things I've had in years!!!

My kitchen had the most enticing smells coming from it for several hours as I was making this recipe, and it will surpass anything you can buy in a jar. YUM!


I tripled the recipe, using 3 pounds of thick-sliced applewood smoked but uncured bacon, cut into 1" pieces and fried until just curling at the edges. You want them still soft in the middle. Remove the bacon and drain.


Then leave just a tablespoon (or 3 tablespoons since I tripled the recipe) of bacon fat in the pan, add the brown sugar and sliced onions. Cook over low heat until the onions are slightly caramelized.


Add the spices, cook for about 5 minutes, then add the liquid ingredients and the bacon. Cook at a low simmer for a couple of hours, until somewhat thickened. Cool it enough to handle and then run the cooked "stew" through a food processor until it is the consistency you like. After 2.5 hours, mine was still on the thinish side, so after I processed it to a jam consistency, I added a half a tablespoon of Knox gelatin dissolved in a bit of water... then heated it up for the gelatin to "set" before putting it in jars to refrigerate.


I suppose you could can it in a pressure canner, but frankly I think it will be eaten in short order so I just refrigerated it.

Here is the basic recipe I used; the only changes were to add some finely chopped crystalized ginger, and to reduce the hot sauce and chile powders a bit. It still has a 'bite' but not an eye-burning bite. Oh, since I was tripling the recipe, I cut down on the apple cider vinegar, starting with ¼ cup and then adding more to taste as it cooked down. (You can always add more but you cannot take it out once it's added.) I ended up with a nice sweet/sour balance.

Ingredients
1 pound thick-cut applewood smoked bacon, cut into 1-inch pieces
1 large sweet onion, cut into 1/4-inch thick slices
3 tablespoons light brown sugar
3 cloves garlic, minced
¼ teaspoon allspice
¼ teaspoon cinnamon
Pinch fresh grated nutmeg
Pinch ground cloves
½ teaspoon dry chipotle powder [I used ancho which isn't as hot but it's what I had]
¼ teaspoon smoked paprika
½ cup strong brewed coffee
¼ cup apple cider vinegar
½ cup good quality bourbon
¼ cup maple syrup
1 tablespoon hot sauce

Recipe Steps
In a Dutch oven or large skillet cook the bacon over medium high heat until it begins to crisp up at the edges - the pieces should still be soft in the center. Drain on paper towels and retain one tablespoon of bacon grease in the pan.

Lower the heat to medium low and cook the onion and brown sugar until soft and caramelized (20 minutes or more).

Add the garlic and spices and cook for 5 more minutes.

Add the liquid ingredients and the bacon to the pan. At medium heat, bring to a boil, then reduce the heat to low and barely simmer for about 2 hours. Check every 30 minutes to make sure that the mixture does not dry out. If it does, just add a few tablespoons water. The final mixture should be moist and sticky.

Let cool slightly and add to the bowl of a food processor and pulse until it reaches the consistency you like - slightly chunky to showcase the bacon or smoother.

Make 1½ cups.
Recipe source: kayb @ eGullet


ps, this is my second attempt. The first time I used a Smithfield hickory smoked, thick-cut bacon without cooking a piece of the bacon first to check the taste. It was terrible tasting, and I should have known better. What a waste of money and ingredients! Usually I make my own bacon, but sometimes I'll buy bacon at a natural foods store if I don't have access to fresh pork belly to make my own bacon.

pps... I'll be out of pocket and able to approve comments until the morning of Nov. 21

Friday, May 6, 2011

Tapioca Pearls in Puddings


I love tapioca pudding but I've never made any from scratch, or if I did it has been so many years that I've forgotten. Recently I spied a bag of tapioca pearls on the shelf of an Amish market I frequent, so bought some!

A search on the internet for tapioca pudding recipes brought up several, and searching for just tapioca to see what else I can do with it, brought up Bubble Tea, sometimes called pearl tea. It is something unfamiliar (Remember, I live in the sticks, LOL!) to me but sounds interesting for the possibilities. 

I decided to combine several recipes for my first tapioca pudding, and I WILL play with making bubble drinks... but that will be another post.


On to the tapioca pudding. Here's a ½ cup of pearls soaking in 1½ cups water. They will soak overnight. In just a very few minutes, the pearls have already increased in size.


The next morning, I heated 1 quart of milk with about ¼ cup of sugar, and when it came to almost a boil, I added the soaked tapioca pearls I had just drained. and about ½ teaspoon of salt. Cook over medium-low heat, stirring occasionally, until the pearls turn fully transparent. All of the recipes I found call for more sugar (often 1½ to 2 cups total) than I am using, but since I have to cut back on sugar, I am just adding enough to taste slightly sweet.


Next: beat 3 eggs in a separate bowl, add 1 teaspoon of vanilla, and more sugar to taste if it needs it. (I didn't add more.) Remove the mixture from the heat and allow to cool enough to add the egg mixture.


After the milk mixture had cooled considerably, I tempered the egg mixture with a little of the warm milk before adding it to the rest of the cooked milked. When you do add the eggs, vanilla and sugar mix to the cooked milk and tapioca, stir thoroughly, and bring to a full boil. Remove from heat. Serve warm, or allow to cool and refrigerate.


It was lovely to have a bowl of tapioca pudding that was not full of chemicals, just real milk and eggs thickened with tapioca (which is made from the cassava root).

Options: Dust some cinnamon over a serving, or add coconut, nuts, fruit, chocolate, or whatever strikes your fancy. YUM!


ps... I'll have a fun post about other things to do with "pearls" later on when the garden is in a slow growth period and I have more time.


Tuesday, March 15, 2011

Easy Cheddar

I wasn't going to make a simple cheddar (simple meaning the actual "cheddaring" process is bypassed) because those posts are all over the internet. However in the end I relented, just so I can make a cheese I can eat sooner! Most of the cheese types I have planned require several months to age before tasting... and my list is growing!

So far, I want to make a Stilton-type (it can't be a 'real' Stilton because I don't live there); some Tommes, an Asiago, a Parmesan-type, Grana Pardana, Munajuusto Egg Cheese, Butterkåse, real Dutch Gouda, Jarlsburg, Reblochon, Brie (one of my very favs!), Colby and even some real (aged more than a year to be sharp) Cheddars. Can you tell I love cheese?? LOL


Anyway, I have a simple farm cheddar 'working' as I'm writing. I have just added the rennet to 2 gallons of milk, which was warmed to 90ºF and then a packet of mesophilic culture added. If I had wanted to add any cheese coloring (I don't even have any) now would have been the time. I added ¼ tsp. of calcium chloride diluted in ¼ cup distilled water along with the starter, to help make a stronger curd. When milk is heated for pasteurization, the calcium content drops, and calcium chloride brings it back up. (How much calcium is lost initially depends on the method of pasteurization, whether it is high temp flash, or lower temp for longer.)  

2 gallons of whole milk in a pot is huge... and heavy, a little over 17 pounds!

Once the rennet is added, there's a more reliable way to tell when to cut the curds rather than estimating a clean break. It's called the flocculation method. Actually it's fairly simple, but rather than reinvent the wheel, the instructions are here.


When the floccuation is finished, time to cut the curds into ½ inch cubes. After the curds are cut, the pot of curds and whey needs to be gradually heated to 100ºF, not an easy task since it only needs to climb 2º every 5 minutes. You could do this by setting the pot in a sink of hot water, but I chose to set my pot in a larger stockpot with water, and heat slowly with the stove. (I did start with hot water, about 130ºF.) As the curds and whey are heating gradually, you need to stir to keep the curds from matting. Also, this brings up larger pieces of curd that need to be cut smaller so their whey can drain.


After reaching 100ºF, cover and let the curds rest for 5 minutes. During the previous 30 minutes, the curds will have shrunk, releasing a lot of their whey.


The finished curds look like this, above.


After the short rest, scoop the curds out with a skimmer or ladle, and place in a cheesecloth-lined colander. There will be a LOT of curds. In fact, I'm afraid I may have too many for my one and only mold!


Tie the corners of the cheesecloth and hang out of a draft for one hour. Ideally they should be hung in a warm room temperature.


After they have drained for an hour, place the curds in a large bowl. It will probably be one big lump. Break up the lumps with your fingers to golf-ball size or smaller. Add 1 tablespoon of cheese salt, baker's salt, or any fine-milled salt you have on hand. A coarse salt or table salt will not do, and it needs to be iodine-free.


Next, line the mold with cheesecloth and put the curds in it. Fold the cheesecloth neatly over the top and press for 10-15 minutes with 10 pounds of weights. As I suspected, it was a tight fit!


After the 10 minutes, you can see there is a large amount of whey drained, shown in the plastic container, plus what the bamboo mat soaked up, and it has compressed a bit. Take the cheesecloth/cheese out of the mold, remove the cloth, put the cloth back in the mold, turn the cheese over and put it back in the mold, again covering the top neatly.


Double the weight to 20 pounds, and press for another 10 minutes.

 
Remove the mold, repeat the process of turning and re-dressing the cheese, and this time press with 50 pounds for about 12 hours.


I really must get some good weights!

So, it's time for bed for both me, and the cheese for its overnight 12 hour press under about 50 pounds. Sure hope I don't hear any crashes in the night!


After the cheese has been presses for 12 hours, remove it from the mold and carefully peel away the cheesecloth. 


Now it is ready to air-dry at room temps for 1-3 days, until it has formed a rind and feels quite dry to the touch. The time to dry will depend on room temps and humidity, and we have a rainy forecast for the next 2-3 days. The wheel should be turned several times so it can dry evenly. At this point, the wheel weighs 2.17 pounds, but it will lose additional moisture as it dries.


Once dry, it could be waxed (but I will vacpak it), and aged for at least a month in my cave. I wish I had made several so I could see how each tasted aged for 1 month, 2 months, 3 months...

Note: I made this cheese Feb. 20-21, sliced the wheel in half horizontally and vacuum-packed each half so I can taste one while letting the other age longer. I can taste the first one around March 25, and will post a tasting update. However, being very new to cheesemaking, I'm prepared for disappointment as well as success!

Thursday, March 3, 2011

Venison Bresaola

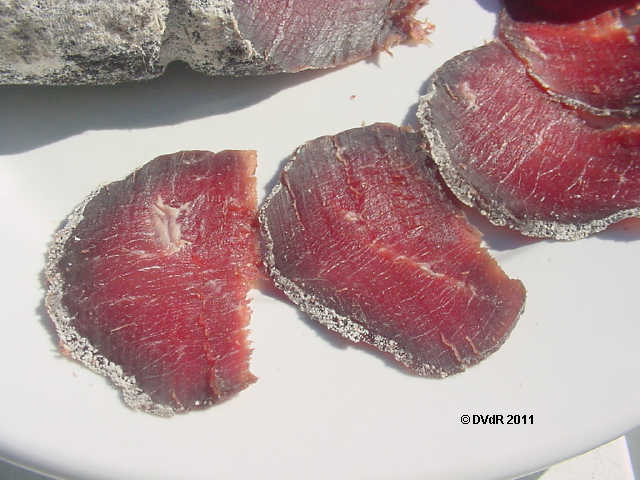
Photo is in the public domain

"Bresaola is air-dried salted beef that has been aged 2-3 months until it becomes a dark red, almost purple color. It is usually made from very lean beef top round. 

Served as an antipasto, bresaola is usually sliced paper thin and served at room temperature or slightly chilled. It is most commonly eaten on its own, but may be drizzled with olive oil and lemon juice or balsamic vinegar, and served with rocket (rucola, arugula) salad, cracked black pepper, and freshly shaved Parmesan cheese. The similarity to carpaccio, which is made from raw beef, results in that name being used (incorrectly) for bresaola dishes as well." ~ Wiki


I started my first bresaola with 2 pieces of venison on January 13th, 2011. The total weight of the 2 pieces was 1000 grams (a little over 2 pounds). All the instructions I have read suggest that it is a waste of time to try and cure a bresaola weighing less than 3 pounds (in one piece) and that it cures best if it is a rounded tube in shape.

As you can see, I ignored the suggestions because it's what I had available!

Here's my recipe:
Salt: 20g Coarse sea salt
Sugar: 20g Demerara sugar
Cure #2: 2.7g
Coarse Cracked Black pepper: ½ tsp
Dried rosemary: ½ tsp
Dried Thyme: ½ tsp
Crushed juniper berries: ½ heaping tsp.
Nutmeg: about 3 grinds
Ascorbic acid: pinch
Zest of 1 lemon
Zest of half an orange
Note: I intended to use dark Muscovada sugar, but I picked up the wrong package off my pantry shelf. It won't matter except it won't have a slight molasses overtone.

The cure was mixed together and half was thoroughly rubbed all over both pieces of venison, and refrigerated in a lidded plastic container. The venison was turned and massaged daily for 6-7 days, then rinsed and the other half the cure applied.


After another 7 days of turning and massaging daily, the meat felt rather dense and somewhat resistant to finger pressure, compared to the initial feel. I rinsed both pieces thoroughly in cold water, and put on a baking rack to air dry for about 3 hours. (Jan. 27th)


Next, I weighed them; they were down to 946g from the initial 1000g, showing a loss of some moisture during the refrigerated cure. Once they felt dry to the touch, I wrapped then in a double layer of cheesecloth. It was suggested to lightly coat with olive oil to keep them from the outside drying out too much and forming a hard "skin". I compromised by oiling just one so I can learn any difference it might make, if any.


On Jan. 27th I hung them in my root cellar, where the temps stay between 34-40ºF and the humidity stays around 70-75%. After one week, the one I didn't oil had lost 11% of its weight. They need to lose about 30% to be considered "finished". (I neglected to weigh the other one after I oiled it before hanging, so I have no idea what moisture loss it has experienced.)

Update, Valentine's Day: The uncoated bresaola has lost 27% of its weight by today. I am sorely tempted to unwrap it and slice a bit... BUT I'm equally determined to do this "by the book" if possible. Both still smell great. As best I can estimate, the olive oil coated one has lost only about 12% of it's weight. So it is definitely aging more slowly. Whether that is good or bad remains to be seen! 

I'll be back with a new post and photos of the finished product (good, bad or otherwise) in a few more days, when the loss reaches 30%!


Update: The bresaola reached the target weight while this post was in the queue, so here it is. The surface developed a lovely, very fine white mold, like the dry-cured Italian salumi get... and it smells like a really great (and expensive) cheese! (It's very difficult to slice it thin enough; I may have to take it to a deli counter.) It is really tasty, worth ALL the effort... YUM!

(I also brought in the olive-oil coated one, and unwrapped it. The very top portion where the oil had drained away was pretty hard. I cut off that portion, re-wrapped it sans oil, and hung it back in the cellar for a few days. I don't think it will develop as nicely as the uncoated one, though.)


ps, Jason Molinari posted some nice photos of his Breasaola di Cervo (Deer Bresaola) here.

Monday, February 28, 2011

Two Cured Steelhead or Salmon Recipes


These recipes are for cured salmon, and actually I don't have salmon, but a close relative, the steelhead trout. The recipes will work equally well for it. Both are easy to "cure" in the refrigerator in 2-3 days, offering up some lovely alternative taste treats during the dreary winter. Think gravlax, or Nova Scotia; bagels, lox and cream cheese; antipasto/canapes for a party, or just thin-sliced salmon with cream cheese on a good pumpernickel bread sandwich.

The first recipe is fennel-cured, and the second one is a citrus cure. My fish weighed just about two pounds so I divided it into 2 pieces of 1 pound each, because I want to try both cures.

Warning: If the fish happens to be wild caught, there is a possibility it could carry a parasite. I have read that freezing for 3 weeks in a home freezer will kill the parasite, but some chefs and seafood purveyors say only a commercial freezer that chills to -40ºF is cold enough to kill the parasites. If you are wary, use a farmed salmon or steelhead trout, which do not carry the parasite.


First, the fennel cure, adapted from Charcuterie: The Craft of Salting, Smoking, and Curing

1 pound salmon (or steelhead trout)
46 grams sugar
70 grams light brown sugar
65 grams kosher salt
1/8 cup Pernod (I could only find Ouzo at our state liquor store)
1 fennel bulb with ferns
25 grams toasted fennel seeds
1 tablespoon ground white pepper


Before toasting


This is twice the fennel seeds for the recipe, done before I decided to do half in a citrus cure

After toasting


Toast the fennel seeds in a hot skillet until fragrant and slightly browned.


Mix the sugars, salt and pepper together well. Put 1/3 down in the bottom of a dish.


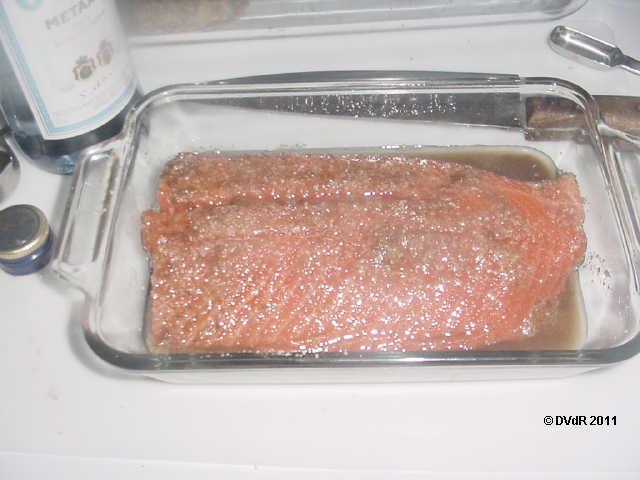
Put the fillet skin side up on the mix and lightly pour half the Pernod over it. (not shown)


Turn the fillet flesh side up and pour the remaining Pernod over it. Add the remaining cure.


Slice the fennel bulb and the ferns, and place on top of the cure.


Sprinkle the fennel seeds on top of the fennel.


Cover with plastic wrap, and find a weight of several pounds that will fit inside the dish with the fish. Here I've used a loaf pan and a 6 pound brick wrapped in a clean plastic food bag.


Refrigerate. I turned them about twice a day to evenly distribute the cure. After 2 days (maybe 3 if the fish is thick), the fish should feel firm and you can rinse the cure off the fish in cold running water. Pat it dry, and you can slice it thinly to eat now, or freeze it for later. 


Here's the citrus cure for 1 pound of salmon or trout:
1 pound salmon or steelhead trout
1/2 cup sugar (use brown sugar for a deeper flavored taste)
3.5 oz. kosher salt
zest of one orange
zest of one lemon


Pretty simple! Mix all the ingredients together, add them to a baggie along with the fish (or wrap them in 2-3 layers of plastic wrap and put in a bowl to catch the juices), and refrigerate under some weight. Turn them about twice a day to evenly distribute the cure. After 2 days (maybe 3 if the fish is thick), the fish should feel firm and you can rinse the cure off the fish in cold running water. Pat it dry, and now you can slice it thinly to eat, or freeze it for later.


Here's the piece cured with fennel, after the cure was rinsed off. I put all the pieces in the freezer for a day or two, partly because I'm busy with other projects.


I sliced a bit this morning, and the taste isn't as strong after soaking 2-3 hours, and freezing for a couple of days. There is, however, a faint "fishy" smell, which means it wasn't really fresh when I bought it. One of the problems with not having a fishmonger in my small town is that I cannot ask to smell a fish before purchasing it. Supermarkets do not take kindly to me poking a finger through the plastic-wrap to get a whiff!

I'm prepping the cold smoker now, to give it all a light smoke. I think I will make a smoked fish spread/dip with some of it, and some smoked trout rillettes.


Here's the fish after cold-smiking in maple and apple wood for 8 hours.