Sunday, January 9, 2011

Sausage Making Trial and Error, Part Three


Italian Sausage (Pork) Links
Sausage Making Trial and Error, Part One
Sausage Making Trial and Error, Part Two


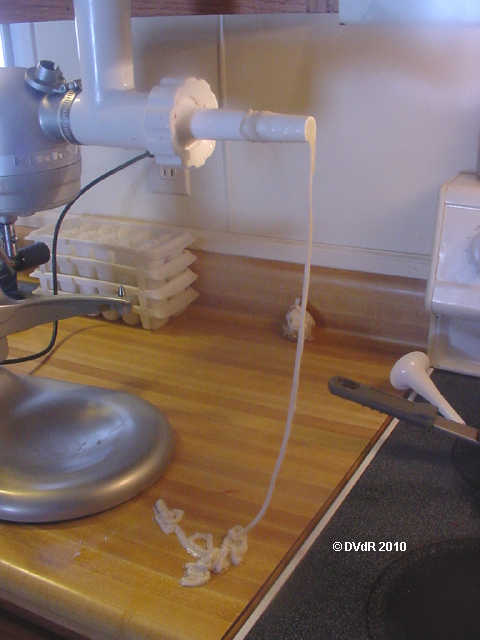
I'm starting to get the hang of making sausage links. Still, they would be more uniform if I had another pair of hands to guide the stuffed casings off the nozzle. You can see in the photo above that some are fatter than others. I tried rolling them out and moving the sausage more evenly in the casing, but the casing split in a couple of places. (Could that be because the casings had been refrigerated 2 days in water, rather than one as suggested?) There's about 2 pounds of sausage in the photo.


Sweet Spanish Sausage


This next batch came off somewhat better. I pulled the stuffed casings with my right hand while I pushed the mix into the chute with my left hand. Not easy, nor consistent! 


This 2nd batch shown above is a recipe I found for Sweet Spanish (pork) Sausage, more of a breakfast sausage. I followed the recipe fairly close since it was my first time, but I thought the sultanas (white seedless raisins) it called for might be too dry. I soaked them in a dry white wine overnight, and then coarsely chopped them. The mix still went through the grinder again after mixing in the spices, so the raisin bits weren't all lumped together.


I fried the sausage left in the stuffer as a patty with my dinner. Interesting sausage, and it leaves a hint of several flavors on the tongue. I will make this recipe again!


Sweet Spanish Sausage with Sultanas (golden raisins)
adapted from sausagemania.com


1 pound ground somewhat-fatty pork
½ Tbs coarse salt
¼ tsp ground black pepper
⅛ tsp cayenne pepper
¼ tsp. ground ginger
⅛ tsp ground nutmeg
¼ cup sultanas, soaked overnight in enough dry white wine to cover
(note: you can use regular raisins, taste just won't be as delicate. Original recipe called for sugar which I omitted, and it did not call for soaking the raisins like I did.)


I made this recipe below into patties, for Christmas breakfast. Tasted kinda like sausage mixed with hints of pumpkin pie!


Alsatian Christmas Sausage
adapted from sausagemania.com


1 pound ground pork
½ Tbs coarse salt
¼ tsp ground black pepper
¼ tsp ground cinnamon
½ tsp. ground ginger
¼ tsp ground nutmeg
¼ tsp ground cloves
½ tsp sugar


At least for the next month or two, I am through making fresh sausage (I think). I have about 30 pounds vacuum-packed in my freezer now, but some will be gifted to two of my neighbors, including the one who gave me all the venison. I have about a dozen more sausage recipes I want to adapt to my taste (plus a few recipe ideas in my head), and I'll probably make those in small batches to try first.


All in all, I'm feeling pretty confident about making fresh sausages, whether in casings or patties. I certainly understand more about making sausages and various  recipe mixes than I did with my first sausage 2 years ago, or even the first batch in this series.

Next will be sausage that has to be cured and/or smoked and aged, such as Kielbasa, Polish Sausage, Chorizo... and maybe I'll feel gutsy enough for something a bit more challenging, like salame, pancetta and prosciutto. Who knows, by next year I'll probably tackle a ham!

Saturday, January 8, 2011

How to Choose a Moon Planting Guide

Photo by Mike Cattell

I have done my planting by the moon signs as much as I can in the last 2-3 years, and hope to be better about it this year as I learn more. I have had some success, but my gardening has also been hit or miss because I didn't understand at first that there are TWO different methods of determining the moon signs. No wonder so many of us are confused and have unreliable or conflicting results!

One method is geocentric... that is, looking at the signs as if the earth is the center of the universe. (The Gardening by the Moon Calendar is based on the geocentric and astrological calculations.) When the Moon's position is computed geocentrically, it's computed from the center of the Earth. For planting, this is entirely correct and logical. We live on the Earth; we plant on the Earth. All our activities are "Earth-centered."

When a computation is made to find the Moon's location in the heavens as an astronomer does, it is computed from the center of the Sun, or heliocentrically. (The Old Farmer's Almanac is heliocentrically calculated.) This system is more complicated and also takes into consideration eclipses, trines, apogees and perigees as well as descending and ascending moons.

To clarify... If you compared a geocentrically calculated almanac with one calculated heliocentrically, you'd find that on the first day of January 1985, a geocentric calendar would show the Moon in Taurus, and a heliocentrically calculated one would show the Moon in Aries. This difference is a vital when planting.

Fortunately most calendars showing the Moon's signs are geocentric, as are most (but not all) almanacs. If you choose to plant by a heliocentric calendar (like the Old Farmer's Almanac) you will have very different results than if you plant by a geocentric calendar (like the Gardening by the Moon Calendar).

Update: Yes, The Old Farmer's Almanac is heliocentric. However I understand that their separate page of Planting by the Moon Signs is geocentric. It does not show the time of day the moon enters a sign but it is still usable as a general planting guide.

Friday, January 7, 2011

My Older Sausage making Experience

I found the photos of the first sausage I ever made, in January 2008, using venison, pork and pork fat, stuffed in collagen casings. I thought I'd post the photos just for kicks. Actually, I'm posting this because the difference between what I did in 2008 and what I'm doing now reminds me a little of comparing slice and bake cookies to made from scratch cookies.

My family ended up removing the casings of most of this batch and making patties when we cooked them; none of us liked the tougher collagen casings when we cooked the sausage in the casings.


First, I ground all the meat and fats separately (not shown), mixed them together by hand, and re-ground as shown above.


Next, I added the spices and put the whole shebang in the mixer to get even distribution; this mixing is also important to get the sausage to bind together in the casings.


I threaded the collagen casings over the large stuffing nozzle... and stuffed my sausage mix into the casings. Piece of cake.


Voila! Sausage Links!

The recipe I used was from Field and Stream. I did not emulsify a third of the mix in a food processor as the chef does, simply because I didn't have a food processor. His notes say you can add more fat, which I will certainly do when using this recipe again; they were a little dry whether poached first or split open and fried as patties.

I used this same recipe (with more pork fat added) for the venison links I made here. Next time I'll add some fresh thyme or sage, and perhaps his suggestion of adding some chopped dried cranberries.

Wednesday, January 5, 2011

Sausage Making Trial and Error, Part Two

Continuing from Sausage Making Trial and Error, Part One:

The morning after making sausage in Part One, I was fired up, ready to tackle sausage links again. I had the smaller sheep casings soaking, and some of the soaked hog casings left from the previous day. I just needed to grind more venison, pork and pork fat to add to what I had ground the previous day.

About the time the frozen packages of meat and fat hit the counter to thaw, the power went out. We seemed to be having an ice storm. Power is seldom out for long around here, so I didn't worry. After all, I still had hot coffee in my thermos, and a book. After an hour or two, the house was getting colder, the meat was NOT thawing... so back into the chest freezer it all went. Good thing I did that... the power was off for 3 days! (I don't worry much about opening a chest freezer in the beginning of a power outage, since the cold air doesn't fall out like in an upright freezer... think of the open-top freezers in a supermarket.)

The casings I had soaking were trash after the second day. Phew!! Casings cannot be frozen or they split everywhere when stuffing, and I didn't want to open the refrigerator for fear of losing what cold air was inside.


So, a week later, I finally started again. Cubed more venison, pork shoulder, and pork fat. Mixed up my spices, and added them to the mix, and re-ground. 

Problem #1: The plate with the larger grinding holes is missing from my grinder parts. The first grinding should be coarse, and the second grinding with a smaller grinding plate. Since I only had the finer grinding plate, my finished mix was almost emulsified. 

Some of that emulsification could have happened because I also ignored the recommendation to keep all parts and the mix in the freezer off and on while making sausage. I did start out with all the grinder parts and bowls in the freezer, but I didn't put portions of the meat back in the freezer as I was working. I wasn't worried about spoilage because the kitchen is quite cool, but I hadn't considered the texture of the sausage with the combination of a small grinding plate and cold but not icy meat mix.

Problem #2: Smaller casings! My stuffing attachment has two sizes of tubes. I used the larger one earlier for the lamb sausage, and even though I visualized the sheep casings should fit over the nozzle tip, there was no way! So, I put a yard or  of casings the smaller tip, and started the motor to fill the casings. The push rod met a LOT of resistance trying to get sausage mix into the auger, and I only filled about a foot or so of casings in about 10 minutes.


Closer examination showed the tip of the smaller stuffing tube was pretty small, 5/16". No wonder the machine was having a hard time pushing the mix through it. I cut about an inch and a half of the tip, sanded off the burrs, and back to work. The new opening is now 7/16". I would have liked it a bit larger but I didn't think I could cut more off this tube and still have space for the casings to load on the tip.


Problem #3: Lubrication (lack of). This time it went pretty good... well, almost. The casings slid somewhat easily over the tip because they were wet. However, as the filled casings started pulling the bunched casings off the tip, the casing seemed to stick to the tip, and I got a few tears. Next step, I dried the tip with a paper towel and buttered the outside of it. The next yardage of casings went on with about the same ease since they were still wet.


Success! Most of the sausage rolled off the nozzle pretty well; I had 2-3 more splits which could be a sharp edge from the cut that I didn't get sand-papered off, OR it could be that a second set of hands guiding the sausage straight out from the nozzle would have relieved some stress to the casings at the nozzle.

After I had done KP duty, I put the lengths of stuffed casings out on a counter and rolled them to be a bit more even, then twisted into links. Rolling was very necessary as there were some thin spots while I was loading more mix into the chute, and some fat spots where the casing wasn't coming off the tube very well. In both cases, another pair of hands would have been a great help!

TIP: If you plan to vacuum-pack the sausage links, freeze them in package portions first! I didn't do that in the beginning and a couple of the links burst from the vacuum pressure. I froze the rest before continuing!

At any rate, I managed to stuff the whole batch of venison sausage and I'm very pleased!

Lessons Learned:

1. I like making (and eating!) sausage, and I have a bunch of different recipes to try, other than breakfast sausage.

2. Mix the seasonings thoroughly in some water before adding to the meat. It helps disperse them more evenly throughout the mix when blending... whether by hand or in a mixer.

3. I need a better stuffer than the cheap plastic tubes that attach to my meat grinder attachment. I have seen several stuffers that have multiple sizes of smooth stainless steel nozzles. I'm also thinking I might like a non-electric stuffer where the pusher is attached, and the nozzles discharge the stuffed sausage casings close to the work surface. With the set-up I have now, I must stand on a stool to see and be able to push meat chunks into the grinding chute, and the drop from the stuffer to the counter is about 2 feet, stressing the casings.

4. I will eventually want/need a separate meat grinder. The toll on the motor of my KitchenAid mixer is apparent in the sound of the motor.

5. A stainless steel work surface would be great to have as it would stay colder, and be easier to clean. It is very low on the priority list, though. Just wishful thinking!

6. None of this current sausage-making solves my problem of wanting some meats that can be preserved in non-electric-powered storage. What I'm making now are all sausages that need to be frozen, if not cooked and eaten in a couple of days. First things first, though.

Next on my list to make: Italian Sausage, Polish Sausage, Venison Sausage with Garlic and Bay or Sage.

Monday, January 3, 2011

Sausage Making Trial and Error, Part One

I can't even say "Sausage 101" because I feel like I'm just beginning my intro to making sausages. Actually that's not a true statement, because 2 years ago I made some sausage with venison, but in collagen casings and/or patties. That's in the same ballpark, but not nearly the same thing as using real hog or sheep casings.


The collagen casings (made from collagen in cattle hides) were very easy to use, but I just didn't like the texture when the links were cooked. The venison recipe I used was tasty and I'm using it again. Using the natural hog or sheep casings is a lot more difficult, and would be much better and easier with another pair of hands when stuffing the casings.


Before I continue: hog and sheep casings are sold in packages of 100 yards in length, and in several sizes (circumference). I chose one package of the smallest hog casings, and one of the smaller diameter sheep casings. I only started with the hog casings because I wasn't sure which would be best to use. 


At any rate, the first thing to do is take some casings from the hank and soak them overnight (unless you are doing 100 or so pounds of sausage at a time and might need the whole hank). The instructions say you can soak them for merely an hour in 90ºF water just before stuffing, but that they may not fully soften. I didn't want to take that chance, so I soaked a few yards of casings overnight.

I wish I'd had someone with a video camera while I was trying to untangle and work on some of the salty casings. I'm sure it was a hoot. In the salted state, they look a bit like a zillion salt-crusted shoelaces heaped together... but not the round kind of laces. There was a plastic ring in the hank... I suppose at one time it held all the lengths of casings together, but finding any end was not easy. I ended up cutting off a few lengths!

I wish I had photos to show this part but my cat is a terrible photographer! Once I got a few yards off the hank and ready to soak, the instructions also say to flush them... another task easier said than done.

When I finally could hold an end to the faucet, water went in pretty fast and the casings widened to over an inch... BUT, the motion of the water stream tended to twist the lengths of casing so that I had a series of long water bubbles that swirled in the sink getting more and more tangled. I'm hoping I can rig some sort of board with pegs about 3 feet apart and unwind the casings on it. Not sure how I'll flush them like that, because it won't fit in the sink... and if I take the length back off the pegs it will just tangle again.

For ALL the blogs, posts and books on making sausage I've read in the last 3 years, I don't remember anyone ever addressing the problems I had with the initial handling and rinsing the casings. Was it just me? Or were they too chicken to mention it? In retrospect, I think if I could lay out the casings on a long table while in their salty state, it might be easier to find ONE length, which maybe could be wound around a plastic cup or something that would fit in the sink.

So, a few strands of 1-2 yards of the hog casings soaked overnight. When I rinsed the mess in the morning, I had a repeat of all the lengths tangling, this time because they were slippery. I finally got 2 lengths separated into a small dish of water, and they flushed pretty easily.

I left the rest of the slippery casings in the bigger bowl, and what I don't use today can be re-salted and kept with the original salted casings in the refrigerator for a year or more. They MUST NOT be frozen, nor allowed to dry out. I think I will vacuum-seal what I don't use immediately and then I won't have to worry about drying out.


Venison cubes ready to grind


Next: set up the meat grinder attachment to my KitchenAid mixer. Making sausage is a lot easier if everything is cold, and I cut the venison into chunks while it was still about half frozen. I already had ground some pork, and some pork fat earlier, and frozen it in one pound packages. I flattened the packages when I froze them so they thaw quickly.


Grinding Venison

Here's the set-up for the meat grinder. I ground 2 pounds (not shown) of venison after taking this photo, and put it back in the refrigerator for now.

Meanwhile, I had defrosted one pound of ground lamb overnight, and I seasoned it to make my first batch of sausage in casings (nothing needed to be added but seasonings). I added rubbed sage, black pepper, salt, cayenne pepper, and a pinch of cloves to the ground lamb, pretty mild seasonings because I wanted a breakfast sausage. Next time I will add at least a quarter-pound (or maybe more) fatty pork as the sausage was tough when I cooked a patty.


Threading casings onto stuffing nozzle


I used the larger of my 2 plastic stuffing funnels on the grinder and threaded some casing material on it. It really went on quite easily, to my surprise.

Lamb Sausage

Then I stuffed what I had seasoned into the casings. I didn't get a picture because I didn't have enough hands and I was afraid to let the mess just hang from the nozzle and possibly break while I took a photo. These casings were Hog Casings for Small Brats and Italian Sausage, 29/32mm. They were the smallest size of hog casings, and when stuffed they were much fatter than I wanted for these sausages (fatter than in the photo above). That size casing will be perfect for kielbasa and Italian sausage though.

I found I could lay the whole short length out on the counter and roll it to thinner size before twisting into links. Another pair of hands could have helped by pulling a tad on the stuffed casings as they came off the funnel so they wouldn't have been so fat.

Lamb Sausage Links

When you twist into links, pinch a spot with your fingers and then twist... make every other link twist in the opposite direction and they will stay twisted until you can tie them off. You don't really have to tie them if you are just freezing them (rather than smoking, or hanging for curing), but I decided to tie anyway.

Stuffing just one pound of meat into casings leaves a lot in the stuffing funnel, so I made it into a patty (which I cooked for lunch). Now that I realize how much excess is left in the tube, I need to defrost another chunk of venison to add to what I ground today, defrost some additional pork and fat to add, and try to stuff at least 4-6 pounds of sausage at one time. 


Here's the sheep casings in the package, and a few yards I separated out to soak for tomorrow for venison sausage. I notice there is liquid plus salt in this package, whereas the hog casings were merely damp, and totally salt crusted. Could be simply that the sheep casings say pre-flushed and the hog casings do not.

I DO feel much more confident after today, though!

Update: I did the venison batch but it's too lengthy to add here, so it will be a separate post.

Sunday, January 2, 2011

Apropos of nothing in particular but Dismay

Three or four years ago I had my gall bladder removed, which was to be an easy-in, easy-out outpatient procedure. I ended up 3 days in ICU.  I went home with my brother, who had come to stay with me. The next morning, trying to get out of bed, I tore my rotator cuff, and my mobility worsened as days passed. 

My brother had gone back to Florida, and I found myself losing my balance, falling often... and unable to manage working in the kitchen. Social Services was providing a home-care person for OT/PT once a week, and finally they signed me up for Meals on Wheels.

Let me tell you, it was a godsend... until I tried eating them. The meals came frozen, 1 meal a day (kinda), total of a 10 day supply every 2 weeks. (I guess the other 4 days are supposed to be fasting? No lunch, no breakfast?) There was absolutely NO nutritional information on the packages, and even portion names were vague... but I did finally find a phone number on the cardboard box.

I placed a phone call to the outpost who package the meals for several counties; they use local handicapped services (which I thought was wonderful) but they had NO data on nutritional values, as the food comes to them from the USDA (or FDA, I forget now); they merely package it in portions for delivery.

Not only could I not get any nutritional values from them, they could not direct me to anyone who could. I knew just from taste that everything was too high in sodium, but there was little else I could discern. Most of it was tasteless, and totally unappealing or even filling. A single sandwich plateful to feed me for 24 hours. Mystery meat, sometimes but not always labeled 'chicken' or 'beef', and questionable side portions. The single bagged slice of wonder bread was always recognizable. After the second batch of 'meals' was delivered, I decided I'd rather starve so I discontinued the service and asked them to pick up the box of frozen meals.

My point in all this is that we are being sold a Bill of Goods on the National Nutrition Program. If you know someone getting Meals on Wheels, do them a favor and take them a real meal occasionally. The folks who deliver the Meals on Wheels are all Volunteers, and deserve a big hand for their efforts. It is just too bad that in this country where food stamps run rampant, our shut-ins have to eat so poorly.

Resolve...

Photo by Johan J.Ingles-Le Nobel

re·solve  (r-zlv)
v. re·solved, re·solv·ing, re·solves
v.tr.
1. To make a firm decision about.

I have but one Resolution for 2011:

"I resolve to further reduce my dependence on the industrial food system, which means producing more of my own food, and/or buying more food I don't or cannot grow from local sources whenever possible."

That seemingly simple goal actually requires a LOT of work on my part:

1. Planning, perhaps enlarging, amending, planting, feeding, weeding and otherwise tending the garden.
2. Better plans for processing, and storing what I do not eat immediately.
3. Processing (see #2) requires some of the things I have written in earlier posts: learning to make hard cheese, and charcuterie to cure and keep meats. For me, it also means learning to grow or obtain, prepare and eat foods not familiar to my generation or younger, but prevalent in earlier times.
4. Storing (see #2) means additional work on the root cellar. It needs new plumbing to free up space the spring water pipes now occupy, better insulation, better shelving, and the fuse box replaced with a breaker box. New and better shelving would be a big bonus!

Let me be clear that my thoughts and plans of action have little to do with the rampant fear of the future that's running amok, except as my general desire to be prepared for disruptions (mostly weather) fits in. However, Supply is beginning to touch the edge of that picture, and that does concern me. Basically I'm doing this because I should be doing it "anyway". Have you read  The Theory of Anyway , or the  Anyway Project

Sharon Astyk said, "When in doubt about how to change, we should change our lives to reflect what we should be doing "Anyway." Living more simply, more frugally, using less, leaving reserves for others, reconnecting with our food and our community, these are things we should be doing because they are the right thing to do on many levels."

So, what have YOU resolved?

Saturday, January 1, 2011

Dreaming Gardens from Seeds

Photo from Jim Linwood's photostream

Yes, it's that time of the year... the mailbox stuffed with seed catalogs! It used to happen in January, and even as late as early February, but now it seems the seed companies are all trying to get their catalogs out sooner, perhaps hoping to be the first available for orders.

What is nicer on a snowy, blustery winter day than paging through seed catalogs and dreaming of a luscious, bountiful garden coming soon?

This year I am looking closely at several factors in choosing seeds. I want to continue to increase the heirloom and open pollinated vegetables in my garden so I can save more of my own seeds. I do NOT want any GMO seeds... no Chernobyl giants in my garden! I  want to buy from seed suppliers who adopt the Safe Seed Pledge which says:

"Agriculture and seeds provide the basis upon which our lives depend. We must protect this foundation as a safe and genetically stable source for future generations. For the benefit of all farmers, gardeners and consumers who want an alternative, we pledge that we do not knowingly buy or sell genetically engineered seeds or plants. The mechanical transfer of genetic material outside of natural reproductive methods and between genera, families or kingdoms, poses great biological risks as well as economic, political, and cultural threats. We feel that genetically engineered varieties have been insufficiently tested prior to public release. More research and testing is necessary to further asses the potential risks of genetically engineered seeds. Further, we wish to support agricultural progress that leads to healthier soils, genetically diverse agricultural ecosystems and ultimately people and communities."

'Bright Lights' Chard Photo by permission from Fishon4lb

Who can resist glowing descriptions like "A beautiful chard, its colors are brilliant pink, yellow, orange, red and white... Pretty enough to plant in the flower garden, and so delicious, one of our favorite greens!" (Baker Creek's Silverbeet Chard aka 'Bright Lights', as seen above)

My seed lists always start out too long because I succumb to the tantalizing photos and delicious details of vegetables I'd like to try. I end up ordering more seeds that I can plant or manage in my garden, so this year I'm trying to be more realistic. Tomatoes have been a bust for the last 2 years, thanks to blight and stink bug infestations. Still, I will plant a few heirloom tomatoes. 

Burpee Long Keeper Tomatoes

In my pantry, I currently have 3 small tomatoes ripening, from a volunteer I missed hidden in the winter squash leaves in October. They are Burpee Long Keeper and while not a truly tasty tomato, I like that they ripen indoors starting about December, and anything is better than the red tennis balls from the supermarkets. I may plant another 2-3 of them next year from saved seed. I haven't decided what other heirloom tomatoes I will try this coming year.

Other "new to my garden" vegetables on my list are Belgian endive, bulbing fennel, rutabagas, sweet potatoes, parsnips, beets and carrots... and I haven't selected any varieties of those yet either. I haven't grown many root vegetables before now because my soil was so compacted. The leeks, shallots and garlic I grow survived only because they do not need to penetrate deeply into the ground. Now with 3-4 years of adding compost and other amendments, I'm hoping for a little bit of success with more root veggies.

What are you dreaming for your garden?

Friday, December 31, 2010

Happy New Year!


This may be a very interesting and challenging year coming up, so I'm wishing everyone a Healthy, Prosperous and Happy New Year!

Thursday, December 30, 2010

Prepping, and Thoughts During a Winter Storm

Photo By jumpinjimmyjava 

I've been a 'Prepper' most of my life, having been raised in the Hurricane Belt. Living in snow country isn't much different for prepping, except for the cold weather. The recent ice storm left my area without power for several days, and I am happy to report that I was just fine thanks to my preps. I had plenty of heat, illumination after dark via candles and LED lights, food, water...

The big hole in my preps, though, was 2 sided. On one side, I was bored to tears, totally isolated, and had only a few library books. On the other side, I had plenty of time to fret about 2 freezers full of meat, and how long the power outage might extend. Fortunately I got lucky with the return of power just before I would have lost the freezer contents.

As a result, I plan to delve deeply this coming year into safe meat (and other food) preservation that doesn't require any power refrigeration or freezing, yet still retains safety, quality and taste. It will mean lots of experimenting, and probably loss of some meat during my trials, but I will feel better in a year if I have that option of preservation.

I have canned and dried foods for years, and canned a few meats along the way. What I don't have is a place to store jars of canned goods that could freeze and break in extreme cold. I want to better insulate my root cellar for canned goods, but I also want to store some meats that are not canned so I have some variety. Making cheese once I have a 'cave' is also high on the list!

There is something called 'rabbit starvation' whereby folks had only rabbit to eat, but starved to death because the body (especially the brain) requires fats to survive... and vegetables generally do not provide the fats that most animal meats, eggs and cheese do. Hence the interest in preserving meat, along with cheese and eggs.

My feet have been teetering at this threshold for some time, with my desire to learn to make cheese and charcuterie, but it's time to get more serious and cross over the damn line... get busy and make something! Charcuterie such as fresh sausage still requires refrigeration or freezing, but there are dry-cured meats (like chorizo, pepperoni and summer sausage) that keep at room temps. Some meats can be cured (salted), smoked, and hung in a cold (even if not freezing) place over winter; some pre-cooked meats can be stored immersed in a crock of fat in a cool place, and some meats can be dried. There is a lot for me to learn out there!


Update: I wrote this post above Dec. 19, after our ice storm. Then the East Coast Christmas Blizzard came along, and I worried about losing power again. Thankfully, although we got a ton of snow, the power stayed on! I worked on making sausages, which I will cover in several posts over the next week or two.

Wednesday, December 29, 2010

Quasi-Baking on a Wood Stove in Power Outage


During our recent several-day power outage, I cooked and heated water for coffee on my wood stove, something I have done many times before. Usually I have cooked soups and stews, but generally not much more than that. Coffee is easy since I use an old Chemex pot every day anyway and it makes great coffee! All you need is boiling water to pour over the ground coffee in the filter paper.


One of the power-less days I decided I wanted a baked sweet potato. I was getting bored with hot soups/stews!  I wrapped 2 sweet potatoes in aluminum foil and put them on the hot cast iron stove top. (Ignore the nasty pot on the left; I keep water in it to add humidity to the room, and it has a mineral build-up from our hard water.) After a few minutes, though, I decided I would probably get potatoes cooked on one side where they touched the stove, or cooked unevenly even if I rolled them over occasionally.


I don't have a Dutch Oven that I might be able to bake in, so I improvised, creating a contained heated space by inverting a disposable aluminum container over the potatoes. I stuck the instant-read thermometer between the 'taters and stove top; the temp read 350ºF. Hey, it's not rocket science... but I was hungry and it worked!

Hindsight says I should have checked the temp in the enclosed air space around the potatoes, but I didn't think of it at the time. The potatoes baked just fine, although they were steamy from being in the foil. I had wrapped them only because the stove is sooty and it's hard to clean a HOT stove. I also didn't time baking the potatoes; it was difficult to read my wristwatch in dim light, and frankly I didn't much care at the time. I squeezed the potatoes occasionally, and took them off when they felt soft. 

There were 2 long thin spots along the bottom of the potatoes where they sat on the cast iron, and those places were just very slightly browned but not hard and dried out. I slathered on some butter, and YUM!

Since I am still without the oven on my electric kitchen range, I want to see if I can actually bake a cake or muffins on the wood stove, without anything more than some kind of cover to contain heat around the pans.I have a Le Creuset 7 quart French Oven on my Wish List!

Update: The above was written before Christmas. Since then, my sister has had a repairman come and fix the electric oven on the kitchen range. So, I again have an oven for convenience. BUT I still need to learn to bake on a wood stove for eventual power shortages and outages. 


Baking on a wood stove may not sound like a big deal, but if you've never tried it, how do you learn? Another option for baking is a solar oven... easy to make, and use on sunny days... but I'm not thrilled with the idea of using one on a snowy, windy day in the dead of winter. That will be a summer project!


Tuesday, December 28, 2010

Why Brine?

Photo from Average Jane's Photostream

It is past Christmas and a brine for a Goose this year, but maybe you have a duck or turkey planned for New Year's Day? You could still brine it! I've been brining my annual Thanksgiving turkey for 3-4 years now, and throughout the year I brine whole chickens and even Cornish game hens. I haven't brined any pork or beef roasts yet, but now it's on my List.

If you had asked me before now why I brine, my answer would have been "to make it juicier", but with no real scientific knowledge behind my observations.

Now, thanks to Harold McGee's book On Food and Cooking, I know that the salt disrupts the structure of the muscle filaments... that is, salt uncoils/unbinds the proteins to form looser bonds. How that actually works is that a 3% salt solution dissolves part of the protein structure that supports the contracting filaments in muscle tissue... and a 5.5% salt solution actually dissolves the filaments themselves. By such actions, the meat actually becomes more tender!

Secondly, the interaction of salt with the proteins result in a greater water-holding capacity in the muscle cell structure, thus the meat loses less moisture when cooked... in other words, the meat is juicier. This is especially important if you are smoking meat a long time over slow heat.

Another benefit of brining is the infusion of added flavors. The moisture in both meat and brine travels back and forth between them until it reaches equilibrium, and any flavorings (herbs, spices, lemons, oranges, and even the salt) you have added to the solution end up in the meat... IN the meat, not just in the outer surface of the meat. Because of that transfer of flavorings, it is important to brine with the correct balance of salt to water, and to brine for the amount of time recommended for the weight of your bird or whatever you are brining. Otherwise, you could end up with a salty bird.

See some brine recipes and tips here.

Monday, December 20, 2010

Interruption by Weather, and a White Christmas coming...

Photo from HAM guy's photostream

My posting schedule has been interrupted by the WEATHER. For the last few days we were without power, thanks to an ice storm. Fortunately I had some posts in the pipeline... I will be posting later about how well my emergency preparations played out. 

For now, our forecast is for additional snow tomorrow, and then 3+ days of more snow over the Christmas weekend, bringing us a White Christmas!  I had already planned to take a break from posting over the Christmas Holidays, but now I'm extending it so I can shore up weather preparations and get my self, and house, ready for the coming Christmas and New Year holidays.


Thankfully, we are not forecast to get 2 feet of snow like NYC did recently. (The sculpture above is by G Augustine Lynas. I love it!!)

(Source Unknown)

I'll be back in a few days. For now, I'm Wishing everyone Good Food and a Happy Holiday, whatever your take on it happens to be.

Sunday, December 19, 2010

Cranberries for my Garden

Photo of flowering cranberries, Courtesy of Todd Boland

I have been following a chat thread on Dave's Garden about what new edibles we are planning for the next planting season. I have decided to include cranberries on my list! I love cranberries, and they were both dear and scarce this year, so why not grow some?

Cranberries, Vaccinium macrocarpon, grow wild from North Georgia to Canada, usually in damp and swampy areas. However, cranberries are not necessarily grown in bogs; they can be grown on dry land. They prefer the colder zones 2-6/7, and do best in acidic (pH of 4.5-5.0, just like blueberries) and fertile soils. The are perennials, and the shallow root system grows just in the top six inches of soil. Many commercial growers add an inch of soil or sand after harvest to help protect the root system over winter. 

The best time for planting is late October or early November before the ground freezes, or in April and early May.

In my clay soil, I can just put them in the ground, in prepared planting holes 8" deep and a foot apart, filled with blood meal, soft rock phosphate and bone meal well-mixed into peat moss (the peat is for acidity). The clay keeps the soil around the roots from draining too much, but they need to be closely watched as they may need frequent watering to prevent fully drying out during the growing season. One year old plants will fruit in 2 or sometimes 3 years; the average fruit yield is one pound of fruit per square foot of plants. As plants get old and woody, they should be replaced for better production.

Once you have a few plants established, you can take softwood cuttings in the summer to root for additional fall plantings, and be sure to take cuttings from old woody plants you are replacing. The cranberry is basically a low-growing ground cover, growing to about 12" tall, putting out fast-growing horizontal runners. Short "canes" grow up from the runners and produce the spring flowers that become the fall fruit.

Plants are available from Park Seed, Gurney's, Jung, and Shooting Star Nursery. The University of Maine has a fabulous website about cranberries, with curriculum helps and printables for teachers. (There are a lot cranberry facts and information for classroom use with children of all ages on the U. Maine website.) 

I can't see that I have anything to lose by trying to grow a few cranberries in my garden!

Saturday, December 18, 2010

Spiced Dried Pear Chips

I came across a recipe for pear chips dusted with cocoa powder mixed with sugar and some spices, and decided to make a trial batch of the chips without the 2 tablespoons of cocoa since I'm not a big cocoa fan. Kids would probably love these pear chips WITH the cocoa!

The recipe called for baking in a 275ºF oven, but our oven is non-functioning at the moment. (My sister ran the self-clean cycle and now the door won't open. She'll have to get a repair man out since I've tried every trick I could find online.)


I sliced just one peeled and cored pear on the mandoline, and spread the slices out on a dehydrator tray as a trial run.


I mixed 3 Tbs. sugar, 1/2 tsp. ginger, 3/4 tsp. cinnamon, 1/4 tsp. cloves and 1/2 tsp. galangal* together and lightly dusted the slices. Maybe should have left out the cloves? Note added later: No, I won't change the spice mix; it's tasty and subtle just as it is!

(*Galangal is ground from the rhizome of blue ginger. The flavor is similar to ginger, but more flowery with less peppery heat and a lingering intensity.)


Of course, I didn't think to put a cookie sheet under the dehydrator tray, so now I have a sugary mess all over the counter in addition to what actually landed on the slices. What a dunce!

Since I'm making this up (with no oven) as I go along, I put the tray in the dehydrator at the highest heat setting for an hour. Then I'll turn it down to about 135ºF until they are fully dry but still somewhat pliable. They will get stored in mason jars in the pantry but probably won't last very long anyway if they are as tasty as they smell!

Spiced Pears on left, plain dehydrated pears on the right

Update: The spiced pear chips are really yummy, but a little  too sweet for my taste. (These particular pears are exceptionally sweet and juicy, more so than the ones from my other neighbor. Even the Belgian Pears I made with no sugar added are pretty sweet.) I'm dehydrating a few pears with the spice dusting sans sugar, and also dehydrating several trays of just plain pear slices. 


These are the pears I dried. Only the smaller jar had spiced pear chips; the others are just dried pear slices. Isn't the pattern of the core interesting on the single slice? (I sliced some of the pears across the pear rather than from stem to bottom.)

How to use spiced pear chips (other than as a snack): They would be great on a cheese tray. Put a few pieces on sliced havarti cheese with sprouts and/or bibb lettuce on a hearty bread sandwich. Add a few to a sweet potato casserole. Soak a few slices and drape over a pork loin roast, or a roast chicken. YUM!

Friday, December 17, 2010

Christmas Can-Can


Just a little musical fun for everyone shopping for Christmas gifts!

Thursday, December 16, 2010

Living on USDA Budget, Update 1

It's halfway through December, and here's where I am so far by the USDA Food Budget Allowances. I'm using the lowest budget, the 'Thrifty' budget. In actuality, this is almost all I will spend for food for the whole month since I put away much of what I bought, although I will need fresh cream for coffee before the month is over.

I have spent $146.34 (before tax of 2.5%) which is 97% of the 'Thrifty' budget @ $5 per day, or 81% of the 'Thrifty' budget @ $6 per day. The eggs and some of the meats are free range, but nothing else is even organic except a 10 oz. bag of coffee that was on sale. 100% of my meals and snacks are eaten at home.

Another thing to keep in mind is that beans and grains, even though less expensive, are not allowed on my food protocol (although I sometimes cheat a tad). As far as I can  tell, the USDA Food Guidelines do not address folks with dietary restrictions, but are aimed at the average diet. 

My food expenditures break down in general categories like this:
Dairy (eggs, cream, yogurt, cheese): 24%
Meat: 29%
Fruit/Vegetables: 15%
Staples that will carry over like flour, spices, olives, ketchup: 17%
Other Groceries (coffee, bread, crackers, canned tomatoes): 15%

However, I have also consumed the following foods that were either purchased before December, or canned/frozen/stored from my garden.
Butter 1 lb
Olive oil, unknown (forgot to measure!)
Rendered lard or tallow for cooking ½ lb
Chorizo, ½ lb
Lamb neck bones, 1½ pounds
Bacon, ½ lb
Ground Beef, lamb and pork 5 lbs
Thanksgiving Turkey leftovers, ~1 lb
Thanksgiving Dressing and gravy leftovers, 2 meals
Green beans from pantry or freezer, 2 meals
Winter squash from root cellar, 2 meals
Apples from root cellar, 2 desserts
Clafouti from cranberries and pears on hand, 2 desserts
Poached pears, 2 desserts

The meat portion of my budget is really hard to figure. I bought a pound of prepared (not free range) breakfast sausage, a half-pound of Lebanon bologna lunchmeat, and splurged on a pint of oysters for oyster stew that stretched over 4 meals. The rest of the meat money went for free range pork shoulder on sale (and sausage casings) to add to the donated venison I have on hand to make sausage. I estimated the sausage will last 3 months, so I only included one third of the costs for the pork, and one sixth of the cost of the casings, which should make more than 3 months' sausage.

A big expenditure in January will be a variety of cultures to make cheese, and extra milk. I have no idea how to spread that amount out since some of it may go to waste, depending on my failure rate!

I can see tracking food expenditures over just a month, or even several months, will not give me a complete picture because I "put foods by" either freezing, canning or storing foods in the root cellar. I'm hoping that a full year will give me a good snapshot, though.