Thursday, March 29, 2012

My Passive Solar Nautilus House


It has been a struggle for me to post the pictures of the floor plan and the model I'm constructing of my Nautilus House. Generally, anytime I (or anyone) mention something different than the accepted mainstream beliefs, we end up being ridiculed and thought totally weird. The concept for this house came to me from Spirit, in a meditation about 10 years ago.

The shape of this house is based ion a Fibonacci Spiral, or Phi:The Golden Number/Golden Mean/Golden Ratio.
.


Putting that aside, there are still many, many questions still to answer in fine-tuning in the plans for this house. The changing pitch of the roof in each section will be a real challenge to build. The "public space" of kitchen, dining and living room are planned to be one large open space, with probably a kitchen counter/bar as a visual separation. Then there are the things not definable, like the energy contained within the Fibonacci spiral shape.


There are a number of things I see built into this house. First off, it is basically Passive Solar, with the long exterior window-wall of the living room facing south. I envision radiant hot water pipes in a well-insulated concrete slab floor, now that hot water heat with long flexible lengths of piping to prevent leaks at junctions is possible, and affordable.


Some sustainable considerations include: a greywater system, composting toilet, earth cooling tubes, rocket mass heater, solar chimney, solar heated water, possible passive solar greenhouse attached, sustainable forestry adjacent to the site, and a sheet-mulched, no-dig permaculture / edible food forest garden.

I envision this as a long term project that includes other eco-buildings, food forest gardens, aquaculture ponds, coppicing and possible timber production depending on the site, a classroom for courses and workshops, orchard, cider making facility, wild food, wildlife refuge and maybe even part a future small sustainable community.

This house is only 1 bedroom, with slightly under 900 square feet of living space, but could be built to include one more turn of the "nautilus shell" so there are 2 bedrooms. Alternatively, there could be a loft bedroom above the private spaces (laundry/pantry, bath, and bedroom) without increasing the footprint. I didn't even consider a 2 bedroom mock-up since there is so much interest today in smaller houses, rather than McMansions.

I looked into several different types of exterior construction... from straw-bale, earthbag, and cob to a cast-in-place sculptural form like Flying Concrete. In the end I decided the transition to a passive solar non-conventional shape would be more readily accepted by using conventional stick-building techniques. The large vaulted, open (public) space with exposed wood beams supporting a wood tongue and groove ceiling would be striking, with a strong feel of "mountain getaway cabin".

I am hoping to interest some university (or perhaps private) schools with sustainable and/or alternative energy departments into considering this house as a hands-on teaching project.

Tuesday, March 27, 2012

Watercress, and Cream of Watercress Soup


Photos taken in February; they are much more green and lush now, but my camera is having problems!.

I have an abundance of edible watercress growing in my spring's shallow overflow pond. The overflow culvert has carried more watercress down to the creek where it also flourishes in the shallow edges, but I'm not inclined to pick watercress to eat from there because I don't know what pollutants are in the creek. I probably don't want to know!

Watercress is a prolific "weed", but mustard cress, shepherd’s purse and wild turnip are also prolific, easily collected, and more valuable than appreciated. Watercress is a good source of all the major plant nutrients and most of the minor ones, but its chief value is as a source of phosphorus.

My old-timer neighbor has pointed out a tiny crustacean living in my overflow pond, saying they will not live in polluted water so it's an indication the water is pure... and that many years ago the creek itself was once chock-full of them. I should ask him the name and write it down before I forget again (and/or he dies). Maybe even take a photo for posterity. We are losing so much common knowledge that earlier generations held!

At any rate, I have no qualms about eating watercress from the overflow pond. I just hate putting on my waterproof boots and getting in there to harvest some because the pond is so doggone cold, summer or winter... even though it's less than a foot deep! (I ended up standing on the culvert pipe and pulling in the watercress with a rake.)

Have you ever made cream of watercress soup (Potage Cressonniere)? I have only made it once before, many years before I moved here, because watercress isn't available much in many grocery stores. (Fresh watercress is delicate and does not keep well.) But I have to say the soup was outstanding!

My recipe is from my much-used (and abused!) New York Times Cookbook by Craig Claiborne (1961, although mine is a reprint I bought in the early 1970's before more than 40% of the recipes were altered or replaced).

Cream of Watercress Soup
1/4 cup butter
1 clove garlic, minced
2 cups chopped onions
1 quart thin-sliced potatoes
1 tablespoon salt
1/4 teaspoon freshly ground black pepper
3/4 cup water
1 bunch watercress
1-1/2 cups milk
1-1/2 cups water
2 egg yolks
1/2 cup light cream

Heat the butter in a large saucepan. Add the garlic and onions and sauté until tender, about 5 minutes. Add the potatoes, seasonings and 3/4 cup of water. Cover and bring to a boil. Reduce heat and simmer 15 minutes or until the potatoes are almost tender.

Cut the watercress stems into 1/8 inch lengths. Coarsely chop the leaves.

Add the watercress stems and half the leaves to the potato mixture, along with the milk and water. Cook 15 minutes. Purée in a blender or press through a food mill. Return to the saucepan and reheat.

Blend together the egg yolks and cream. Gradually stir this mixture into the soup and cook, stirring constantly, until slightly thickened. Garnish with a few watercress leaves, and serve immediately.

This recipe above is quite different than the one by Julia Child, but since I have never made hers, I cannot compare them. Julia uses leeks rather than onions, no egg yolks, milk or light cream, but does use some heavy (whipping) cream. I suspect I'd like it as well!

Update: I did ask my neighbor about the tiny snails... they are fresh water periwinkles! Also, I did make the soup too, but my camera is on the fritz so no photos. Sorry.


Sunday, March 25, 2012

The Ultimate Rocket Stove!


Yup, the Ultimate Rocket Stove... it cooks, AND it can charge your cell phone at the same time!

This stove is among the 18 Semi-Finalists in the 2012 Buckminster Fuller Challenge


BioLite is a biomass cookstove that converts waste heat into electricity, reduces smoke emissions by 95% for improved health. It also provides mobile phone and LED light charging capability.

Those are the HomeStove versions, above.


This is the CampStove version. 

These stoves power all USB-chargeable devices including smartphones, GPS, and LED lights. They light quickly and easily, burn sticks, pine cones and other biomass. The CampStove folds for portability and weighs just over 2 pounds.


How it Works
Open wood fires are inefficient, wasting potential energy and creating toxic smoke due to incomplete combustion. Carefully designed stoves that use fans to blow air into the fire can dramatically improve combustion. However, such stoves require small amounts of electricity to power their fans and most people who cook on wood are without grid or battery access. BioLite stoves solve this problem by converting a fraction of the fire’s thermal energy into electricity to power our combustion improvement system. Excess electricity is made available to users for charging small electronic devices such as mobile phones, LED lights, GPS and many others.


Friday, March 23, 2012

Expanding my edible food forest garden, round 2

Cornus mas, photo by wlcutler

Last year I started my first guild (and updated here) in a long-range plan for an edible food forest garden. Now with spring approaching, I'm ready to expand my food forest garden a little. I'm actually not expanding it yet since it's only March, but I just bought a bunch of new perennial plants that will get started in some new areas of my yard when it gets warmer. Oh, and I've also put a whole slew of woody fruit cuttings in little mini-greenhouse enclosures, hoping some will root.

Hardy Kiwi (female), photo by Joe+Jeanette Archie

My new plants just purchased include: 2 Cornus Mas (dogwood family) aka Cornelian Cherry which has edible fruit and shown at the top of this post; 1 Aycock green leaf plum that I have lusted after ever since I ate one right off the tree 4-5 years ago; two hardy kiwi (one male and one female) vines; 2 table grapes (a Concord and a white variety); and 2 different Haskap varieties.

Haskap, aka Juneberry; photo by Jeena Paradies

Haskaps are also known as Juneberries, and as Saskatoons, but for all practical purposes the fruits look and taste like blueberries. However, they do not require the acidic soil that blueberries do, and that's a big plus for me and my more neutral soil.

I had my three 20 gallon pots of figs, and my  several potted blueberries stored in the barn for the winter, covered in fiberglass insulation. Either mice or voles got into them, and only one blueberry survived. They didn't leave a speck of root nor branch except one blueberry and that one is iffy! The Haskaps will go in the ground soon and start to replace the blueberries. 

My big concern is that since some critters ate the roots and stems of my potted plants in the barn (like they ate all my sweet potato tubers in the ground last year), how do I protect new tree and bush roots in the ground? My instinct tells me to encircle each of them with planted garlic, chives and garlic chives. It will be a challenge, and my cat is sure not earning her keep killing the voles!

In April I will be attending an Extension Service grafting class about 2 hours away; it's being held at an antique cider apple orchard. They say we'll each go home with 5 apple grafts to plant! 

The woody fruit cuttings I now have under tents here at home include 2 trays of elderberries... the first tray of over a dozen seems to be growing fine. The second tray was just set a few days ago, so there's a long way to go. Other woody cuttings include beach plum, filberts (hazelnuts), Nanking cherries, Chinese chestnuts, black currants, buffalo currants, and maybe even some red currants (my currant bushes are unmarked).

I don't expect a lot of success with my woody cuttings other than the elderberries, since it's my first attempt, but I have to start somewhere... and buying a lot of fruiting plants is not in my budget. Any of these that do not root will be attempted again in summer with softwood cuttings. And again in winter with woody cuttings if necessary.

Wednesday, March 21, 2012

What to do with Fennel stalks


Fennel is a recent introduction to my food palate, and I love it enough that I have started some seeds for this year's garden. It is outrageously expensive in the supermarkets here, so it often stays on the shelves long past it's prime. There IS one vendor at the farmer's market with great, fresh and affordable fennel, but he always sells out fast.

Fennel bulbs are almost always sold by weight, and there's not much value in the stalks and ferns which can make up half the weight/cost. The stalks and ferns are tasty when fresh, and can be used sliced thin in salads and as a garnish but they lose all taste/flavor if dried, much like dried parsley. So... the stalks often get thrown on the compost pile, keeping just the fat bulb for cooking.

However, I came across this recipe for making orange pickled fennel stalks from a charcuterie blog I  read. It's a simple recipe and takes just a few minutes of your time (plus some wait while the sliced stalks are in salt to lose some of their liquid). I put mine on some lamb chops... delish!


My picture should have been taken immediately, as the orange looses color (but not taste) after a couple of days, but I was busy with seedlings and forgot!

Orange Pickled Fennel Stalks
Adapted from recipe by Joy of Pickling by Linda Ziedrich

    * Stalks from two fennel bulbs, sliced
    * 1 1/2 tsp. kosher salt
    * zest of 1/2 orange, peeled from the orange in thin strips
    * 1/2 cup white wine vinegar
    * 1/2 cup orange juice
    * 1 Tbsp. sugar
    * 4 black peppercorns, cracked

1: Combine sliced fennel with salt and let stand for one to two hours.

2: Drain fennel slices and combine them with the orange zest.

3: Pack fennel stalks and zest into a jar. Heat vinegar, orange juice, sugar and peppercorns to a simmer, stirring to dissolve the sugar. Pour the hot liquid over the fennel and screw on lid.

4: Let cool to room temperature and then place in the refrigerator. It will be ready in a few days.

I think this would be good on salmon, too. YUM!


Monday, March 19, 2012

Solar Housing Thoughts

In the 2-1/2 years of this blog, I have posted very little about my passion for passive solar sustainable housing. Maybe I have shied away partly because I think when most Americans hear the word "solar", they immediately think only of solar PV panels on the roof, and the accompanying complex systems of deep-cycle batteries, a bunch of electronic monitors and controls that don't make sense to them, and even possibly having every electrical thing in the house converted to run on 12 volt direct current electricity if they don't use an inverter. The cost for such systems can easily exceed $40,000-$50,000 even though the prices for PV panels have come down considerably in the last 10 years.

Why is it so expensive? Because the big corporations that control the PV market are the same big corporations that control the fossil fuel energy market, and they are the most profitable businesses around. Plus, they have incredible political as well as financial clout. Sure, the companies that install PV systems aren't making the kind of profits the fossil fuel utility companies make, and the government does provide token underwriting for some alternative energy systems (also usually owned by big utilities), or sometimes token tax breaks for us, but it's all smoke and mirrors.

Most small and independent alternative energy companies are not in a financial position to donate millions of dollars to political campaigns, although the pittance allowed to them in funding is used in a platform by political candidates to proclaim they back alternative energy. Truth is, just the federal money spent to aid fracking could put hundreds of small alternative energy companies in business, and people back to work.

However, active solar electric systems are not my point here.

I suspect the average homeowner doesn't know a lot about what passive solar really IS, much less what it can do for their existing homes, often on the cheap. However, they DO know how hot their car gets sitting in the sun during summer, which is pure passive solar! (New homes are a different ball game because they can be designed for passive solar gains, discussed below.) 

Simple summer cooling
My own (older) home is not oriented to take advantage of any solar gain in winter, but a simple solar chimney and some earth cooling tubes could be installed for a few hundred dollars, which would mean not running expensive AC in the summer. For a few hundred dollars (or less if I do a lot myself) I could have free solar hot water for the 6-7 non-freezing months of the year and turn off power to the water heater in those months! For only a couple hundred dollars more, it could be a closed-loop system filled with a liquid that doesn't freeze and I could have free solar hot water all year long, for the rest of the life of this house (although I could need electricity from a small PV panel to run a pump from the collector if necessary).

External summer wall shading
One of my spring projects is to install a tall wire trellis a couple of feet from the narrow south end of this house, and grow vines and pole beans on it to shade that wall. The wall is windowless, but it sure heats up the house because there's minimal insulation in the old walls. I need to find some really tall poles, and then I'll post this project as I get it started.

During the 1970's there was a strong movement into alternative energy because of the oil embargo. Homeowner-inventors lurked in a gazillion basements and garages, and many energy-saving innovations were born. Homeowner-built things like "breadbasket" aka batch collector solar water heaters, Trombe walls thrown up outside existing walls to gain heat in winter, attached green living spaces with solar collection mass added in the lower walls and floors, tall interior tubes containing water or phase-change materials to collect and slowly release the solar-gained heat at night... the list was almost endless.

The opportunities in new construction were also endless, and needed only one big basic thought-change to jump-start sustainability... orient the house to the sun, not to the street!

Unfortunately, the government incentives and tax breaks ended soon after the embargo ended and fossil fuel was cheap once again.

I'll have more to say on passive solar heating AND cooling as time goes on, since I'm working on a scale model of my own passive solar home design which I will post in a few days.


Saturday, March 17, 2012

We will miss this great woman, Maria Thun

I love this photo, from Floris Books' tribute to Maria Thun
 
My fruits, flowers, leaves and roots will miss Maria Thun, "The Grandmother of Biodynamics", and so will I. The legacy of this eminent researcher (and the impact of her work on me) is so great it's difficult to describe.

For many years I have dabbled in planting by the moon signs, sometimes with success, and sometimes not. Then I discovered Maria Thun, who died in February of this year, just 2 months shy of her 90th birthday. My sowing success has increased greatly since following her calendars, although I still have lots to learn. I will have to keep following her planting calendars "by the book" (unless I can learn enough to to see the different constellations and the moon's passage through them, which is unlikely). Fortunately, Maria's son Matthias and daughter Christina have been working with her for many years and will continue the calendars.

Maria was born on a farm in Germany, and noticed her father would observe the sky every morning and evening before determining when it was time to plant. After she married in the 1940's, she began following the Ruini calendar which referred to star constellations in a broad manner, hoping it would give her the ability her father had to judge the right time for sowing. She started by experimenting with radishes and discovered variations between crops sown on different days, in spite of the seeds and soil conditions being equal.

Maria's husband introduced her to some biodynamic farmers, and she began taking courses at the Institute for Biodynamic Research. The principles of biodynamic agriculture were first proposed by the Austrian philosopher Rudolf Steiner in 1924. He spoke of life forces not detectable by our physical senses, yet linking together the universe and all living things. He believed that the energy of plants can be affected not only by human actions and the weather, but also by the energy of the moon, stars and planets. Decisions about when to sow and prune, he suggested, should be made according to patterns of lunar and cosmic rhythms.

Rudolf Steiner had pointed out the connection between cosmic forces and the growth of plants, so Maria began studying the astronomical calendar of the Goetheanum. She discovered that every two or three days the moon passed into in a different constellation of the zodiac. This made her decide to study astronomy more intensively. She found that radishes acquired a different form and size depending in which constellation they were planted.


Maria Thun continued experimenting with sowing during the 1950's with almost all types of crops to see whether the movement of the moon had the same effect on all crops. Over years of research she concluded that root crops (including onions and leeks, which are not technically root crops) do best if sown when the moon is passing through constellations associated with the earth signs; leafy crops do best when the moon is associated with water signs; flowering plants do best associated with air signs, and fruits did better with fire signs. From her observations she divided passage of the moon through the zodiac into four: root days, leaf days, fruit days and flower days, each indicating which type of plant is best sown on each specific day.

The news of the results of her trials spread quickly through the biodynamic movement, and  The Biodynamic Sowing and Planting Calendar has been published annually for the last 50 years. As the extent of the trials expanded, so did the calendar and early on it was translated into French and Finnish, and today it is available in 27 languages. 

The results of planting and harvesting different plants at particular times have been well-documented over the years. Biodynamic techniques in agriculture can have a significant effect on the quality of the crops and how well they last. Maria Thun's book, Results from the Biodynamic Sowing and Planting Calendar, shows that if farmers and gardeners link their work into these cosmic rhythms, the quality of their produce is markedly increased, and is based on over 40 years of research.

The information on the background and research work of Maria Thun came from:
Amazon Books

Maria Thun also wrote Gardening for Life and When Wine Tastes Best

Thursday, March 15, 2012

Buy Safe Seeds, guaranteed not GMO seeds

Several folks have asked where I buy my seeds. I really don't buy many, except for new things I want to try. Most of my seeds are my own saved seeds, or from swaps with friends.


When I do buy seeds, I ONLY buy from a company that has signed the Safe Seed Pledge.

Here's the Pledge:


"Agriculture and seeds provide the basis upon which our lives depend. We must protect this foundation as a safe and genetically stable source for future generations. For the benefit of all farmers, gardeners and consumers who want an alternative, we pledge that we do not knowingly buy or sell genetically engineered seeds or plants. The mechanical transfer of genetic material outside of natural reproductive methods and between genera, families or kingdoms, poses great biological risks as well as economic, political, and cultural threats. We feel that genetically engineered varieties have been insufficiently tested prior to public release. More research and testing is necessary to further asses the potential risks of genetically engineered seeds. Further, we wish to support agricultural progress that leads to healthier soils, genetically diverse agricultural ecosystems and ultimately people and communities."


For more information contact: 
The Safe Seed Project 
5 Upland Road, Suite 3
Cambridge, MA 02140
Telephone: (617) 868-0870


Wednesday, March 14, 2012

Apple Pie from scratch


"To make an apple pie from scratch, one must first invent the Universe."
~Carl Sagan

Monday, March 12, 2012

Hyperpalatable Industrial Foods

They really do a good job, don't they, those scientists who create the taste and smell of adulterated food to seem real and delicious? As another blogger says, we are "Seduced by Foods".

Research and Development teams have done studies and conducted taste panels that have found "sweet" sells. The more they sell sweet stuff, the more people come to expect it. Sweet is found in loads of savory items too, not just sweet items. Tomato sauces, crackers, salad dressings, mustards, coated chicken products, sausages, and more. Many of our fresh products are also enhanced with sugar, like Butterball turkey, pumped brined pork loins, stewing hens. Our palates are being distorted by sweet.

As much as I am aware of the "deceptions" the food scientists have created, and as much as I am aware of the nutritive value in real foods, there are still times when I am lured by barely detectable smells and/or my mental images into thinking a fast food meal like a Big Mac, a taco supreme, or a take-out pizza* would hit the spot! Taste-wise I'm sure it would, thanks to those scientists who work hard to manufacture chemicals that tease our taste buds, and addict us to their pseudo foods. It is a very difficult temptation to resist! 

The tongue can detect five tastes: sweet, salty, sour, bitter and umami (savory). While you are probably familiar with the first four, umami is a taste that is relatively new to the Western palate, although the Japanese have known about it for decades. Umami is based on the detection of glutamate, and many foods naturally contain glutamate, although it is often added as well. You have probably heard of MSG: monosodium glutamate is the lab-derived chemical that enhances tastes. It makes things taste more like what they are (or should be). While umami is a taste that is hard to define, it is sometimes described as “meaty.”

The sense of small is probably the oldest and the least understood of our five senses. During evolution it has kept its connections with the parts of the brain, which grew to be the sorting house for our emotional responses, intimately linking the odors of things to our emotions. Think of the smell of BBQ coming from a grill at the BBQ joint down the street. Do you notice they have the grill/smoker outside or even vented outside, all the better to send those lovely smells in the air and capture us for a sale? It's an emotional response, our involuntary response to those smells wafting in the air. Researchers say 80 percent of the flavors we taste come from what we smell.

Our sense of taste is also triggered by sight. Ever notice the ads for foods on TV look SO juicy and tempting? Enough so that we have an emotional response that even overrides the reality of the supposedly same thing we are actually served. We salivate and feel the taste of a preferred food before even touching it. In the end, we believe more in what we see than in our other senses.

I have to constantly remind myself that those "almost foods" or "food-like products" come packaged with "micronutritional" malnutrition, and they can bring on (among other things) thyroid dysfunction, insulin resistance, and poor gut flora... all of which can lead to obesity. So many processed foods aren't really food, but nutritionally lacking "food-like products" engineered to stimulate us to eat more, buy more, and ensure that big food conglomerates turn a profit.

When most Americans eat a "hamburger", it isn't really meat they are eating. It's a "flavorless, factory-formed protein matrix for sugar and soy oils engineered to induce higher consumption".  Source

* I do eat pizza... but home-made, with real aged raw-milk cheese rather than pseudo "processed" cheese... tomato sauce from my garden without any artificial ingredients; true pepperoni that even real Italians would recognize rather than that imitation stuff made just for pizzas; fresh organic vegetables (onion, peppers) and mushrooms for toppings, and NO GMO soy or canola anywhere in sight.

My hamburgers are local grass-fed beef, and the condiments are lacto-fermented, home-made without all that sugar, although I think you can now buy good quality condiments with a dedicated search. I did look in the natural foods store yesterday for a mayonnaise without GMO soy or canola oil. None to be found.

Saturday, March 10, 2012

Been Hiding under a Rock?... Find the Groasis Waterboxx

Groasis Waterboxx  ©AquaPro
I guess I DO live under a rock, because this terrific sustainable tech product has been around about 4 years, and I only stumbled on it about 3 months ago. I've been incubating the possibilities in my mind since then, and after a second review of the system recently, I still think the Groasis Waterboxx™ is the best product to support worldwide sustainable food production to come along in many, many years. (ps... I have no financial interest in this company, nor receive any remuneration from writing about it.)

As the Manufacturer says, "It's nothing more than an exceptionally well-designed bucket" that will grow trees even in the desert!

Groasis Waterboxx via Popular Science  ©AquaPro

Popular Science selected it as the 2010 Best of What's New, Innovation of the Year.

"This "waterboxx" is an ‘intelligent water battery’ that produces and captures water FROM THE AIR through condensation and occasionally a tiny bit of rain. The condensation is caused by artificial stimulation and the water is captured through physical capacities, without using energy.

The “Groasis” waterbox makes it possible to plant trees or bushes on rocks, on mountains, in gardens, in ashes of recently burned woods, eroded areas or deserts or any other place, without the help of irrigation with a 100% planting result. In moderate climates the “Groasis” waterbox causes a 15 to 30% faster growth after the start. There is no other planting solution comparable to this.

It is a product that the inventor foresees as a means to help save mankind as the world's population soars, a plant incubator that doesn't need irrigating, and which could help make fertile again the 70% of the world's arid and semi-arid lands whose productivity has been hit by deforestation and over farming."  Source

How it works is pretty cool... you put down a seed or two (or 1-2 seedlings), put the Waterboxx base over it, add 3 gallons of water to the box and another gallon to the seeds/seedlings... add the cover, and forget about it for the rest of the year.

The planting tub drips about three tablespoons of water a day into the soil via a wick, sustaining the plant while encouraging its roots to grow deeper in search of more water. By forcing the tap root deeper it strengthens the tree for it's entire lifetime making it less prone to wind damage and more likely to tap deeper for drought protection.

Too much water and a tree will create a layer of surface roots to maximize water consumption. These shallow roots, however, will bake and dry out whenever artificial watering stops.

Too little water and the tree dies.

Just enough water keeps the tree alive, but searching for more water - by sending the roots in the one direction that water can always be found - down.

Once these roots reach the aquifer, even if it is a seasonal aquifer, there is normally enough water to sustain the dry season.

I'm only surprised that such results can be reached in a single year!

Since I don't think I can adequately describe why it works, here's some text courtesy of www.groasis.com :

The Groasis waterbox - using natural principles

Capillary: in each soil is capillary water. As soon as the sun shines on the soil, the capillary dries up. The Groasis waterbox prevents this. Do a test at home in your garden: lift a stone during the hottest days and look at the difference between the soil beside the stone and under the stone. Under the stone the soil is damp or wet.

Rain: almost every place on Earth has rain. Even in the middle of the Sahara it is 50 mm per year. That is 50 litre per square meter. In most of the so called deserts or savannahs it is around 250 mm. That is 250 litre per
square meter. The problem of this rain is that it falls in 2 days, and it all evaporates within a week. So the problem is not a lack of water, but the capture and distribution of the water over a year's period of time. The Groasis waterboxx captures this rainwater and distributes it via an ingenious stand-alone system over the year to the tree.

Condensation: everywhere in the world where there is a minimum of relative humidity, and when surfaces are able to get colder than the air temperature, there is condensation. Two examples: 1) if you are cooking in winter and the warm air of your room touches the cold glass of the windows they will be wet. In Summer this phenomenon does not happen. 2) if you walk with glasses from the outside where it is cold into a warm place, your glasses will be covered with condensation. This is the phenomenon that the Groasis waterbox uses: during the night the temperature of the surface is able to drop lower than the surrounding air due to radiation. Due to the temperature difference between the surface of the Groasis waterbox and the air, the air is locally cooled down below its dew point. Now the air condensates at the surface of the Groasis waterbox and it gets wet. Because of its design which stimulates the production and collection of the condensation, the Groasis waterbox produces condensation daily. So the Groasis waterbox does NOT only collect dew, but also enhances the generation of it. To conclude: the Groasis waterbox produces on an artificial basis condensation that develops against its cold surface. Dew is the condensation of air humidity that develops when warm air is crimping.

Distribution: the produced and collected water is distributed in small daily dosages via a small wick throughout the year or even for a longer period, to the plant.

Avoid evaporation: the biggest loss of water is evaporation. That is why irrigation via tubes or sprinklers are so ineffective. The Groasis waterbox covers the place where the tree is planted. Therefore the capillary cannot evaporate nor the distributed water either. This means that the Groasis waterbox stimulates a 100% effective use of the added water. Compare this to irrigation: only between 10 to 20% of the added water is really used, the rest evaporates.

Use of capillary: in nature seed is spread by grazing animals and birds. The seeds are sown ON TOP OF the soil. This is not a coincidence! In nature, coincidence does not exist, everything has its reason. The manure pastes the seed to the soil. In this way the capillary makes the seed humid, stimulating it to put a small root directly into the soil, giving it direct access to the available capillary humidity, allowing it to further grow. The Groasis waterbox planted with seeds copies this process: it does not disturb the soil and therefore maintains the existing capillary structure of the soil. Without capillary the soil would dry out to dust and erode.

Temperature balancing: the buffer of water in the Groasis waterbox functions as an equalizer of the soil temperature. Avoiding extreme temperatures stimulates growth.

Here's what happens with the sun's movement over the waterboxx..

©AquaPro
©AquaPro


©AquaPro

I will tell you upfront that these planters are not too cheap. Bought in quantities of 10, they are $27.50 USD each... BUT, if you consider they are reusable for new trees/shrubs/plants for 10 years (or more), that brings down the cost PER TREE to under $3.00. I can't tell you how many expensive trees and shrubs I've lost over the years, but it's quite a lot of money. If I were planting trees up on the hill above my house, these would more than pay for themselves, because I surely WILL NOT carry water up that steep hill!!

It is amazing to see the possibilities we have available to provide all basic necessities for humanity. "Money" is pretended to be the constraint, but its only because providing trees would hardly be profitable for any financier. That’s why this kind of thing doesn't happen enough. We need to realize we have to use every resource, including money, to be efficient and sustainable.

Video Links:
Growing Vegetables in Desert Conditions

Video channel with many Groasis videos

Here's what a South African Dealer has to say.


Thursday, March 8, 2012

Using Preserved Lemons

Recently I posted about Making Preserved Lemons, and since then, several folks have asked me just how to use these pretties. It's actually a very good question, since preserved lemons are not a typical part of the American Food Culture. Here's some suggestions, and at the end, a couple of recipes.

First, the taste: There is a really intense lemon taste to them, and like fresh lemons, it has a tartness but also a sweetness (and of course, a saltiness since they are preserved in salt). The small is wonderfully lemony, like lemon oil. But the taste and texture is not really like fresh lemons, and I don't have the words to adequately describe the taste. You'll just have to make some yourself and taste... Use it only lightly at first, because the taste can be powerful (and partly depends on the lemons used). You will develop a feel for how much to use, to suit your own taste.

Some prep is necessary for use. Take one out of the jar and rinse it. Pull or cut away the pulp and scrape away the white pith, which can still be bitter... although some folks use both pulp and pith, discarding any seeds. I wouldn't start with pith and pulp in my introduction to preserved lemons, however.

Uses:  
You might start with a lemon vinaigrette. Make your usual  oil and vinegar combo (including any herbs), and add some finely minced preserved lemon peel to taste. 

Add a touch of finely minced preserved lemon peel to roasted vegetables... the kind of veggies where you might brighten with a splash of fresh lemon... such as carrots or broccoli. I use a tad of the juice on just cooked (rather than roasted) vegetables like summer squash, and on seafood, especially salmon and scallops.

Add some to braised lamb shanks, and chicken picatta. Add some to soups and stews, but don't forget to reduce the amount of salt!

Add some to stir-fried or braised greens like spinach, chard and kale. Use it to add a bit of tang to pilafs, pasta, quinoa and couscous. Roasted chicken is wonderful with a wedge or two alongside.  

Slow-cooked meats like short ribs are dazzling with a sprinkling of minced preserved lemon peel.

Add a touch of preserved lemon to guacamole, aoili, and your Sunday Brunch Bloody Mary.

Here's a relish that would be wonderful with roast chicken:

Preserved Lemon Relish
Makes ¾ cup
1 shallot, minced
5 or 6 preserved lemon wedges, seeded and minced
½ cup minced fresh Italian parsley
1 tablespoon fresh oregano, minced
2 teaspoons fresh thyme leaves, minced
—Kosher salt, if needed
—Black pepper in a mill
3 tablespoons extra virgin olive oil
¼ cup pine nuts, lightly toasted

Put the shallot, preserved lemon, parsley, oregano and thyme into a medium bowl and toss together gently. Taste and correct for salt if necessary. Add several turns of black pepper and stir in the olive oil. Add the pine nuts and toss gently. Use immediately or store in the refrigerator, covered, for 2 to 3 days.

Variation: Use just a cup parsley and replace the oregano and thyme with a cup minced fresh cilantro leaves. Use chopped toasted walnuts in place of the pine nuts. For a mildly spicy version, remove the stem and seeds of a small serrano, mince it and fold it into the relish.

"Gremolata in its most traditional form is a mix of grated lemon zest, minced garlic and minced parsley. It is served sprinkled over osso buco and similar meat stews. This version uses preserved lemon instead of fresh lemon zest, which adds several layers of flavor. It is delicious sprinkled over soups, stews, grilled poultry, fish and meats and rice dishes."

Preserved Lemon Gremolata
Makes ½ cup
Use about 2 cups, loosely packed, Italian parsley leaves and small stems
5 or 6 preserved lemon wedges, peel only, minced
4 to 5 garlic cloves, crushed and minced

Use a sharp chef's knife to mince the parsley and transfer it to a medium bowl. Add the minced lemon peel and minced garlic, toss and transfer to a small serving bowl or glass jar. Use within a day or two.

Variation: Add ½ to 1 teaspoon red pepper flakes

Other Recipes:


Tuesday, March 6, 2012

Rooting fruit and nut tree cuttings

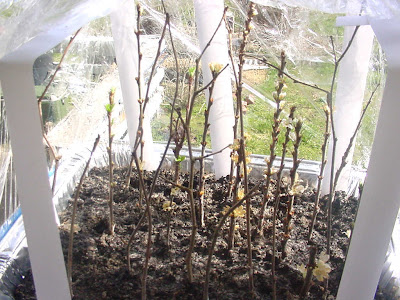
First time for everything! I finally decided to try and root some woody fruit and nut tree/shrub cuttings. So far I have a bunch of elderberry, Nanking cherry (for the birds, hoping they leave other fruits alone), filberts (hazelnuts) in potting medium under a plastic-wrap cover to increase humidity. I still have beach plum and both red and black currants to cut. According to my biodynamic planting calendar, the next optimal time is March 14-17, but they may be in full bud by then.

The hardest thing for me is remembering to keep the cuttings oriented in the direction they were growing when I cut and handle them. To plant them, I mixed up 1/3 sand with 2/3 organic potting mix, and dampened it well. I had put the cuttings immediately in a container of water, so all I had to do was cut segments below a node, re-wet the bottom, dip in rooting hormone, and stick in the pot.

The containers I'm using are half-size disposable steam table pans (aluminum) from Sam's Club (a package of 30 was $6.28). I poked drain holes in the bottom of a few, put some plastic spacers in the bottoms of some others without the drain holes, and put the medium-filled, drainable containers on top of the spacers. The pans are plenty deep for the cuttings, and the outer pan will catch any excess water.

Here's the progress so far:


Elderberry cuttings, dipped in hormone and placed in pot on Feb. 17, kept covered for a moist environment. I did have to take the lid off a time or two as something moldy-looking was growing on a couple of the tips.


Nanking Cherry and Hazelnut cuttings, started the same day as the elderberries. The hazelnuts don't show any signs of growth from the bud nodules yet, but the cherries flowered, and a few now even show tiny signs of leaf tips. Those white strips holding up the plastic "tent" are slats from a window blind.


It's too soon to disturb any of these cuttings to see if they are actually beginning to root, and frankly I'm a little nervous that they may not root! These trays are kept on the bookcase under my living room windows where they only get a half-day of light. I will post again when I know for sure if I passed, or failed the "rooting cuttings" test!

Sunday, March 4, 2012

Chick Grit for Successful Seed Starting!

Those dreaded words "damping-off disease" instill fear in the heart of every gardener who starts seeds. It is a fungal disease, and there are several things besides sterility and cleanliness that can help mitigate the problem. Chick (starter) grit is one of them. Chick grit is crushed granite, and available in sizes "starter" and "grower", from somewhat fine to much larger grit. It does a great job of covering the seeds, much better than using the same soil, or soilless mix, used beneath the seeds. It's really cheap ($6-$7 for 50 pounds), and all farm stores carry it. You might also find it in small bags (for caged birds like parakeets) in a pet store... but I looked at PetSmart today when I went to buy cat food, and they didn't have any.


Use the finest grade of chick grit (which might be oyster shell powder instead of granite dust, which I've heard it's not good for chickens) for any really tiny seeds, and a slightly coarser grade for bigger seeds, more like the size of sand grains. 


If you are starting medium to large seeds, you could probably use the grade of grit for mature chickens (grower grade, shown above), which is all my feed store had in stock this year. Last year I put the extra (unused) granite dust to my garden as a source of potassium and trace minerals. It’s a great soil conditioner for clay based soils. I need to drive over to the quarry and see if I can get a couple of pounds of somewhat finer rock powder since my feed store was out of starter grit.

edited to add: Phooey, the quarry was closed on Saturday, so you'll just have to take my word on the chick starter grit size...

The amount to use as covering varies; it depends on the seed size, but usually a covering 3 times thicker than the size of the seed. Best to follow the directions on the seed package. The advantage of using grit is that it breathes, and doesn't mat or cake up like other seed coverings (vermiculite, sphagnum, etc.) can.


I use a small, fine strainer to distribute the fine grade of grit over tiny seeds, bumping the strainer against my hand to get just a light dusting. Kinda like dusting powdered sugar on a cupcake. I use a regular strainer for larger size grit over most seeds, mainly so I can control the amount of covering. Once they are large enough to be transplanted to regular pots, I just add the grit by hand.


Fungi (major cause of damping-off) LOVE wet conditions. Using chick grit, and care in watering, is the best prevention for damping-off (if the seeds have been planted in a sterile container and medium). That means it's best not to water from the top! Set your pots or trays in a larger container with some tepid water in it. Leave them just long enough for the top layer of chick grit to get fully moistened. Let the seed pots/trays dry out before watering again, but not so dry as dust (the seedlings wilt)! Wilting is very stressful for seedlings, or any plant for that matter. I water my seed starter mix well and let it drain thoroughly before I put any seeds into it. Then I add my seeds, and cover with fine grit, or sometimes a mix of fine grit and sterile mix, depending on the seed size. All subsequent watering is done from the bottom.


I do mist my seedlings usually twice a day, as my house is always very dry from our winter heating system. I found a nifty 1500mL pressure sprayer with an adjustable brass nozzle at a big box store for under $8. I use bottled water (not tap water which contains chlorine, nor distilled water) for my seedlings and house plants, both for watering and for misting. My inexpensive pressure sprayer doesn't hold pressure for more than a few minutes, but it pumps up quickly and easily and sprays a fine mist.


Soilless seed starter mix usually contains no fertilizer, as the seed itself contains enough nutrition to get the seed started and survive until it gets a first set of true leaves.


After my seedlings get their first set (or sometimes their second set) of true leaves, I transplant them to individual small pots, and again use grit to cover the soil. From that point on, I add about a 1/4 teaspoon or less of a liquid general fertilizer per gallon of water to feed them every time I water. I just mix it up in a large plastic tote, set each tray in the water until thoroughly moistened, and make sure to stir up the water/fertilizer mix well between dunking trays. Throw any water not taken up by the trays out over the garden; don't try to save it.


ps... a couple more tips:
Sow seeds thinly to allow space for air to circulate between the seedlings. Provide constant some slight air movement 24/7 but not directly aimed at the seedlings. If you do everything else right but do not provide plenty of air circulation, you may still get damping-off!

Seedlings will "drown" if they stay in a soggy medium... the roots need oxygen. If you accidentally over-water seedlings (or any plant), just over-water them again (really!) with a mix of water and hydrogen peroxide and let them drain well. 

Misting with water mixed with either chamomile tea or clove tea is said to help prevent damping-off. So is a ONE TIME light dusting of powdered cinnamon or powdered charcoal on the soil surface. I haven't tried either...


Friday, March 2, 2012

What's Up with all this?

I don't normally write political rants, other than the politics concerning my foods. But these things really confuse me, living as I do in a Republic (remember the Pledge of Allegiance?).

Congress wants to limit my access to research papers
http://www.anh-usa.org/no-science-for-you/

FBI says paying for your morning coffee with cash is a potential terrorist activity
http://www.infowars.com/fbi-says-paying-for-your-morning-coffee-with-cash-a-potential-terrorist-activity/


Conspiracy Theorists Are Being Rebranded As Domestic Terrorists
http://www.infowars.com/why-conspiracy-theorists-are-being-rebranded-as-domestic-terrorists/

The Sacrificial Caste of Children
http://www.monbiot.com/2012/01/16/the-sacrificial-caste/